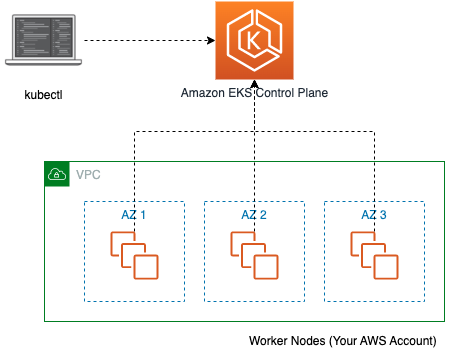
관리형 서비스: EKS는 Kubernetes 컨트롤 플레인이나 데이터 플레인를 설치, 운영 및 유지 관리시켜주는 서비스이다. 사용자가 인프라 설치, 운영, 유지 관리를 할 필요가 없다.
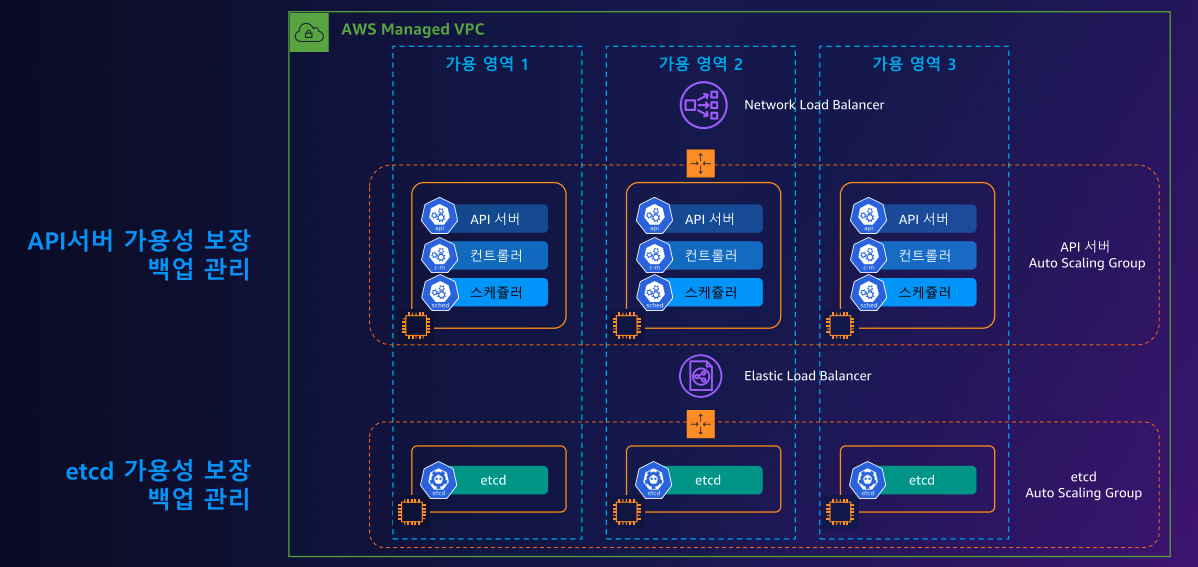
높은 가용성: EKS는 여러 AWS 가용 영역(데이터 센터의 물리적 위치)에 걸쳐 컨트롤 플레인과 데이터 플레인를 분산시켜 서비스의 안정성을 제공한다. 이는 단일 장재 지점을 제거하도록 설계되었으며 자동 관리되는 컨트롤 플레인의 경우 리전 내 개별 가용 영역에서 최소 2개이상의API 서버 노드를 실행한다.
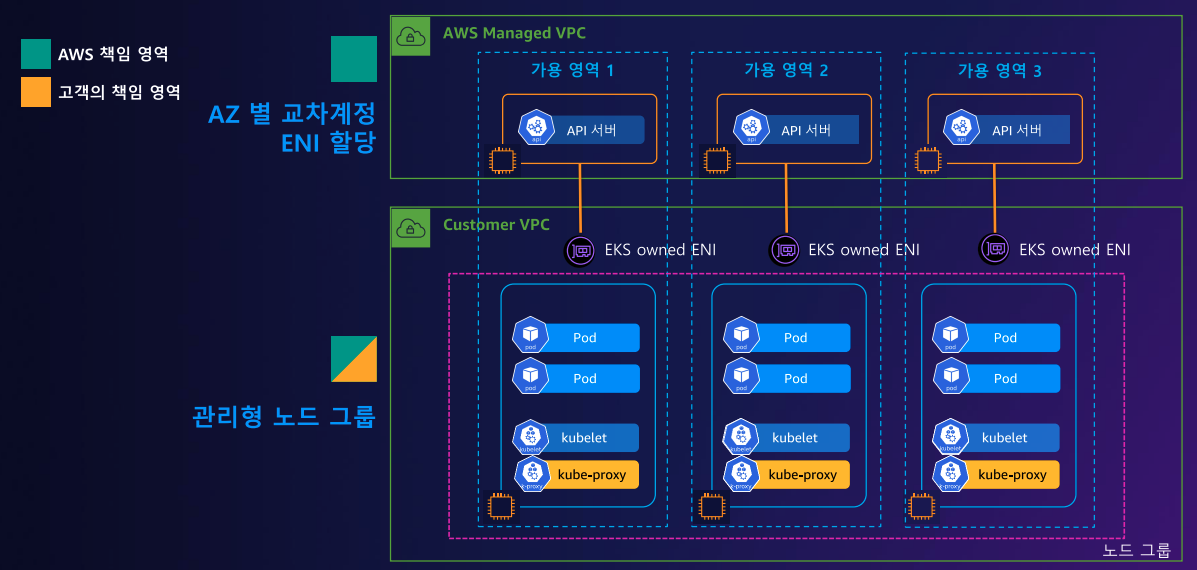
AWS 서비스 통합: 타 AWS ECR(도커 레지스트리), ELB(네트워크 로드밸런싱), IAM(보안), VPC(네트워크)와 같은 AWS 서비스와 통합되어 컨테이너 이미지 저장, 로드 밸런싱, 인증 및 격리를 쉽게 관리할 수 있다.
오픈 소스 Kubernetes 호환성: 최신 버전의 오픈 소스 Kubernetes를 사용하여 기존 플러그인과 도구를 그대로 활용할 수 있다.
지원 버전 : 23년 4월 현재 kubernetes 버전 중 1.22~1.26 지원을 지원 중이다. 버전 출시 주기는 연 3회이며 각 버전은 12개월 동안 지원된다. 지원이 끝난 버전들은 자동으로 EKS가 업데이트시킨다.
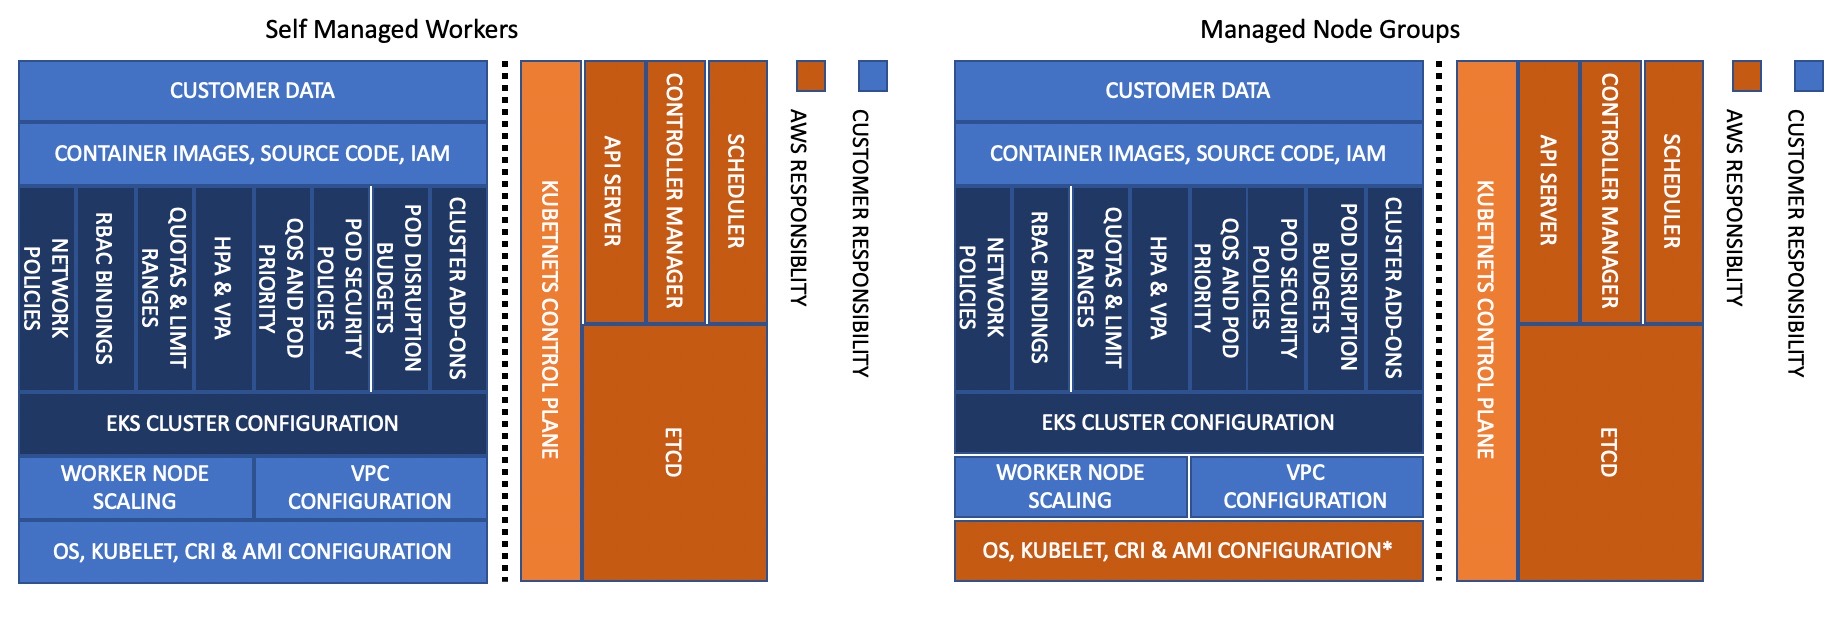
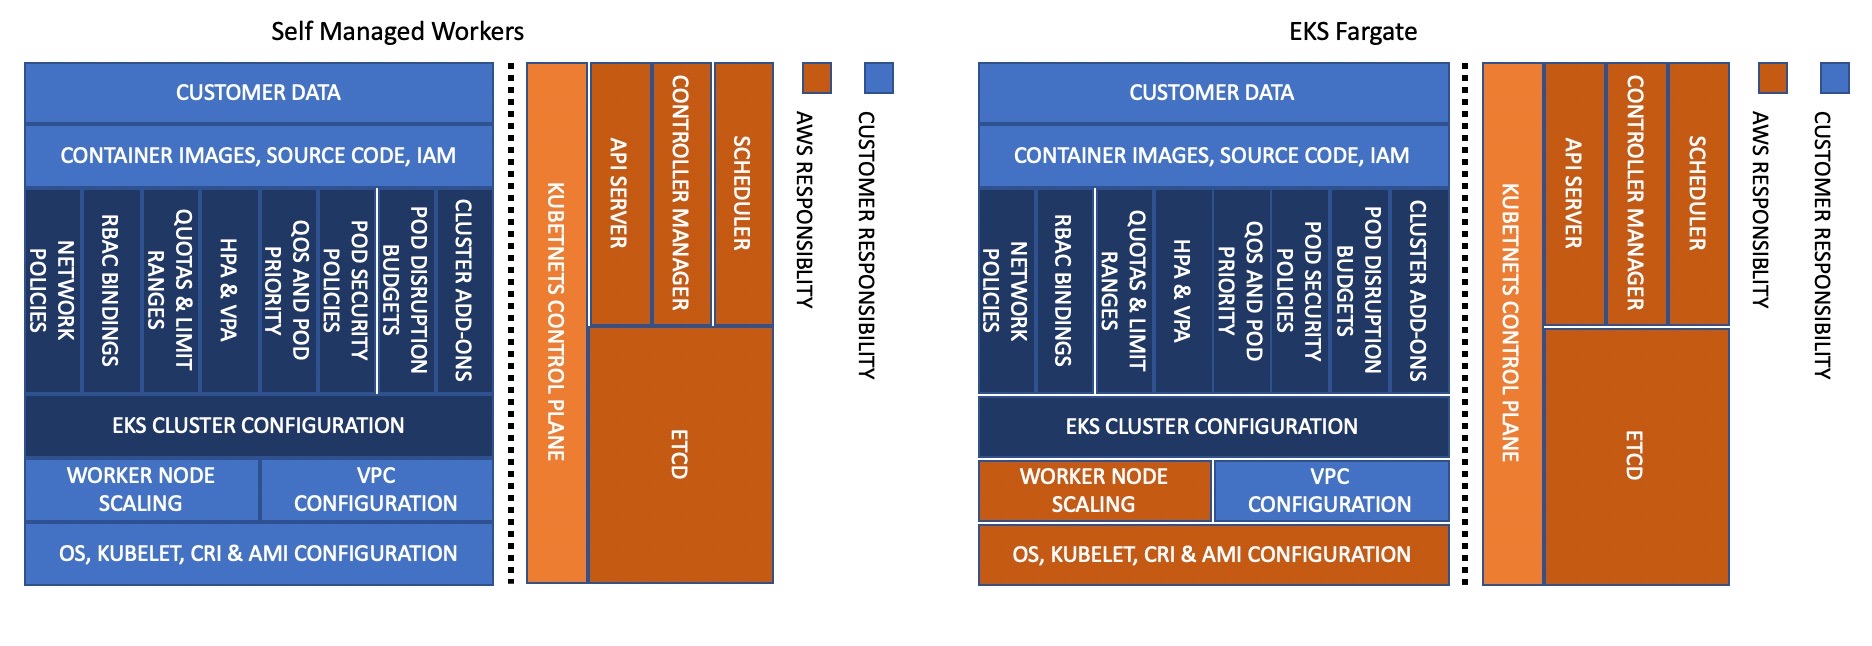
Self Managed Workers :사용자가 직접 노드를 구성하고 관리하는 방식이다. 구체적으로는 Custom AMI를 통해 작업자 노드를 생성하며 AMI와 노드의 패치 및 업그레이드를 사용자가 직접 관리한다.
Managed Node groups : AWS가 노드를 자동으로 프로비저닝하고, 업데이트 및 유지 관리를 처리한다.
EKS Fargate : 서버리스 컴퓨팅 옵션이다. Micro VM를 이용하여 Pod별 VM이 할당된다. AWS가 설정에 맞게 파드 레벨의 스케일링을 자동으로 처리한다.
Cluster Endpoint Access
EKS 클러스터의 API 서버에 대한 접근을 제어하는 설정이다. 클러스터 엔드포인트를 설정함으로써, 클러스터에 대한 접근을 필요한 범위로 제한하여 보안을 강화할 수 있다. 옵션은 3가지 존재한다.
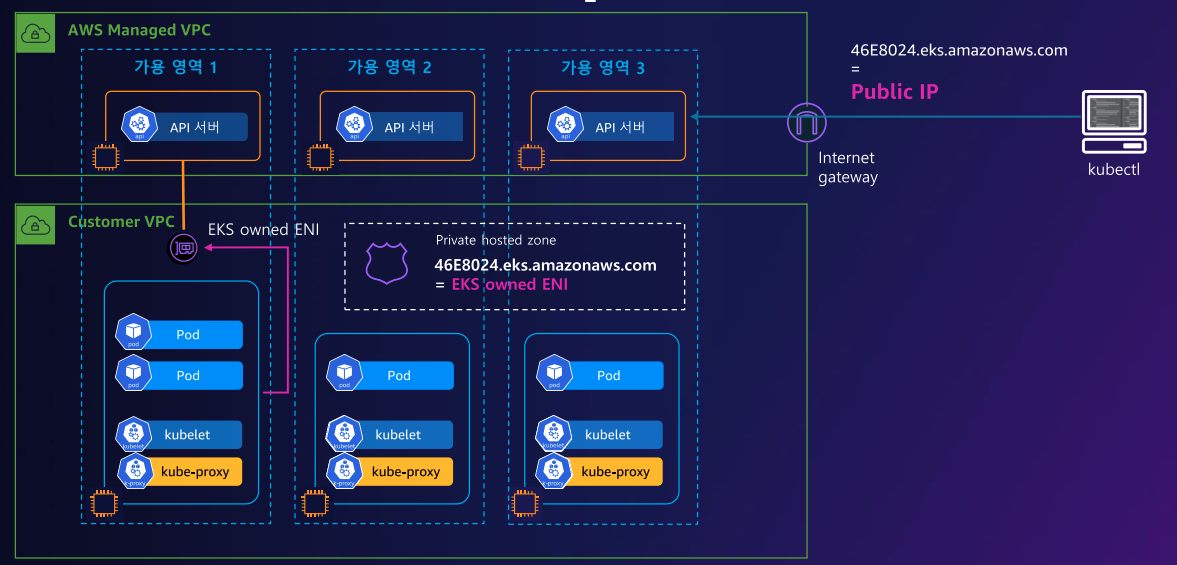
Public : 클러스터 엔드포인트가 Public IP로 할당되어 인터넷에서 접근이 가능한 설정이다. 클러스터 내부에서도 IGW 를 통해 Public IP와 통신한다.
해당 옵션은 AWS 콘솔에서 확인 가능하다. Public 설정시 다음과 같이 접근이 가능하다.
위와 같이 인터넷을 통해 접근이 가능하여 접근성을 높일 수 있다.
Public Private : 워크노드 내부에서는 Private(VPC 내부망에서만 접근 가능)로, API 접근은 Public(인터넷을 통한 접근 가능)으로만 통신이 가능하다. 워크 노드에서 민감데이터 노출을 막기 위해 Private subnet(사설망)에 위치시킨 경우 사용할 수 있는 옵션이다.
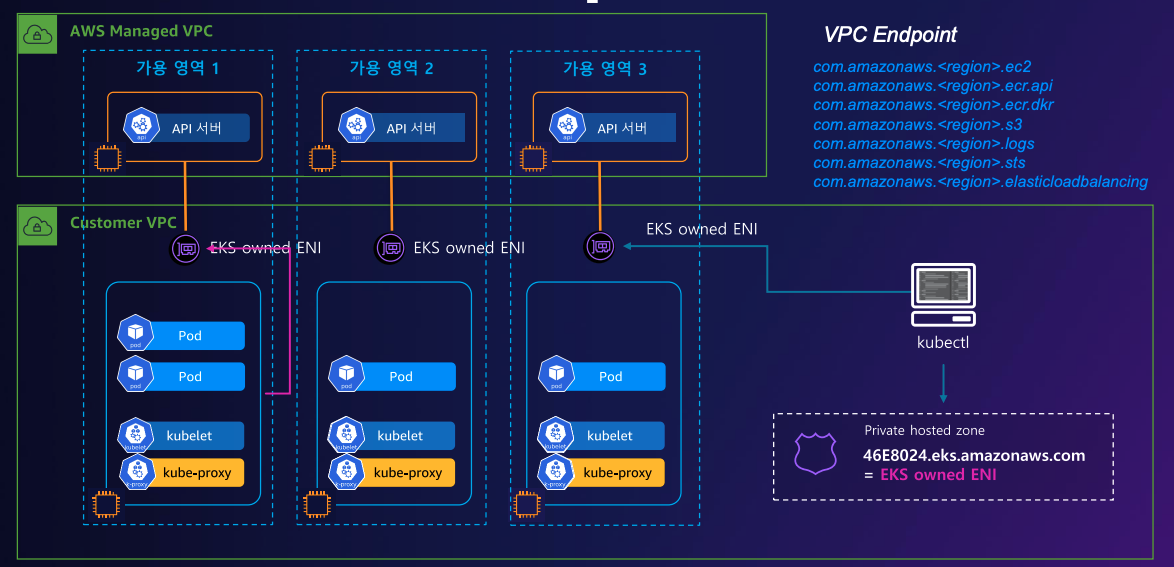
Private : API 서버 엔드포인트 또한 허용된 VPC에서만 접근이 가능한 설정이다.
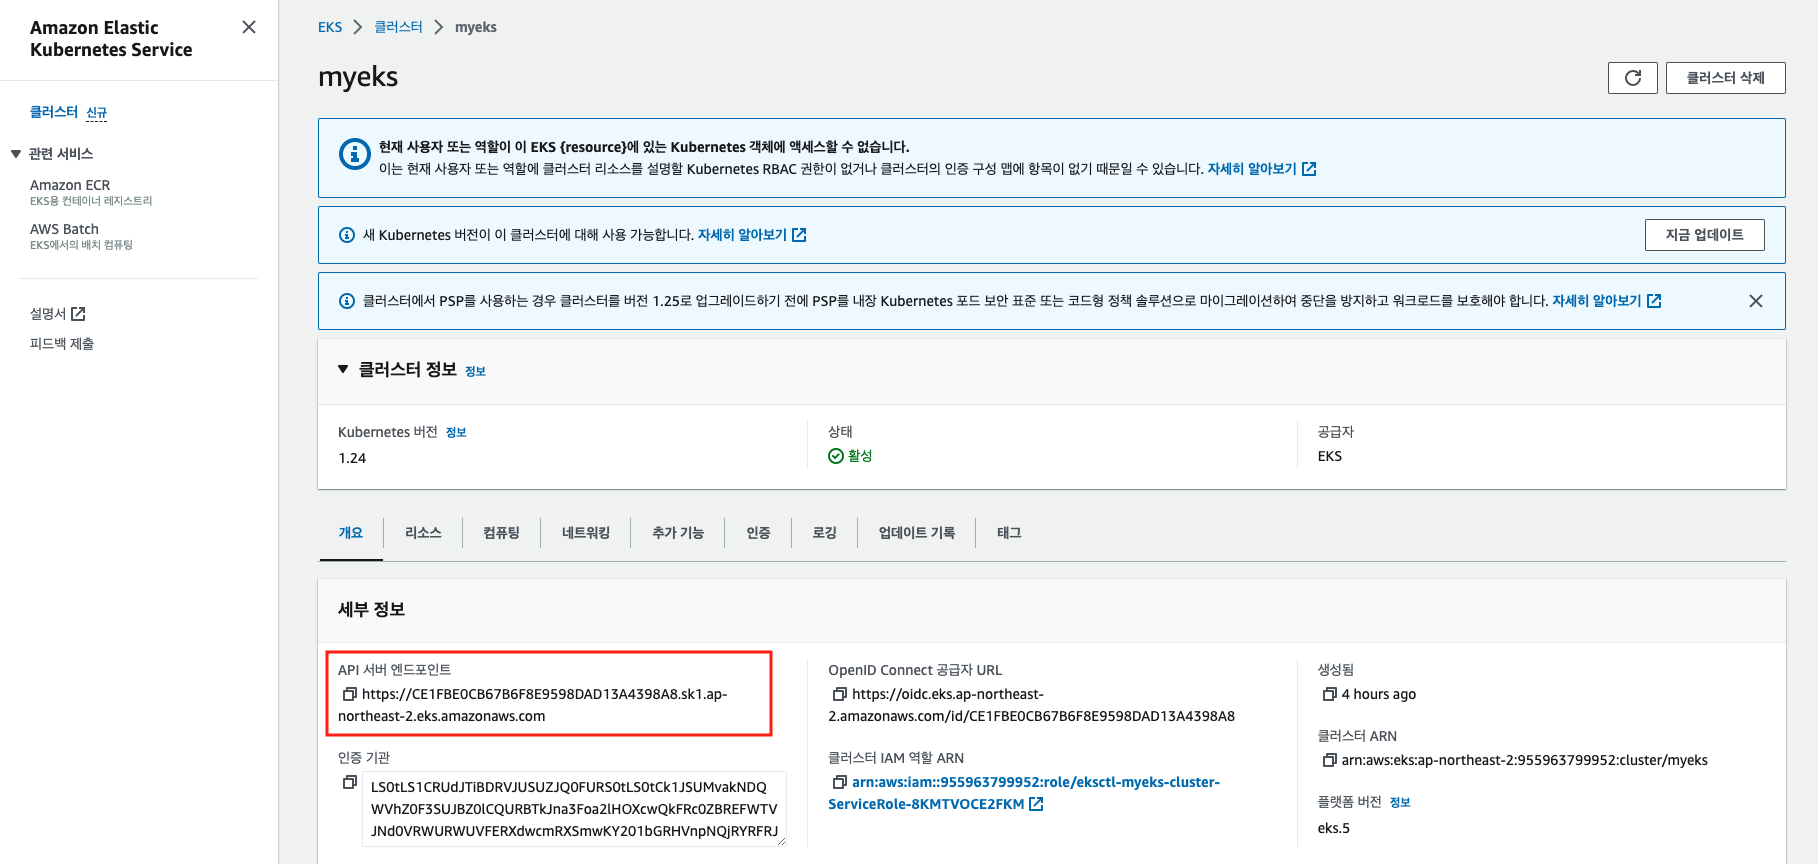
해당 옵션으로 사용시 API Server URL은 Route53 privated hosted zone으로 변경되어 VPC 내부에서만 통신이 가능하다. 해당 URL은 AWS 콘솔의 EKS나 kubectl -v=6 옵션으로 확인이 가능하다.
1
2
3
4
# API Server URL(Route53 privated hosted zone)(terraform-eks@my-eks:N/A)[root@myeks-host example]# kubectl get pods -A -v=6I0428 14:26:36.609385 27821 loader.go:374] Config loaded from file: /root/.kube/config
I0428 14:26:37.276259 27821 round_trippers.go:553] GET https://232B71CC97744BC94C09D40801D073B0.yl4.ap-northeast-2.eks.amazonaws.com/api/v1/pods?limit=500200 OK in 661 milliseconds
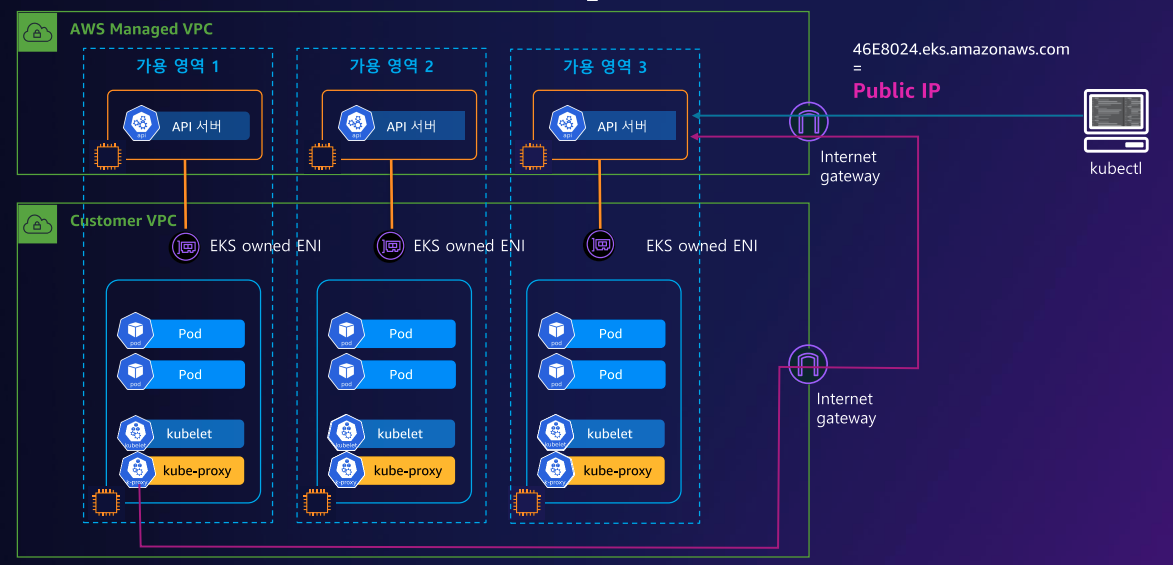
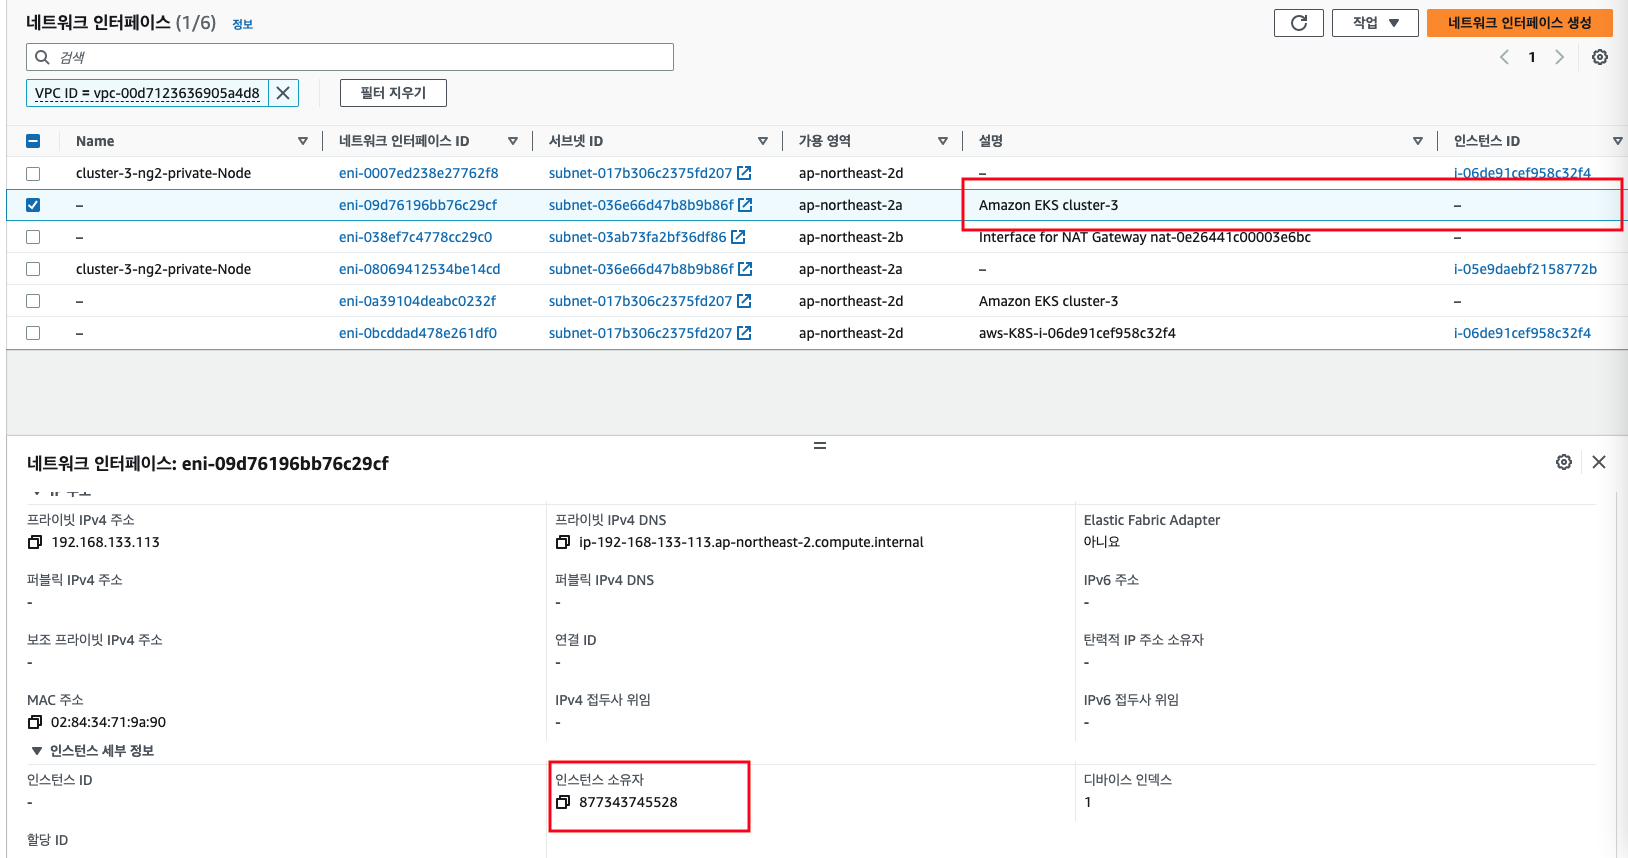
위 [https://232B71CC97744BC94C09D40801D073B0.yl4.ap-northeast-2.eks.amazonaws.com](https://232B71CC97744BC94C09D40801D073B0.yl4.ap-northeast-2.eks.amazonaws.com) 가 API server URL이다. 해당 URL은 EKS 컨트롤 노드가 소유하고 있는 네트워크 인터페이스를 통해 통신된다. 통칭 EKS owned ENI는 AWS 콘솔에서 확인이 가능하다.
네트워크 인터페이스에서 클러스터를 배포한 VPC를 입력하여 인스턴스 ID가 존재하지 않고(- 표시), 설명에 Amazone EKS cluster-name 으로 표시된 것이 EKS owned ENI 이다. 인스턴스 소유자 또한 AWS 소유자 번호가 다른 것을 확인할 수 있는데 AWS가 직접 관리하는 컨트롤 노드의 소유자 번호이기 때문이다.
EKS 배포 방식
EKS 배포 방식은 Manual, Command line utility, Infrastructure as Code 에 따라 구성할 수 있다.
Manual : AWS Management Console 에서 직접 구성
Command line utility : 커맨드 명령어를 통한 구성 (AWS CLI, eksctl)
Infrastructure as Code : 코드를 통한 구성(Terrafrom, AWS CDK 등)
이번 블로그 글에서는 eksctl 를 통해 클러스터를 구성하겠다.
eksctl ?
Amazon EKS (Elastic Kubernetes Service) 클러스터를 생성하고 관리하기 위한 명령줄 인터페이스(CLI) 툴이다. eksctl를 통해 클러스터를 구성 및 삭제, 업데이트할 수 있으며 VPC, 서브넷, 리소스 생성을 위한 정책 생성 등의 작업을 쉽게 처리할 수 있다. 공식 문서를 통해 다양한 인프라 환경에서의 EKS 구성을 참고할 수 있다.
아쉬운 점은 EKS에서만 구축이 된다는 점이다. 추후 다른 클러스터나 멀티 클러스터 구축시 다른 툴을 사용하자.
추가로 사용해보니.. eksctl는 형상관리가 불가능하다. 한 번 배포 이후에는 eksctl 구성 파일을 통해 추가 작업이 불가능하다. eksctl를 통해 기존의 리소스 변경이 불가능하며 추가만 가능하다.
eksctl 를 통한 EKS 배포
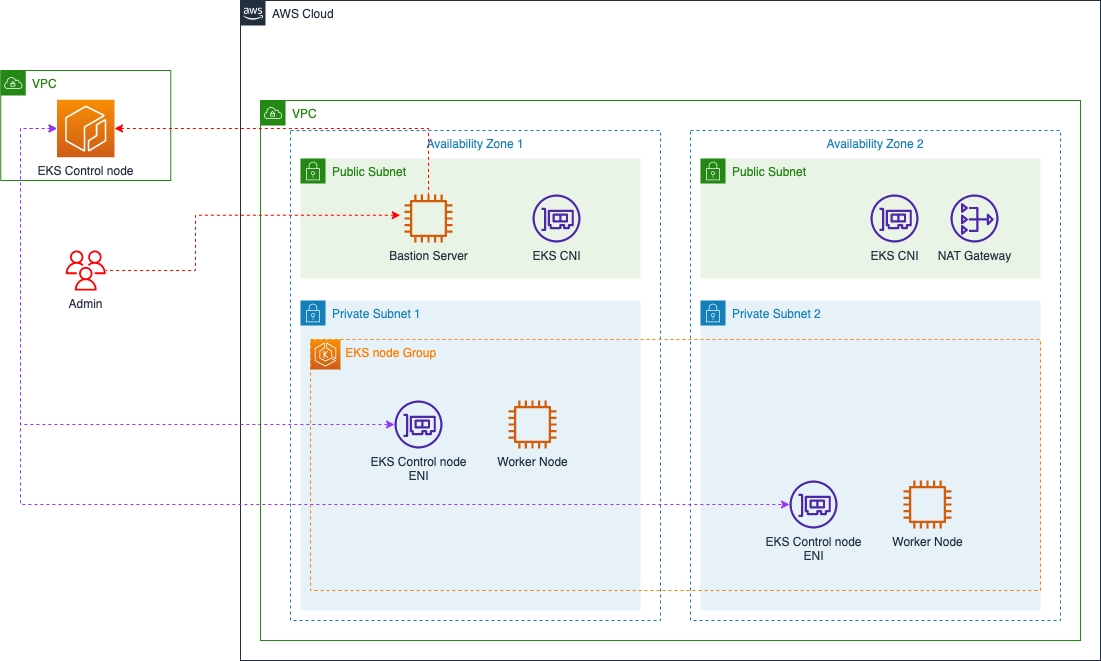
eksctl를 통해 EKS Private Cluster 를 배포하겠다. 구성 아키텍처는 다음과 같다.
노드 그룹은 unmanaged node group 으로, Cluster endpoint 는 Private로 구성하였다. 아키텍처에서 화살표는 통신 아키텍처이다.
EKS Admin(빨간선) : 베스천 서버를 통해 EKS API Server로 접근하여 EKS를 관리하는 과정이다.
Private Worker node(보라선): Private cluster 로 구성되어 EKS control node ENI를 통해 EKS Control node와 통신한다.
배포 과정은 다음과 같이 진행하겠다.
cloudformation를 통한 베스천 서버 배포
eksctl를 통한 EKS 배포
1. AWS Cloudformation를 통한 베스천 서버 배포
AWS Cloudformation을 통해 VPC 구성 및 베스천 서버를 배포하고 eksctl 설치 및 관리 패키지를 설치하겠다. Cloudformation 스크립트는 스터디에서 공유해주신 것을 기반으로 내용을 추가하였다.
1
2
# yaml 파일 다운로드curl -O https://github.com/HanHoRang31/blog-share/blob/main/aews-eksctl/cloudformation-bastion.yaml
구성 코드에서 Private 클러스터 구축을 위한 중요 부분과 베스천 서버의 패키지 구성 정보를 확인하겠다. 먼저 Private 클러스터 구축을 위해 필요한 보안 그룹은 다음과 같다.
# cloudformation-bastion# 파라미터 ...# 베스천 서버 보안 그룹 설정 # EKSCTL-HostEKSEC2SG:Type:AWS::EC2::SecurityGroupProperties:GroupDescription:eksctl-host Security GroupVpcId:!Ref EksVPCTags:- Key:NameValue:!Sub ${ClusterBaseName}-HOST-SGSecurityGroupIngress:- IpProtocol:tcpFromPort:'22'ToPort:'22'CidrIp:!Ref SgIngressSshCidr# 베스천 서버에서 EKS 배포를 위한 보안 그룹 설정 ControlPlaneSecurityGroup:DependsOn:- EKSEC2SGType:AWS::EC2::SecurityGroupProperties:GroupDescription:Cluster communication with worker nodesVpcId:!Ref EksVPCSecurityGroupIngress:- IpProtocol:tcpFromPort:443ToPort:443SourceSecurityGroupId:!Ref EKSEC2SGTags:- Key:NameValue:!Sub ${ClusterBaseName} Control Plane Security Group...
Private Cluster 구축으로 중요 사항은 두 가지이다.
EKSEC2SG : 베스천 서버에 대한 보안 그룹 설정 부분이다. 해당 부분을 통해 베스천 서버에 접근할 수 있는 IP 범위를 제한할 수 있다. 코드 내 SgIngressSshCidr 에서 지정한 IP를 제한하며 해당 값은 배포 명령어로 override 을 통해 값을 수정할 수 있다.
ControlPlaneSecurityGroup : 컨트롤 플레인과 워크 노드간 통신을 위한 보안 그룹 설정 부분이다. 코드에서는 베스천 서버와의 통신을 위해 443 포트의 보안 그룹을 추가하였다.
userdata를 확인하면 베스천 서버에 설치되는 패키지를 확인할 수 있다. 설치 명령어는 다음과 같다.
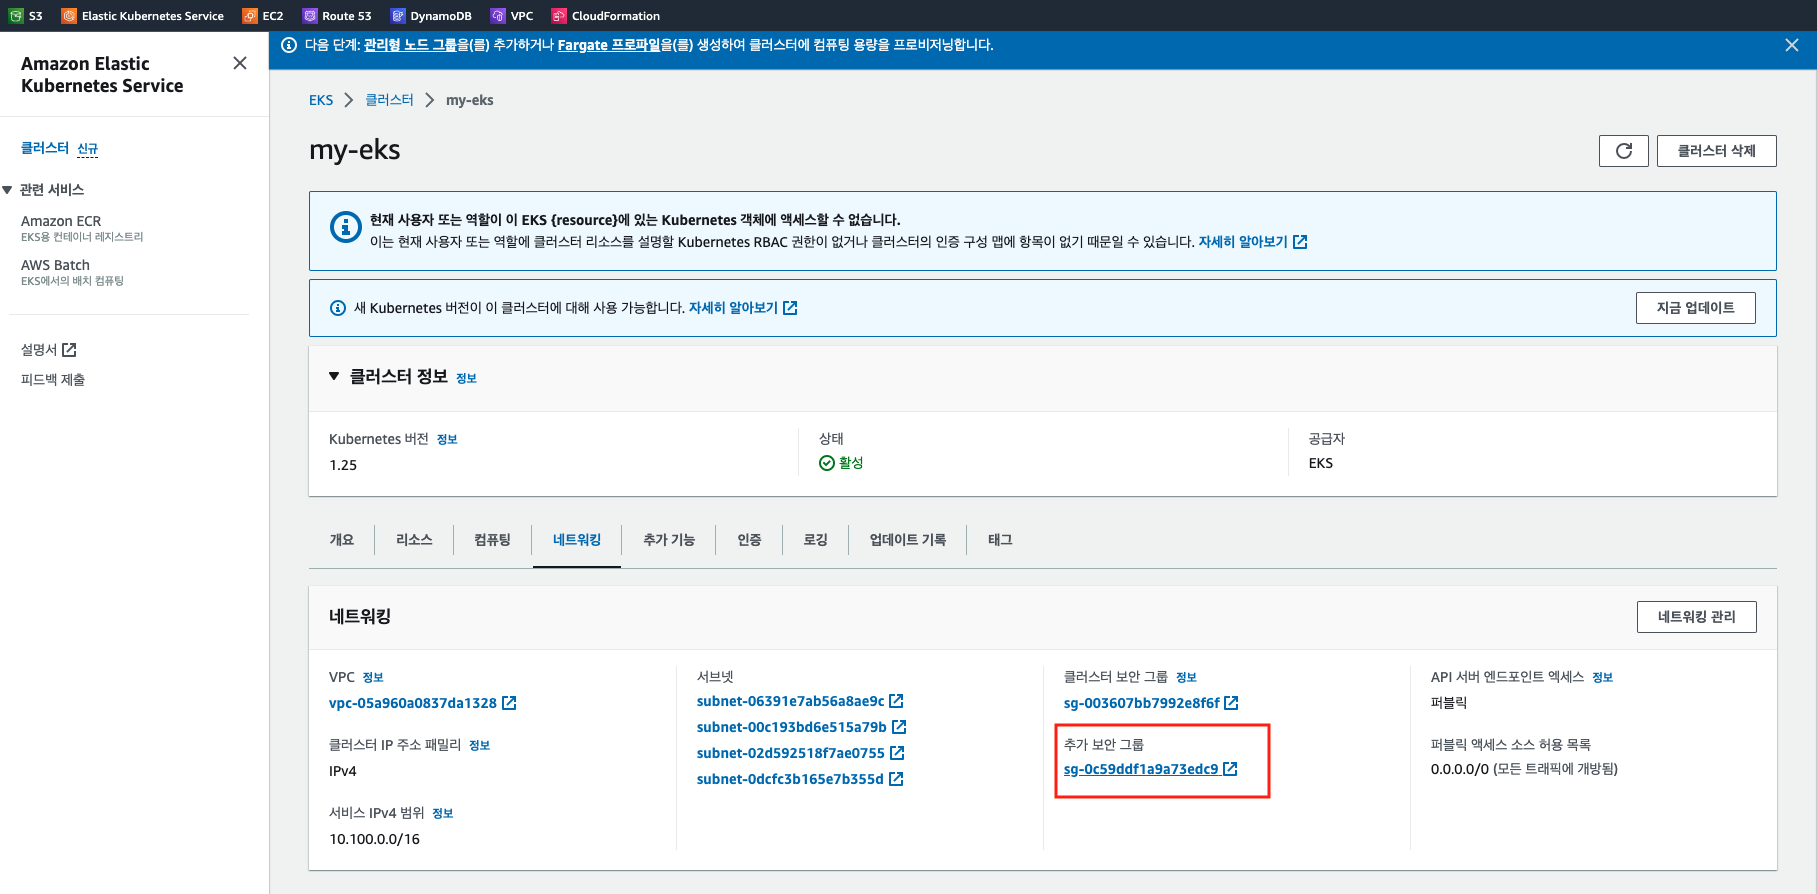
apiVersion:eksctl.io/v1alpha5kind:ClusterConfigmetadata:name:my-eksregion:ap-northeast-2# 지역 설정(서울) version:"1.25"# 클러스터 버전vpc:id:vpc-05a960a0837da1328# 베스천 서버 VPC ID (아래 내용 참고)cidr:192.168.0.0/16 ## 베스천 서버 VPC CIDR (아래 내용 참고)securityGroup:sg-0c59ddf1a9a73edc9nat:gateway:HighlyAvailablesubnets:public:public-2a:id:subnet-06391e7ab56a8ae9c# 서브넷 ID (아래 내용 참고)cidr:192.168.1.0/24# 서브넷 CIDR (아래 내용 참고)public-2c:id:subnet-00c193bd6e515a79b# 서브넷 ID (아래 내용 참고)cidr:192.168.2.0/24# 서브넷 CIDR (아래 내용 참고) private:private-2a:id:subnet-02d592518f7ae0755# 서브넷 ID (아래 내용 참고) cidr:192.168.3.0/24# 서브넷 CIDR (아래 내용 참고) private-2c:id:subnet-0dcfc3b165e7b355d# 서브넷 ID (아래 내용 참고) cidr:192.168.4.0/24# 서브넷 CIDR (아래 내용 참고) clusterEndpoints:# 클러스터 엔드포인트 액세스 설정 부분 publicAccess:false# 공용 액세스 비활성화privateAccess:true# 사설 액세스 활성화nodeGroups:- name:ng-1instanceType:m5.xlarge # 인스턴스 유형desiredCapacity:3# 원하는 노드 수privateNetworking:true# 사설 네트워크 사용ssh:publicKeyName:ec2-key# ec2 보안 키 availabilityZones:- ap-northeast-2a- ap-northeast-2ciam:withAddonPolicies:imageBuilder:true# 이미지 빌더 정책 활성화albIngress:true# ALB 인그레스 정책 활성화cloudWatch:true# CloudWatch 정책 활성화autoScaler:true# 오토 스케일러 정책 활성화instanceName:EKS-WORKER-TESTvolumeSize:30# 볼륨 크기 설정
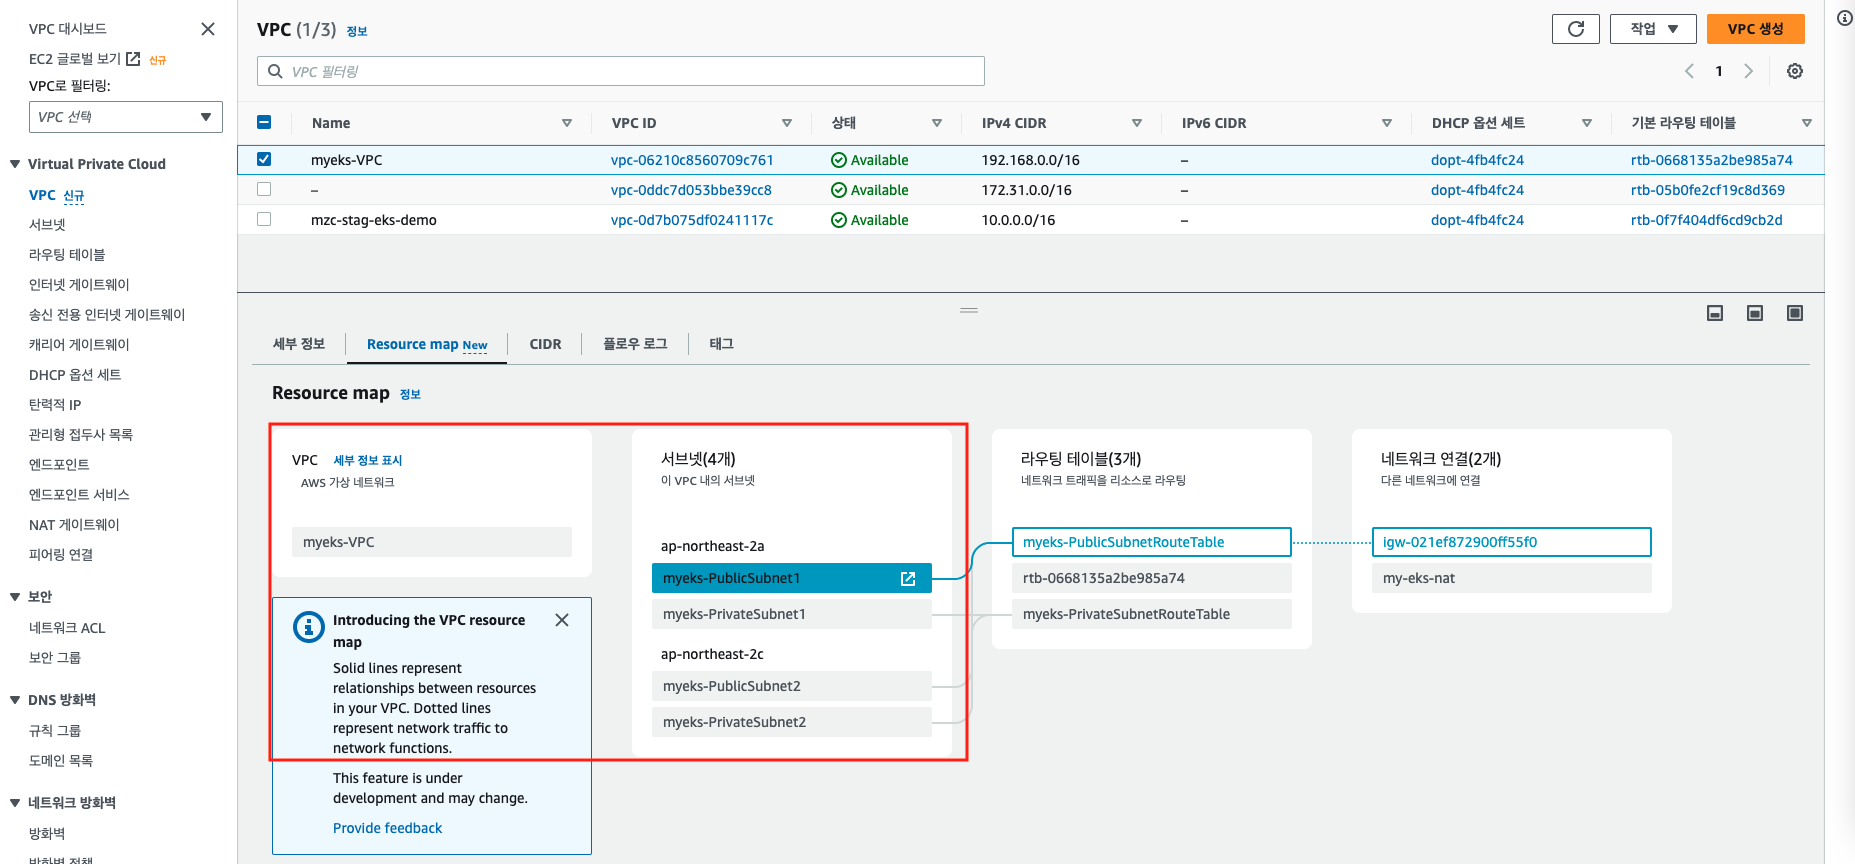
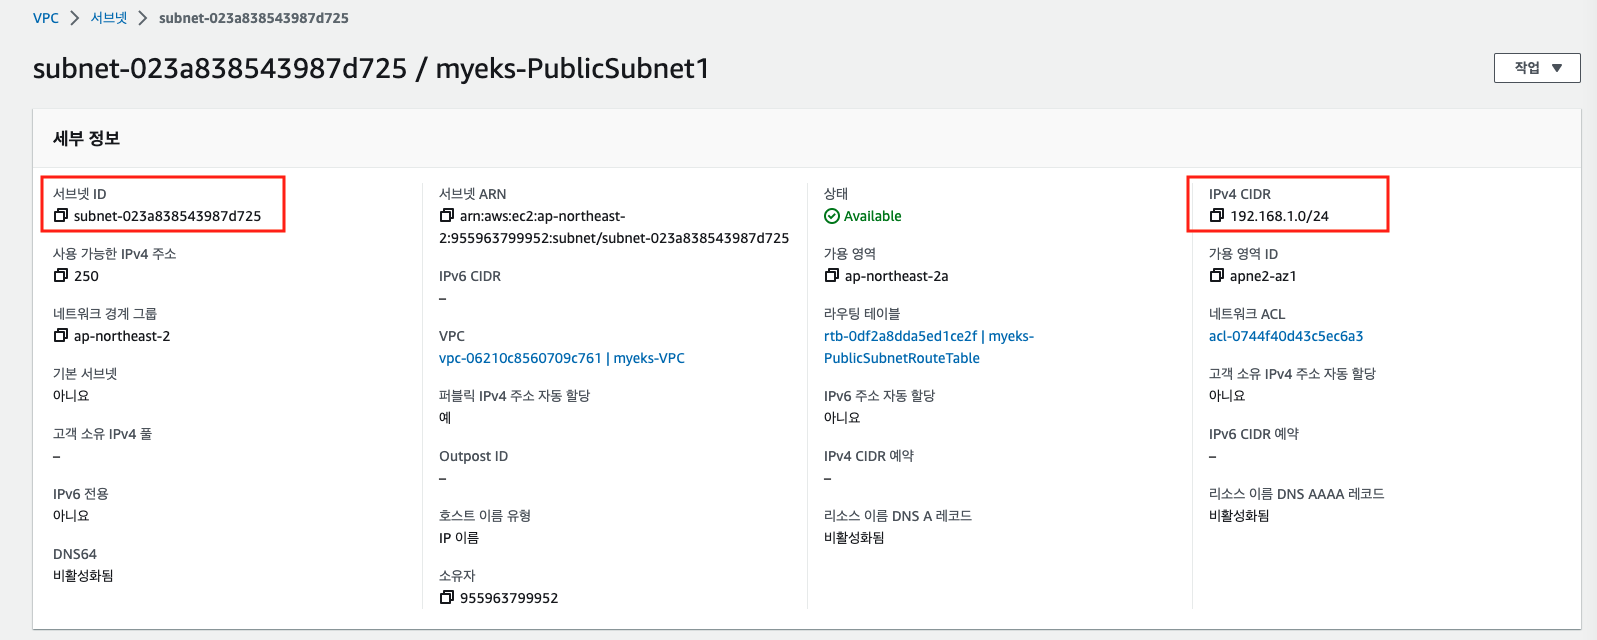
구성 내용 중 VPC, Subnet ID, CIDR은 AWS Console에서 확인할 수 있다. VPC → Resource Road Map 을 통해 연결된 서브넷 및 라우팅 정보를 확인할 수 있다. 정보가 필요한 리소스를 클릭하면 바로 넘어가진다.
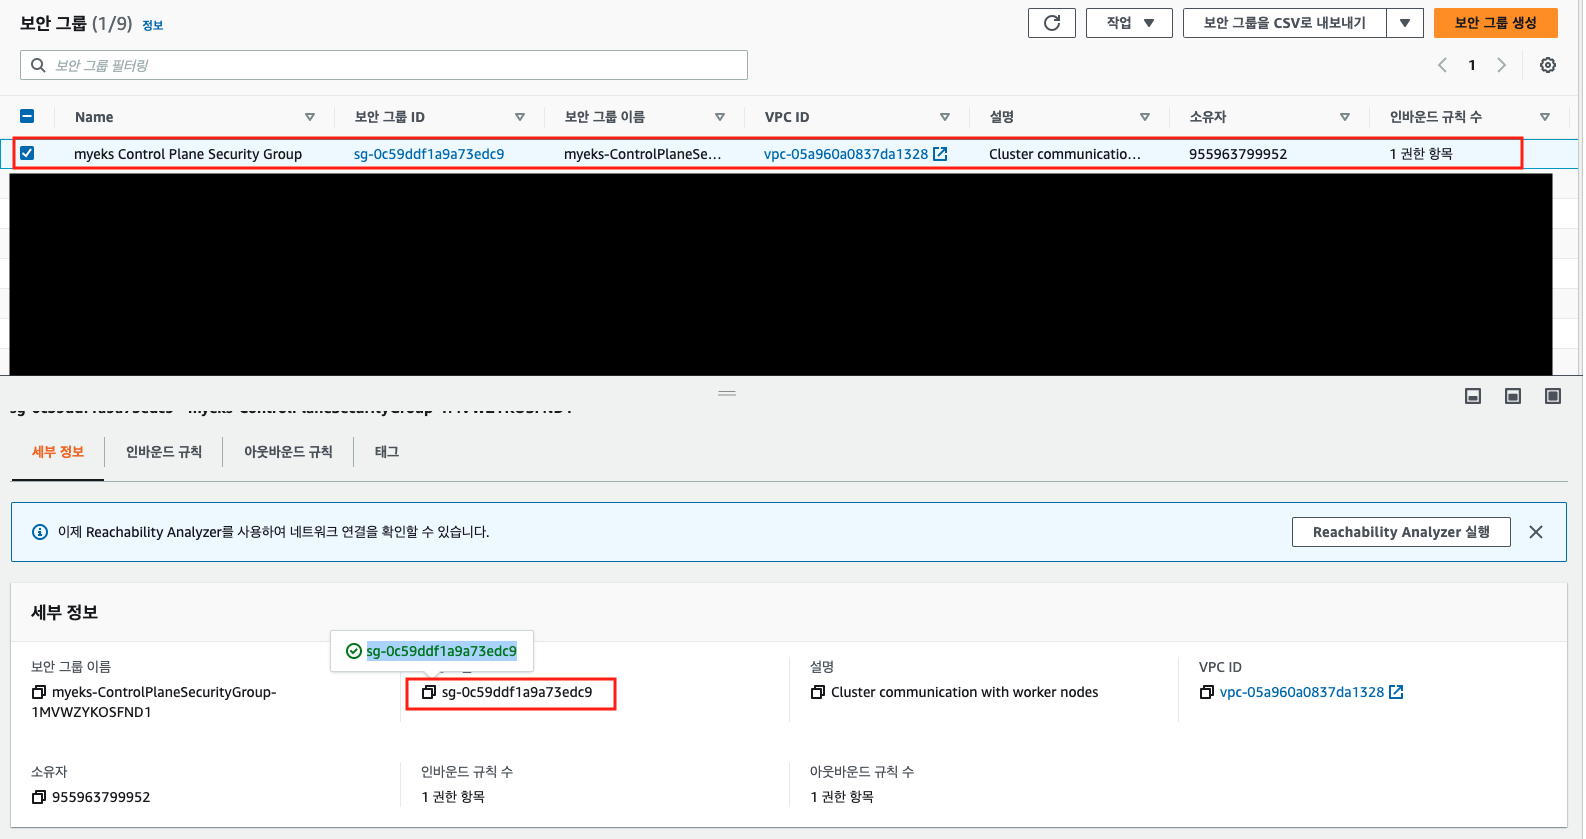
보안 그룹 ID 는 EC2→ 보안 그룹에서 Name myeks Control Plane Security Group 에서 확인할 수 있다.
구성 입력 후 eksctl 명령어를 통해 클러스터를 구축하겠다.
1
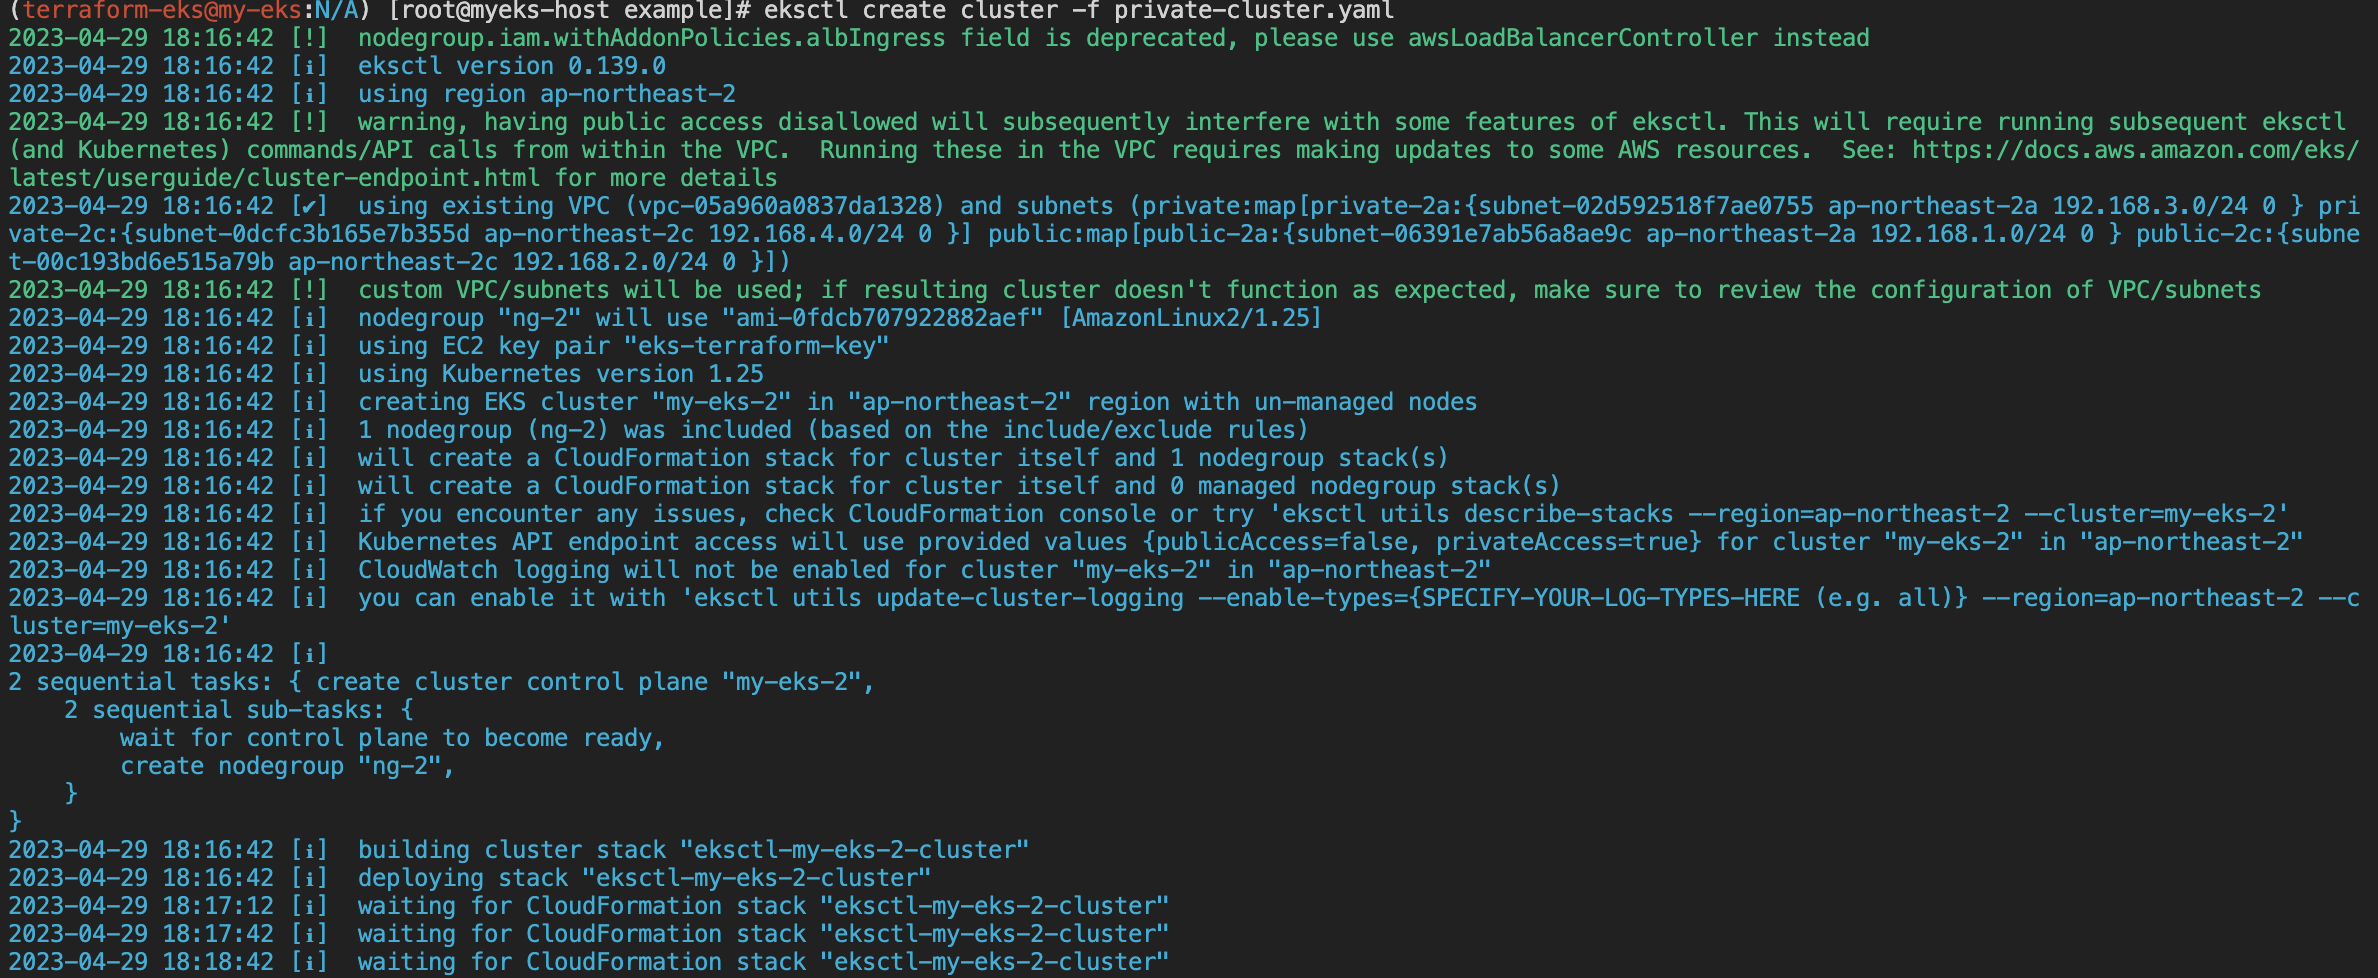
eksctl create cluster -f private-cluster.yaml
배포는 약 20분정도 소요된다. 구성 후 클러스터 API 서버 접근을 위한 인증 정보가 필요하다. 인증 정보는 다음의 eksctl 명령어를 통해 저장할 수 있다.
1
2
3
(terraform-eks@my-eks-2:N/A)[root@myeks-host example]# eksctl utils write-kubeconfig --name my-eks --region ap-northeast-2Flag --name has been deprecated, use --cluster
2023-04-29 19:59:36 [✔] saved kubeconfig as "/root/.kube/config"
(N/A:N/A)[root@myeks-host example]# eksctl create cluster -f private-cluster.yaml 2023-04-28 12:24:04 [ℹ] eksctl version 0.138.0
2023-04-28 12:24:04 [ℹ] using region ap-northeast-2
2023-04-28 12:24:04 [!] warning, having public access disallowed will subsequently interfere with some features of eksctl. This will require running subsequent eksctl (and Kubernetes) commands/API calls from within the VPC. Running these in the VPC requires making updates to some AWS resources. See: https://docs.aws.amazon.com/eks/latest/userguide/cluster-endpoint.html for more details
2023-04-28 12:24:05 [✔] using existing VPC (vpc-06210c8560709c761) and subnets (private:map[private-2a:{subnet-0cceb4f7117a82214 ap-northeast-2a 192.168.3.0/24 0} private-2c:{subnet-0c19b6b58320fce0a ap-northeast-2c 192.168.4.0/24 0}] public:map[public-2a:{subnet-023a838543987d725 ap-northeast-2a 192.168.1.0/24 0} public-2c:{subnet-09e710a10ef0fb5ef ap-northeast-2c 192.168.2.0/24 0}])2023-04-28 12:24:05 [!] custom VPC/subnets will be used;if resulting cluster doesn't function as expected, make sure to review the configuration of VPC/subnets
2023-04-28 12:24:05 [ℹ] nodegroup "ng-2" will use "ami-0fdcb707922882aef" [AmazonLinux2/1.25]
2023-04-28 12:24:05 [ℹ] using EC2 key pair "eks-terraform-key"
2023-04-28 12:24:05 [ℹ] using Kubernetes version 1.25
2023-04-28 12:24:05 [ℹ] creating EKS cluster "my-eks" in "ap-northeast-2" region with un-managed nodes
2023-04-28 12:24:05 [ℹ] 1 nodegroup (ng-2) was included (based on the include/exclude rules)
2023-04-28 12:24:05 [ℹ] will create a CloudFormation stack for cluster itself and 1 nodegroup stack(s)
2023-04-28 12:24:05 [ℹ] will create a CloudFormation stack for cluster itself and 0 managed nodegroup stack(s)
2023-04-28 12:24:05 [ℹ] if you encounter any issues, check CloudFormation console or try 'eksctl utils describe-stacks --region=ap-northeast-2 --cluster=my-eks'
2023-04-28 12:24:05 [ℹ] Kubernetes API endpoint access will use provided values {publicAccess=false, privateAccess=true} for cluster "my-eks" in "ap-northeast-2"
2023-04-28 12:24:05 [ℹ] CloudWatch logging will not be enabled for cluster "my-eks" in "ap-northeast-2"
2023-04-28 12:24:05 [ℹ] you can enable it with 'eksctl utils update-cluster-logging --enable-types={SPECIFY-YOUR-LOG-TYPES-HERE (e.g. all)} --region=ap-northeast-2 --cluster=my-eks'2023-04-28 12:24:05 [ℹ]2 sequential tasks: { create cluster control plane "my-eks",
2 sequential sub-tasks: {waitfor control plane to become ready,
create nodegroup "ng-2",
}}2023-04-28 12:24:05 [ℹ] building cluster stack "eksctl-my-eks-cluster"2023-04-28 12:24:05 [ℹ] deploying stack "eksctl-my-eks-cluster"2023-04-28 12:24:35 [ℹ] waiting for CloudFormation stack "eksctl-my-eks-cluster"2023-04-28 12:25:05 [ℹ] waiting for CloudFormation stack "eksctl-my-eks-cluster"2023-04-28 12:26:05 [ℹ] waiting for CloudFormation stack "eksctl-my-eks-cluster"2023-04-28 12:27:06 [ℹ] waiting for CloudFormation stack "eksctl-my-eks-cluster"2023-04-28 12:28:06 [ℹ] waiting for CloudFormation stack "eksctl-my-eks-cluster"2023-04-28 12:29:06 [ℹ] waiting for CloudFormation stack "eksctl-my-eks-cluster"2023-04-28 12:30:06 [ℹ] waiting for CloudFormation stack "eksctl-my-eks-cluster"2023-04-28 12:31:06 [ℹ] waiting for CloudFormation stack "eksctl-my-eks-cluster"2023-04-28 12:32:06 [ℹ] waiting for CloudFormation stack "eksctl-my-eks-cluster"2023-04-28 12:33:06 [ℹ] waiting for CloudFormation stack "eksctl-my-eks-cluster"2023-04-28 12:34:06 [ℹ] waiting for CloudFormation stack "eksctl-my-eks-cluster"2023-04-28 12:36:06 [ℹ] building nodegroup stack "eksctl-my-eks-nodegroup-ng-2"2023-04-28 12:36:06 [ℹ] --nodes-min=2 was set automatically for nodegroup ng-2
2023-04-28 12:36:06 [ℹ] --nodes-max=2 was set automatically for nodegroup ng-2
2023-04-28 12:36:07 [ℹ] deploying stack "eksctl-my-eks-nodegroup-ng-2"2023-04-28 12:36:07 [ℹ] waiting for CloudFormation stack "eksctl-my-eks-nodegroup-ng-2"2023-04-28 12:39:43 [ℹ] waiting for CloudFormation stack "eksctl-my-eks-nodegroup-ng-2"2023-04-28 12:39:43 [ℹ] waiting for the control plane to become ready
2023-04-28 12:39:44 [✔] saved kubeconfig as "/root/.kube/config"2023-04-28 12:39:44 [ℹ] no tasks
2023-04-28 12:39:44 [✔] all EKS cluster resources for"my-eks" have been created
2023-04-28 12:39:44 [ℹ] adding identity "arn:aws:iam::955963799952:role/eksctl-my-eks-nodegroup-ng-2-NodeInstanceRole-283XKKCXM9GT" to auth ConfigMap
2023-04-28 12:39:44 [ℹ] nodegroup "ng-2" has 0 node(s)2023-04-28 12:39:44 [ℹ] waiting for at least 2 node(s) to become ready in "ng-2"Error: timed out waiting for at least 2 nodes to join the cluster and become ready in "ng-2": context deadline exceeded
보통 타임에러로 표시되며 kubectl 명령어를 확인하면 워크 노드가 조인이 안되어 파드가 정상적으로 배포되지 않는 것을 확인할 수 있다.
해당 내용은 깃 이슈에서 참고할 수 있지만 답을 찾을 수 없어 며칠을 고생했다. 원인은 EKS 보안 그룹 설정이였다. 앞서 베스천서버 구성시 EKS 통신을 위한 보안 그룹을 설정하였는데 추가를 안하면 EKS 워크 노드와 베스천 서버와의 통신이 안되어 조인이 안된다. EKS 보안 그룹을 설정하고 다시 EKS를 배포하자.
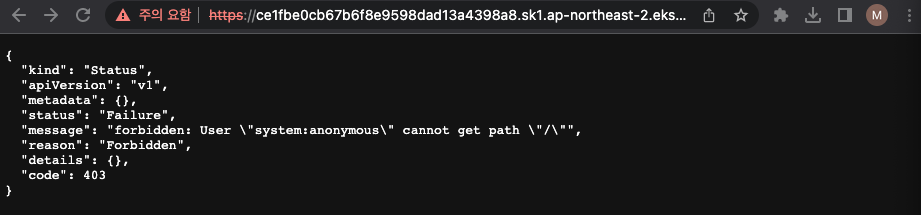
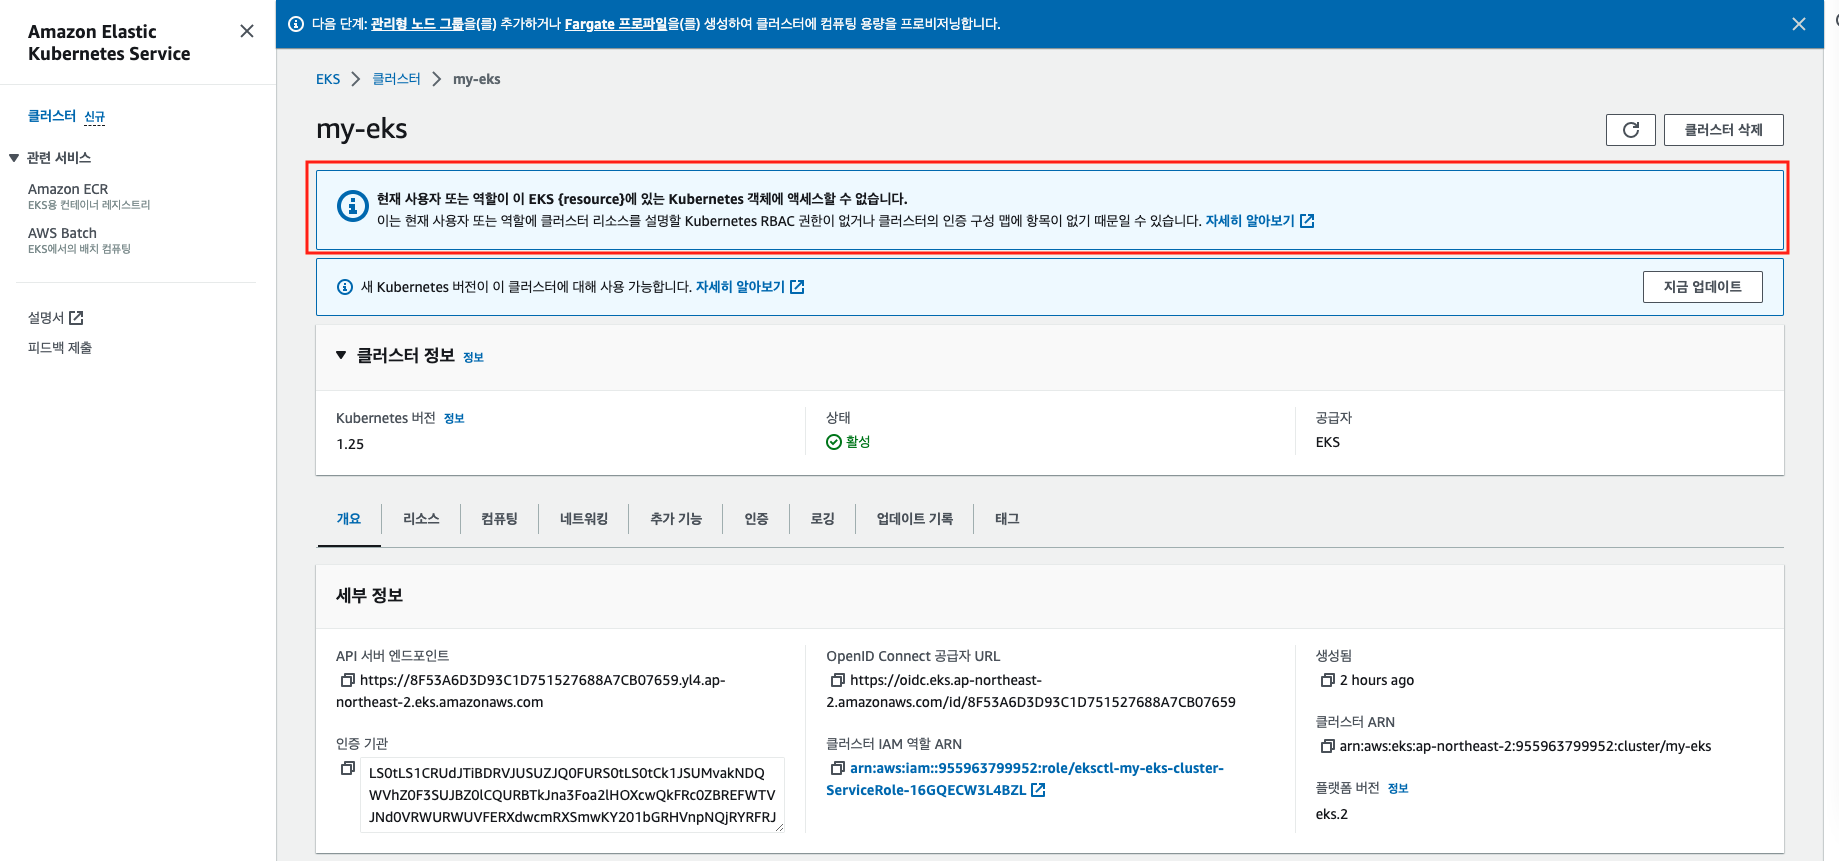
API 서버 접근이 안되는 경우
1
2
3
4
5
6
7
8
9
10
11
12
13
14
15
16
(N/A:N/A)[root@myeks-host example]# eksctl create cluster -f private-cluster.yaml 2023-04-27 19:45:28 [ℹ] eksctl version 0.138.0
2023-04-27 19:45:28 [ℹ] using region ap-northeast-2
2023-04-27 19:45:28 [!] warning, having public access disallowed will subsequently interfere with some features of eksctl. This will require running subsequent eksctl (and Kubernetes) commands/API calls from within the VPC. Running these in the VPC requires making updates to some AWS resources. See: https://docs.aws.amazon.com/eks/latest/userguide/cluster-endpoint.html for more details
2023-04-27 19:45:28 [ℹ] setting availability zones to [ap-northeast-2a ap-northeast-2b ap-northeast-2d]2023-04-27 19:45:28 [ℹ] subnets for ap-northeast-2a - public:192.168.0.0/19 private:192.168.96.0/19
2023-04-27 19:45:28 [ℹ] subnets for ap-northeast-2b - public:192.168.32.0/19 private:192.168.128.0/19
2023-04-27 19:45:28 [ℹ] subnets for ap-northeast-2d - public:192.168.64.0/19 private:192.168.160.0/19
2023-04-27 19:45:28 [ℹ] nodegroup "EKS-PRIVATE-NODE" will use "ami-0fdcb707922882aef"[AmazonLinux2/1.25]2023-04-27 19:45:28 [ℹ] using Kubernetes version 1.25
2023-04-27 19:45:28 [ℹ] creating EKS cluster "my-private-eks" in "ap-northeast-2" region with un-managed nodes
...
Error: getting auth ConfigMap: Get "https://AA1694EDA538EFE2ADC5FCCABBB4F745.gr7.ap-northeast-2.eks.amazonaws.com/api/v1/namespaces/kube-system/configmaps/aws-auth": dial tcp 192.168.175.32:443: i/o timeout
(terraform-eks@my-private-eks:N/A)[root@myeks-host example]# kubectl get pods -A Unable to connect to the server: dial tcp 192.168.134.188:443: i/o timeout
→ 앞에도 다뤘지만 Timeout 의 대부분의 원인이 보안 그룹이다. 이 경우는 클러스터 구성 파일에서 베스천 서버의 보안그룹을 설정하지 않아서 생긴 문제였다. 클러스터 구성에서 베스천 서버에 대한 보안 그룹(아웃 바운드 베스천서버 443 포트)을 설정하면 된다. 클러스터 구성에서 보안 그룹 설정은 AWS 콘솔 → EKS에서 가능하다.
AWS CLI 및 eksctl 결과 i/o timeout
1
2
(N/A:N/A)[root@myeks-host example]# eksctl get cluster --region ap-northeast-2Error: checking AWS STS access – cannot get role ARN for current session: operation error STS: GetCallerIdentity, https response error StatusCode: 0, RequestID: , request send failed, Post "https://sts.ap-northeast-2.amazonaws.com/": dial tcp 52.95.192.98:443: i/o timeout
마찬가지로 보안 그룹 문제였다. 베스천 서버의 아웃바운드에 0.0.0.0/0를 추가하면 해결된다.
콘솔에서 컴퓨팅 리소스 확인이 안되는 경우
다음 그림과 같이 EKS 배포이후 AWS 콘솔에서 워크 노드가 표시되지 않는 경우이다.
원인은 EKS 클러스터 사용자 정보에 AWS 사용자 정보가 없기 때문이다. 다음과 같이 추가하도록 하자.
# Please edit the object below. Lines beginning with a '#' will be ignored,# and an empty file will abort the edit. If an error occurs while saving this file will be# reopened with the relevant failures.#apiVersion:v1data:mapRoles:| - groups:
- system:bootstrappers
- system:nodes
rolearn: arn:aws:iam::000000000:role/eksctl-my-eks-nodegroup-ng-1-NodeInstanceRole-ZG7JVL5Z4IPU
username: system:node:{{EC2PrivateDNSName}}mapUsers:| - userarn: arn:aws:iam:000000000:user/hanhorang # AWS 인증에서 사용한 IAM 사용자 arn를 입력하자.
username: hanhorang
groups:
- system:masterskind:ConfigMapmetadata:name:aws-authnamespace:kube-system
# 클러스터 확인 (terraform-eks@my-eks:N/A)[root@myeks-host example]# eksctl get cluster NAME REGION EKSCTL CREATED
my-eks ap-northeast-2 True
# 클러스터 노드 그룹 확인 (terraform-eks@my-eks:N/A)[root@myeks-host example]# eksctl get nodegroup --cluster my-eksCLUSTER NODEGROUP STATUS CREATED MIN SIZE MAX SIZE DESIRED CAPACITY INSTANCE TYPE IMAGE ID ASG NAMETYPE
my-eks ng-1 CREATE_COMPLETE 2023-04-29T09:05:31Z 444 m5.xlarge ami-0fdcb707922882aef eksctl-my-eks-nodegroup-ng-1-NodeGroup-IWPRDQX6J0CG unmanaged
# 클러스터 접근 정보 확인 및 노드 확인 (terraform-eks@my-eks:N/A)[root@myeks-host example]# kubectl get nodes -v6I0429 20:21:39.855710 5753 loader.go:374] Config loaded from file: /root/.kube/config
I0429 20:21:40.631509 5753 round_trippers.go:553] GET https://8F53A6D3D93C1D751527688A7CB07659.yl4.ap-northeast-2.eks.amazonaws.com/api/v1/nodes?limit=500200 OK in 769 milliseconds
NAME STATUS ROLES AGE VERSION
ip-192-168-3-31.ap-northeast-2.compute.internal Ready <none> 131m v1.25.7-eks-a59e1f0
ip-192-168-3-59.ap-northeast-2.compute.internal Ready <none> 131m v1.25.7-eks-a59e1f0
ip-192-168-4-195.ap-northeast-2.compute.internal Ready <none> 131m v1.25.7-eks-a59e1f0
ip-192-168-4-250.ap-northeast-2.compute.internal Ready <none> 131m v1.25.7-eks-a59e1f0
# 클러스터 정보 확인kubectl cluster-info dump
...