1
2
AWS EKS Workshop Study (=AEWS)는 EKS Workshop 실습 스터디입니다.
CloudNet@ Gasida(가시다)님이 진행하시며,공개된 AWS EKS Workshop을 기반으로 진행하고 있습니다.

스터디 5주차 시간에는 최근 핫한 노드 수명 주기 관리 솔루션인 Karpenter를 공부하였다. 타 기업 사례에서 자주 보는 주제로서 볼 때마다 시간나면 해야지 해야지.. 생각만 했었는데 이번 스터디로 계기가 되어 정리한다. 이번 블로그 글에서는 Karpenter 에 대해 중점적으로 정리하여 공유할 예정이다. 먼저 Karpenter에 대한 개념과 원리를 살펴볼 것이고, 실습으로 오버프로비저닝과 Kubeflow와 통합하여 테스트를 진행할 것이다.

Karpenter ?

쿠버네티스에서 동작하는 오픈소스 노드 오토스케일러이다. 기존 노드 오토스케일러인 Cluster Autoscaler(CA) 의 진화 기술이라고 생각하면 생각하기 쉽겠다. CA에 비해 Karpenter 가 최근 노드 오토스케일러 기술로 각광받고 있는데 g이유를 정리하면 다음과 같다.

karpenter1.png

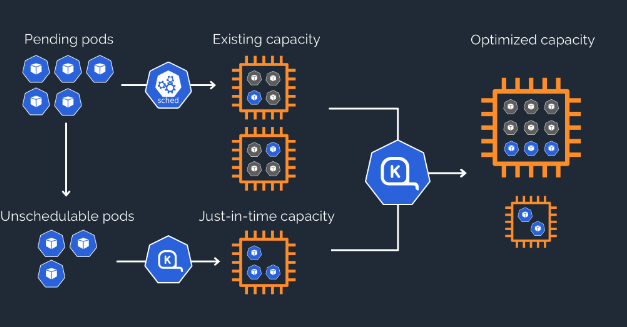
  • 실시간 노드 프로비저닝(Just in time) : 기존 CA 가 5~10분 정도의 프로비저닝 시간이 걸리는 반면, Karpenter 는 5~30초 단위의 시간으로 노드가 빠르게 프로비저닝된다. 이로 인해 운영 워크로드에서 예상하지 못한 트래픽에 발 빠른 대처가 가능하다.
  • 기능 기반 프로비저닝(Optimized) : Karpenter는 인스턴스 가드레일 방식,PV 서브넷 인식을 지원한다. 가드레일 방식이란 사용자가 지정한 인스턴스 타입의 범위에서 노드가 프로비저닝된다는 것을 의미하며 여기에서 가장 저렴한 노드를 자동으로 선택하여 프로비저닝된다. 또한, 자동으로 PV를 인식하여 PV가 존재하는 서브넷에 노드를 프로비저닝 시켜준다.
  • 노드 자동 조정 (Optimized) : 여유 컴퓨팅 자원이 있을 시 자동으로 노드를 정리해주며, 큰 노드 하나가 작은 노드 여러개 보다 비용이 저렴하면 자동으로 합쳐줘 비용 효율적으로 노드를 운영시킬 수 있다.
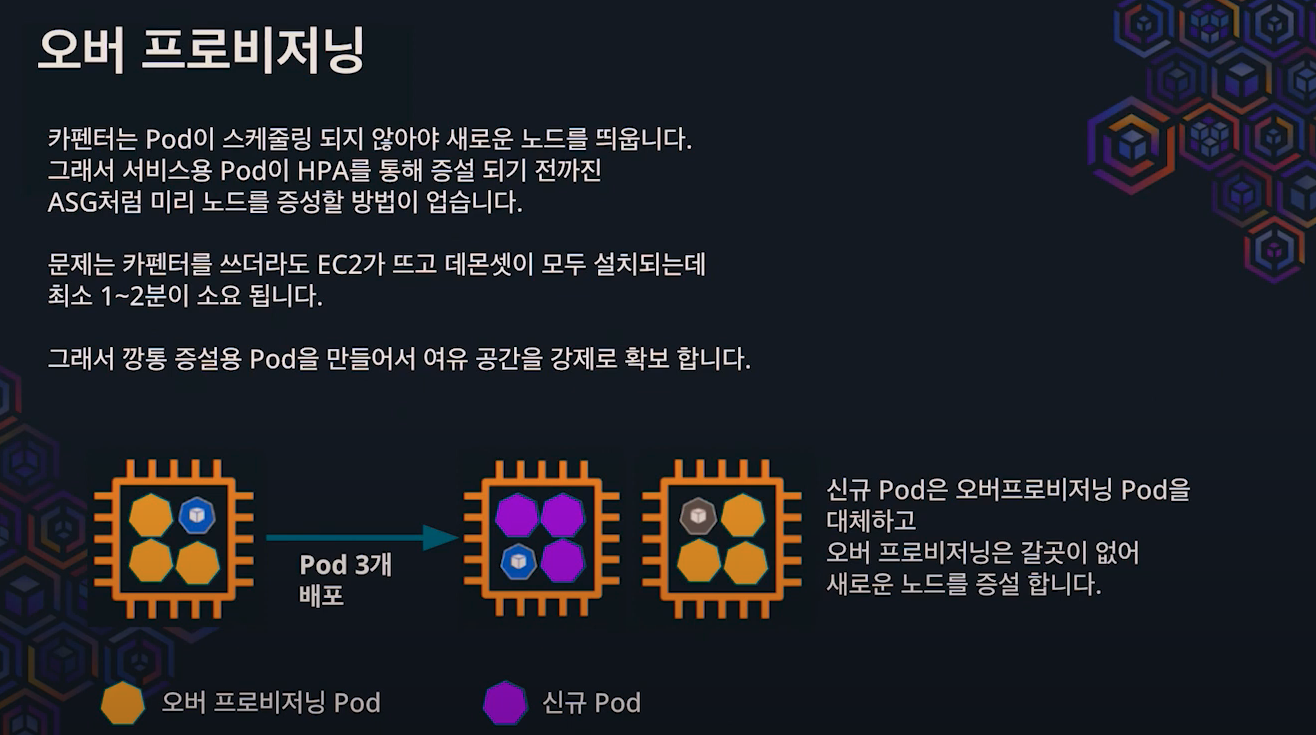
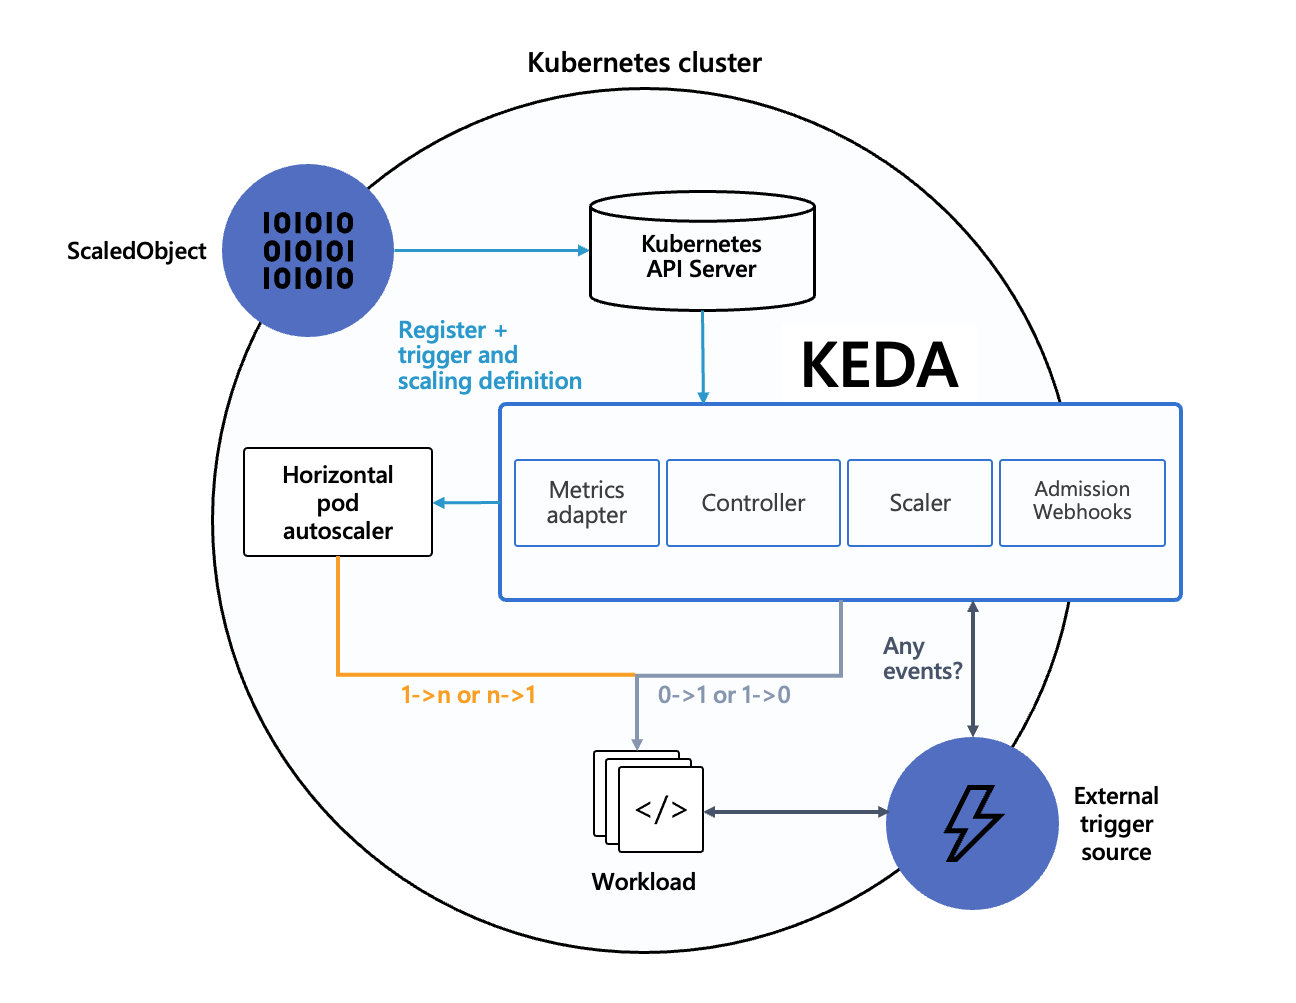
  • 타 운영 관리 솔루션과 합쳐 다양한 노드 스케쥴링 가능 : 대표적으로 이벤트 기반의 파드 수를 조절하는 KEDA와 같이 사용하여 오버 프로비저닝이 가능하다.

기존의 EKS EC2 노드 관리를 생각하면 정말 강력한 기능이 아닐 수 없다! 기존 EKS 의 노드같은 경우 하나의 인스턴스 타입으로 노드 그룹을 구성하고 변경할 수 없었으며, 노드 프로비저닝에 기본 5분이 걸렸다.

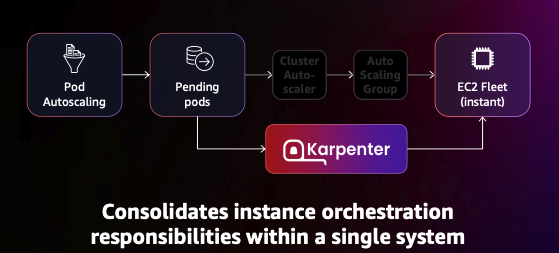
Karpenter가 이러한 기능을 제공할 수 있는 원리를 찾아보니 EKS의 노드를 노드 그룹이 아닌 EC2 Fleet으로 노드를 관리하기 때문이였다.

karpenter2.png

EC2 Fleet은 EC2 인스턴스 유형과 가용 영역을 최대한 활용하여, 비용을 최적화하는 데 유용한 도구이다. 기능적으로는 Karpenter에서 확인한 기능 요소인 다양한 인스턴스 유형 프로비저닝, Spot 인스턴스 & 온디맨드 혼합, 자동 조정을 제공한다.

Karpenter 배포

이어서 Karpenter 를 배포하고 실습해보겠다. 실습 내용은 공식문서와 스터디에서 모임장님이 공유해주신 내용을 참고하였다. 먼저 Cloudformation을 통해 베스천 서버를 구축하고 Karpenter을 활성화시키기 위해 EKS 클러스터 생성을 진행하겠다. EKS 생성이 끝나면 Karpenter을 설치하고, 예제를 통해 노드의 상태를 확인하겠다.

환경 구성

베스천 서버 생성

 1
 2
 3
 4
 5
 6
 7
 8
 9
10
11
# 베스천 서버 YAML 파일 다운로드
curl -O https://s3.ap-northeast-2.amazonaws.com/cloudformation.cloudneta.net/K8S/karpenter-preconfig.yaml

# CloudFormation 스택 배포 파라미터 작성 
# aws cloudformation deploy --template-file karpenter-preconfig.yaml --stack-name myeks2 --parameter-overrides KeyName=kp-gasida SgIngressSshCidr=$(curl -s ipinfo.io/ip)/32  MyIamUserAccessKeyID=AKIA5... MyIamUserSecretAccessKey='CVNa2...' ClusterBaseName=myeks2 --region ap-northeast-2

# CloudFormation 스택 배포 완료 후 작업용 EC2 IP 출력
aws cloudformation describe-stacks --stack-name myeks2 --query 'Stacks[*].Outputs[0].OutputValue' --output text

# 작업용 EC2 SSH 접속
ssh -i key.pem ec2-user@$(aws cloudformation describe-stacks --stack-name myeks2 --query 'Stacks[*].Outputs[0].OutputValue' --output text)

EKS 클러스터 생성

Karpenter 로 노드 수명을 관리하기 위해서는 IRSA 허용, 클러스터 태그 설정 , IAM 정책 설정 그리고 aws-auth 에 역할 연결이 필요하다. 필자는 위에서 구성한 베스천 서버에 접속하여 다음의 명령어를 통해 설치를 진행하였다.

 1
 2
 3
 4
 5
 6
 7
 8
 9
10
11
12
13
14
15
16
17
18
19
20
21
22
23
24
25
26
27
28
29
30
31
32
33
34
35
36
37
38
39
40
41
42
43
44
45
46
47
48
49
50
51
52
53
54
55
56
57
58
59
60
61
62
63
64
65
# Karpenter 버전 및 임시 파일 생성 
export KARPENTER_VERSION=v0.27.5
export TEMPOUT=$(mktemp)

# Karpenter 설치를 위한 환경변수 확인
# 다 나와야 설치가 진행된다. 
echo $KARPENTER_VERSION $CLUSTER_NAME $AWS_DEFAULT_REGION $AWS_ACCOUNT_ID $TEMPOUT
---
v0.27.5 hanhorang ap-northeast-2 0000000000 /tmp/tmp.ckgtAn0r5x

# Karpenter IAM 정책 및 role, EC2 Instance Profile 생성 
curl -fsSL https://karpenter.sh/"${KARPENTER_VERSION}"/getting-started/getting-started-with-karpenter/cloudformation.yaml  > $TEMPOUT \
&& aws cloudformation deploy \
  --stack-name "Karpenter-${CLUSTER_NAME}" \
  --template-file "${TEMPOUT}" \
  --capabilities CAPABILITY_NAMED_IAM \
  --parameter-overrides "ClusterName=${CLUSTER_NAME}" 

# EKS 클러스터 구성
eksctl create cluster -f - <<EOF
---
apiVersion: eksctl.io/v1alpha5
kind: ClusterConfig
metadata:
  name: ${CLUSTER_NAME}
  region: ${AWS_DEFAULT_REGION}
  version: "1.24"
  tags:
    karpenter.sh/discovery: ${CLUSTER_NAME}

iam:
  withOIDC: true
  serviceAccounts:
  - metadata:
      name: karpenter
      namespace: karpenter
    roleName: ${CLUSTER_NAME}-karpenter
    attachPolicyARNs:
    - arn:aws:iam::${AWS_ACCOUNT_ID}:policy/KarpenterControllerPolicy-${CLUSTER_NAME}
    roleOnly: true

iamIdentityMappings:
- arn: "arn:aws:iam::${AWS_ACCOUNT_ID}:role/KarpenterNodeRole-${CLUSTER_NAME}"
  username: system:node:{{EC2PrivateDNSName}}
  groups:
  - system:bootstrappers
  - system:nodes

managedNodeGroups:
- instanceType: m5.large
  amiFamily: AmazonLinux2
  name: ${CLUSTER_NAME}-ng
  desiredCapacity: 2
  minSize: 1
  maxSize: 10
  iam:
    withAddonPolicies:
      externalDNS: true

*## Optionally run on fargate
# fargateProfiles:
# - name: karpenter
#  selectors:
#  - namespace: karpenter*
EOF

eksctl 코드에서 karpenter를 배포하기 위해 몇 가지 설정을 진행하였다.

  • tags : 카펜터를 사용할 곳에 태그를 지정시킨다. 해당 예제에서는 클러스터 전체에서 카펜터를 사용하도록 지정하였지만, 필요에 따라 서브넷, 보안 그룹에 태그를 지정하여 해당 태그에 있는 곳에만 카펜터를 사용할 수 있다.

     1
     2
     3
     4
     5
     6
     7
     8
     9
    10
    11
    12
    13
    14
    15
    16
    17
    18
    19
    20
    21
    22
    23
    24
    25
    26
    27
    28
    29
    30
    31
    
    # 노드 그룹 서브넷 태그 추가
    for NODEGROUP in $(aws eks list-nodegroups --cluster-name ${CLUSTER_NAME} \
        --query 'nodegroups' --output text); do aws ec2 create-tags \
            --tags "Key=karpenter.sh/discovery,Value=${CLUSTER_NAME}" \
            --resources $(aws eks describe-nodegroup --cluster-name ${CLUSTER_NAME} \
            --nodegroup-name $NODEGROUP --query 'nodegroup.subnets' --output text )
    done 
    
    # 보안 그룹 태그 추가 
    NODEGROUP=$(aws eks list-nodegroups --cluster-name ${CLUSTER_NAME} \
        --query 'nodegroups[0]' --output text)
    
    LAUNCH_TEMPLATE=$(aws eks describe-nodegroup --cluster-name ${CLUSTER_NAME} \
        --nodegroup-name ${NODEGROUP} --query 'nodegroup.launchTemplate.{id:id,version:version}' \
        --output text | tr -s "\t" ",")
    
    # If your EKS setup is configured to use only Cluster security group, then please execute -
    
    SECURITY_GROUPS=$(aws eks describe-cluster \
        --name ${CLUSTER_NAME} --query "cluster.resourcesVpcConfig.clusterSecurityGroupId" --output text)
    
    # If your setup uses the security groups in the Launch template of a managed node group, then :
    
    SECURITY_GROUPS=$(aws ec2 describe-launch-template-versions \
        --launch-template-id ${LAUNCH_TEMPLATE%,*} --versions ${LAUNCH_TEMPLATE#*,} \
        --query 'LaunchTemplateVersions[0].LaunchTemplateData.[NetworkInterfaces[0].Groups||SecurityGroupIds]' \
        --output text)
    
    aws ec2 create-tags \
        --tags "Key=karpenter.sh/discovery,Value=${CLUSTER_NAME}" \
        --resources ${SECURITY_GROUPS} 
    
  • iam : OIDC 를 True로 설정함과 동시에 karpenter라는 쿠버네티스 서비스 어카운터에 앞 서 생성한 정책을 연결하였다. 이렇게 하면 생성한 정책에 따라 karpenter 사용자가 AWS 서비스를 관리할 수 있게 된다.

  • iamIdentityMappings: aws-auth configmap 업데이트 작업으로 노드 IAM 역할을 사용하는 노드가 클러스터에 가입하도록 허용시켜주는 작업이다. 예상이지만 노드를 ASG로 관리하는 것이 아닌 EC2 Fleet으로 관리하기에 추가로 필요한 작업인 것 같다.

Karpenter 배포

EKS 클러스터 생성 후, Karpenter 를 배포하겠다.

 1
 2
 3
 4
 5
 6
 7
 8
 9
10
11
12
13
14
15
16
17
18
19
20
21
22
23
24
25
26
27
28
29
30
# 카펜터 설치를 위한 환경 변수 확인
export CLUSTER_ENDPOINT="$(aws eks describe-cluster --name ${CLUSTER_NAME} --query "cluster.endpoint" --output text)"
export KARPENTER_IAM_ROLE_ARN="arn:aws:iam::${AWS_ACCOUNT_ID}:role/${CLUSTER_NAME}-karpenter"

echo $CLUSTER_ENDPOINT $KARPENTER_IAM_ROLE_ARN 

# EC2 Spot Fleet 사용을 위한 정책 확인 : 이미 생성한 정책으로 결과와 같이 에러가 떠야 정상이다. 
aws iam create-service-linked-role --aws-service-name spot.amazonaws.com || true
-- 
An error occurred (InvalidInput) when calling the CreateServiceLinkedRole operation: Service role name AWSServiceRoleForEC2Spot has been taken in this account, please try a different suffix.

# public ECR 로그아웃, 익명의 상태로 이미지 다운로드하기 위함
docker logout public.ecr.aws

# Karpenter 설치 
helm upgrade --install karpenter oci://public.ecr.aws/karpenter/karpenter --version ${KARPENTER_VERSION} --namespace karpenter --create-namespace \
  --set serviceAccount.annotations."eks\.amazonaws\.com/role-arn"=${KARPENTER_IAM_ROLE_ARN} \
  --set settings.aws.clusterName=${CLUSTER_NAME} \
  --set settings.aws.defaultInstanceProfile=KarpenterNodeInstanceProfile-${CLUSTER_NAME} \
  --set settings.aws.interruptionQueueName=${CLUSTER_NAME} \
  --set controller.resources.requests.cpu=1 \
  --set controller.resources.requests.memory=1Gi \
  --set controller.resources.limits.cpu=1 \
  --set controller.resources.limits.memory=1Gi \
  --wait

# 설치 확인 
kubectl get all -n karpenter
kubectl get cm -n karpenter karpenter-global-settings -o jsonpath={.data} | jq
kubectl get crd | grep karpenter

Karpenter 모니터링 설정

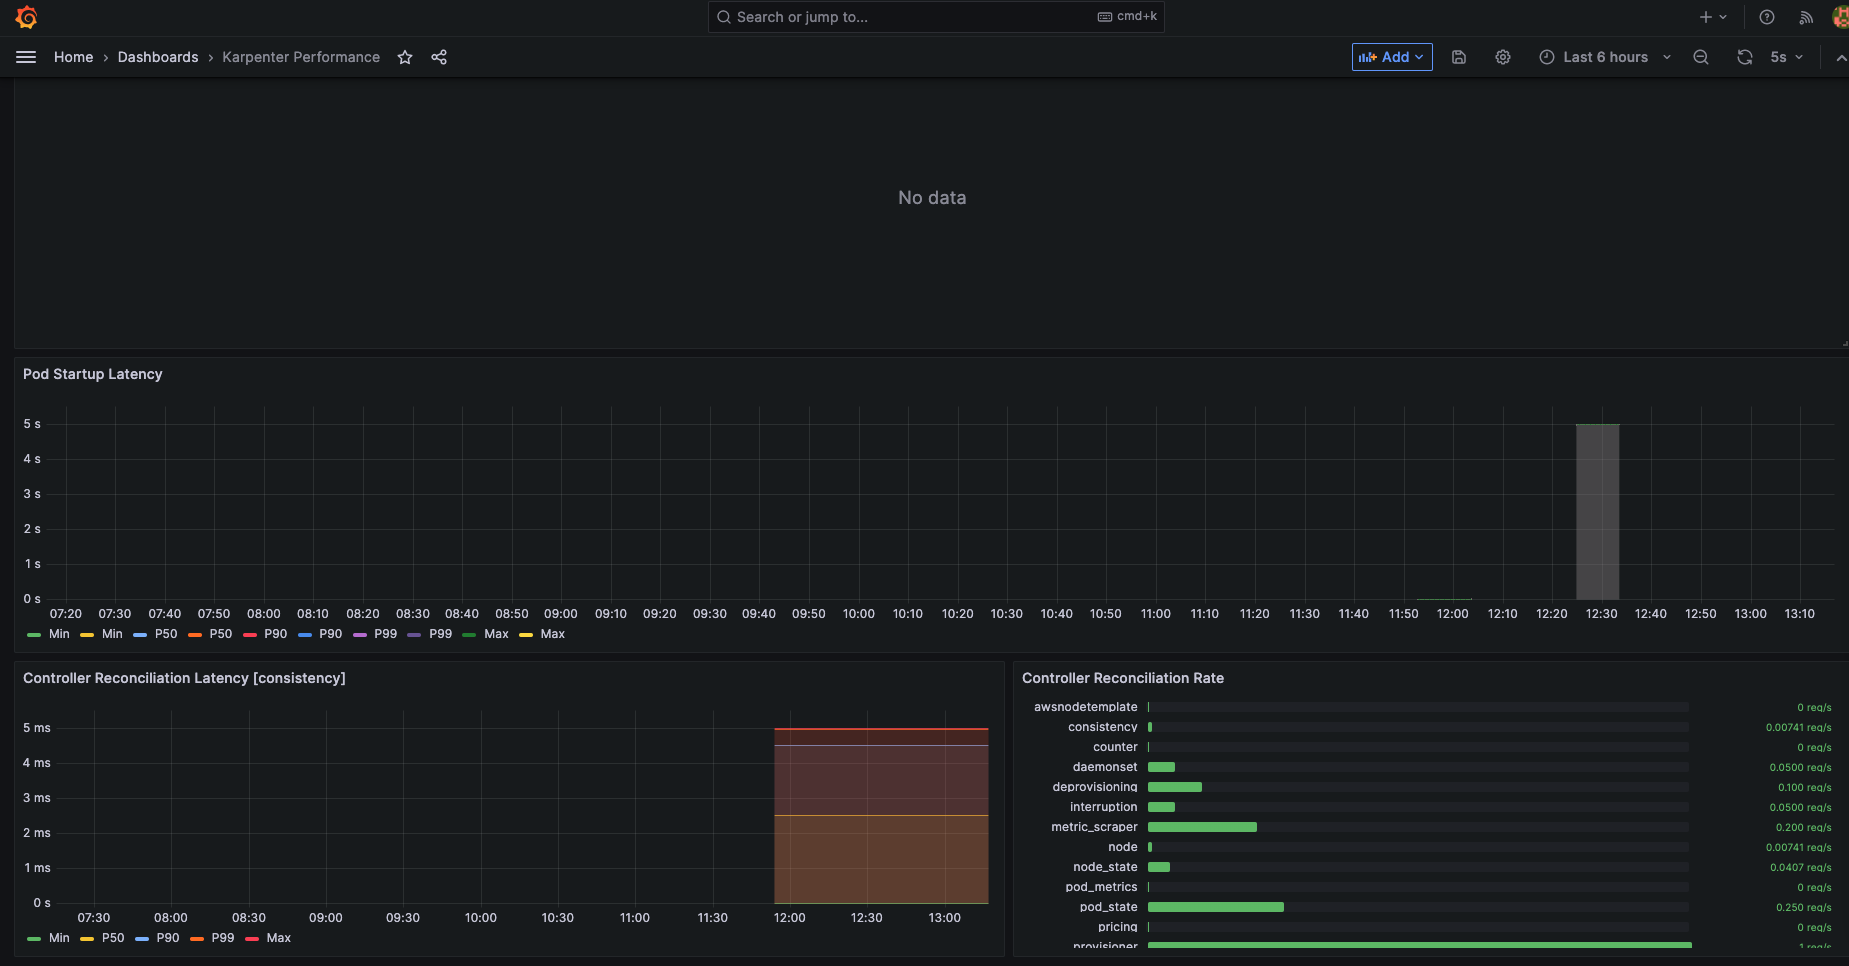
Karpenter 설치가 완료되었으면 예제를 통해 노드 프로비저닝을 직접 테스트해보겠다. 먼저 노드 프로비저닝을 확인하기 위해 그라파나와 노드 모니터링 도구인 eks-node-viewer를 설치하겠다.

 1
 2
 3
 4
 5
 6
 7
 8
 9
10
11
12
13
14
15
16
17
18
19
20
21
22
23
24
25
26
27
28
29
30
31
32
33
34
35
36
37
38
39
40
41
42
43
44
# External DNS 추가
MyDomain=hanhorang.link # 각자 도메인 입력
echo "export MyDomain=<자신의 도메인>" >> /etc/profile
*MyDomain=*hanhorang.link 
*echo "export MyDomain=gasida.link" >> /etc/profile*

MyDnzHostedZoneId=$(aws route53 list-hosted-zones-by-name --dns-name "${MyDomain}." --query "HostedZones[0].Id" --output text)
echo $MyDomain, $MyDnzHostedZoneId
curl -s -O https://raw.githubusercontent.com/gasida/PKOS/main/aews/externaldns.yaml
MyDomain=$MyDomain MyDnzHostedZoneId=$MyDnzHostedZoneId envsubst < externaldns.yaml | kubectl apply -f -

# IP 주소 확인 : 172.30.0.0/16 VPC 대역에서 172.30.1.0/24 대역을 사용 중
ip -br -c addr

# EKS Node Viewer 설치 : 현재 ec2 spec에서는설치에 다소 시간이 소요됨 = 2분 이상
go install github.com/awslabs/eks-node-viewer/cmd/eks-node-viewer@latest

# [터미널1] bin 확인 및 사용
tree ~/go/bin
cd ~/go/bin
./eks-node-viewer -h
./eks-node-viewer 

# 그라파나 배포 
helm repo add grafana-charts https://grafana.github.io/helm-charts
helm repo add prometheus-community https://prometheus-community.github.io/helm-charts
helm repo update

kubectl create namespace monitoring

# 프로메테우스 설치
curl -fsSL https://karpenter.sh/"${KARPENTER_VERSION}"/getting-started/getting-started-with-karpenter/prometheus-values.yaml | tee prometheus-values.yaml
helm install --namespace monitoring prometheus prometheus-community/prometheus --values prometheus-values.yaml --set alertmanager.enabled=false

# 그라파나 설치
curl -fsSL https://karpenter.sh/"${KARPENTER_VERSION}"/getting-started/getting-started-with-karpenter/grafana-values.yaml | tee grafana-values.yaml
helm install --namespace monitoring grafana grafana-charts/grafana --values grafana-values.yaml --set service.type=LoadBalancer

# admin 암호
kubectl get secret --namespace monitoring grafana -o jsonpath="{.data.admin-password}" | base64 --decode ; echo

# 그라파나 접속
kubectl annotate service grafana -n monitoring "external-dns.alpha.kubernetes.io/hostname=grafana.$MyDomain"
echo -e "grafana URL = http://grafana.$MyDomain"
  • 모니터링 설치를 위한 추가 헬름 차트 구성은 다음과 같다. 설치한 메트릭 스택이 있다면 아래 부분을 추가하자.

     1
     2
     3
     4
     5
     6
     7
     8
     9
    10
    11
    12
    13
    14
    15
    16
    17
    18
    19
    20
    21
    22
    
    # 프로메테우스 헬름 차트 
    alertmanager:
      persistentVolume:
        enabled: false
    
    server:
      fullnameOverride: prometheus-server
      persistentVolume:
        enabled: false
    
    # karpenter 메트릭 수집 추가 
    extraScrapeConfigs: |
        - job_name: karpenter
          kubernetes_sd_configs:
          - role: endpoints
            namespaces:
              names:
              - karpenter
          relabel_configs:
          - source_labels: [__meta_kubernetes_endpoint_port_name]
            regex: http-metrics
            action: keep
    
     1
     2
     3
     4
     5
     6
     7
     8
     9
    10
    11
    12
    13
    14
    15
    16
    17
    18
    19
    20
    21
    22
    23
    24
    25
    26
    27
    28
    
    # 그라파나 헬름 차트 
    datasources: # 메트릭 소스 설정
      datasources.yaml:
        apiVersion: 1
        datasources:
        - name: Prometheus
          type: prometheus
          version: 1
          url: http://prometheus-server:80
          access: proxy
    dashboardProviders:
      dashboardproviders.yaml:
        apiVersion: 1
        providers:
        - name: 'default'
          orgId: 1
          folder: ''
          type: file
          disableDeletion: false
          editable: true
          options:
            path: /var/lib/grafana/dashboards/default
    dashboards: # 대시보드 추가 
      default:
        capacity-dashboard:
          url: https://karpenter.sh/v0.27.5/getting-started/getting-started-with-karpenter/karpenter-capacity-dashboard.json
        performance-dashboard:
          url: https://karpenter.sh/v0.27.5/getting-started/getting-started-with-karpenter/karpenter-performance-dashboard.json
    

그라파나 대시보드 화면

karpenter4.png

eks-node-viewer 모니터링 화면

Karpenter3.png

Karpenter 테스트

모니터링 설정이 끝났으면 실제로 노드가 빠르게 프로비저닝되는 지 테스트해보겠다. 노드 관리에 따른 설정 옵션으로 Karpenter 에서는 Provisioner 라는 CRD 형태의 관리 형태를 제공한다. 제공하는 옵션이 많으므로 공식문서를 통해 옵션을 참고하자.

 1
 2
 3
 4
 5
 6
 7
 8
 9
10
11
12
13
14
15
16
17
18
19
20
21
22
23
24
25
26
27
cat <<EOF | kubectl apply -f -
apiVersion: karpenter.sh/v1alpha5
kind: Provisioner
metadata:
  name: default
spec:
  requirements:
    - key: karpenter.sh/capacity-type
      operator: In
      values: ["spot"]
  limits:
    resources:
      cpu: 1000
  providerRef:
    name: default
  ttlSecondsAfterEmpty: 30
---
apiVersion: karpenter.k8s.aws/v1alpha1
kind: AWSNodeTemplate
metadata:
  name: default
spec:
  subnetSelector:
    karpenter.sh/discovery: ${CLUSTER_NAME}
  securityGroupSelector:
    karpenter.sh/discovery: ${CLUSTER_NAME}
EOF
  • spec : Spot 인스턴스를 추가하도록 설정하고 최대 CPU 제한을 1000개로 설정한다.
  • ttlSecondsAfterEmpty : 노드가 비어 있을 때 해당 노드를 종료하기 전에 대기하는 시간이다. 본 예제에서는 30초로 설정하였다.

이제 예제 파드를 배포하고, 파드 수를 늘려 노드 프로비저닝을 확인하겠다.

 1
 2
 3
 4
 5
 6
 7
 8
 9
10
11
12
13
14
15
16
17
18
19
20
21
22
23
24
25
26
# pause 파드 1개에 CPU 1개 최소 보장 할당
cat <<EOF | kubectl apply -f -
apiVersion: apps/v1
kind: Deployment
metadata:
  name: inflate
spec:
  replicas: 0
  selector:
    matchLabels:
      app: inflate
  template:
    metadata:
      labels:
        app: inflate
    spec:
      terminationGracePeriodSeconds: 0
      containers:
        - name: inflate
          image: public.ecr.aws/eks-distro/kubernetes/pause:3.7
          resources:
            requests:
              cpu: 1
EOF

kubectl scale deployment inflate --replicas 5 

파드를 5개로 늘리니 실시간으로 Spot 인스턴스가 프로비저닝된다. 파드가 배치되기까지 약 1분정도 소요되며 그라파나에서 생성한 노드 수를 확인할 수 있다.

karpenter7.png

karpenter10.png

Karpenter 활용

Karpenter와 타 쿠버네티스 플랫폼과 합쳐 노드 관리해보는 시나리오를 구성하여 활용해보겠다. 활용 시나리오는 다음과 같다.

  • Karpenter + KEDA로 노드 오버프로비저닝
  • Karpenter + Kubeflow 로 필요시 GPU 기반의 SPOT 인스턴스 제공하기

Karpenter + KEDA로 노드 오버 프로비저닝

AWS 한국사용자모임 - AWSKRUG 에서 발표해주신 내용으로 직접 테스트해보겠다. 영상 PPT에서 확인할 수 있듯이, 노드 오버프로비저닝의 목적은 카펜터가 프로비저닝 하는 시간(1~2분)을 없애기 위한 목적이다.

Karpenter 는 ASG를 사용하지 않기 때문에 CA 처럼 일정 시간에 노드를 증설하고 감소 시킬 수 없다. 이를 위한 해결 방법으로 이벤트 기반의 툴인 KEDA를 통해 파드를 특정 시간에 배치하여 깡통 노드를 증설시켜 해결할 수 있다.

<a href="https://www.youtube.com/watch?v=FPlCVVrCD64">https://www.youtube.com/watch?v=FPlCVVrCD64</a>

https://www.youtube.com/watch?v=FPlCVVrCD64

KEDA ?

특정 이벤트를 기반으로 파드 수를 스케쥴링시켜주는 Autoscaler이다. Kubernetes의 cron 처럼 파드 수를 일정 시간에 수를 늘릴 수 도 있고, 특정 이벤트(task 수, kafka topic)에 의해 파드를 스케쥴링할 수 있다.

<a href="https://keda.sh/docs/2.10/concepts/">https://keda.sh/docs/2.10/concepts/</a>

https://keda.sh/docs/2.10/concepts/

선수 작업으로 prom-operator 설치가 필요하다. 아래의 과정으로 설치를 진행하자.

1
2
3
4
5
helm repo add prometheus-community https://prometheus-community.github.io/helm-charts
kubectl create ns monitoring
helm install kube-prometheus-stack prometheus-community/kube-prometheus-stack --version 45.27.2 \
--set prometheus.prometheusSpec.scrapeInterval='15s' --set prometheus.prometheusSpec.evaluationInterval='15s' \
--namespace monitoring
 1
 2
 3
 4
 5
 6
 7
 8
 9
10
11
12
13
14
15
16
17
18
19
20
21
22
23
24
25
26
27
28
29
30
31
32
33
34
35
36
37
38
# KEDA 설치
cat <<EOT > keda-values.yaml
metricsServer:
  useHostNetwork: true

prometheus:
  metricServer:
    enabled: true
    port: 9022
    portName: metrics
    path: /metrics
    serviceMonitor:
      # Enables ServiceMonitor creation for the Prometheus Operator
      enabled: true
    podMonitor:
      # Enables PodMonitor creation for the Prometheus Operator
      enabled: true
  operator:
    enabled: true
    port: 8080
    serviceMonitor:
      # Enables ServiceMonitor creation for the Prometheus Operator
      enabled: true
    podMonitor:
      # Enables PodMonitor creation for the Prometheus Operator
      enabled: true

  webhooks:
    enabled: true
    port: 8080
    serviceMonitor:
      # Enables ServiceMonitor creation for the Prometheus webhooks
      enabled: true
EOT

kubectl create namespace keda
helm repo add kedacore https://kedacore.github.io/charts
helm install keda kedacore/keda --version 2.10.2 --namespace keda -f keda-values.yaml

오버 프로비저닝 테스트

Karpenter 설치와 프로비저닝은 테스트에서 진행한 프로비저닝과 inflate 파드을 그대로 사용하겠다. 아래의 KEDA 이벤트를 정의하여 특정 시간에 파드를 늘리는 정책을 생성하고 노드 수를 모니터링하겠다.

 1
 2
 3
 4
 5
 6
 7
 8
 9
10
11
12
13
14
15
16
17
18
19
20
21
22
23
24
25
# ScaledObject 정책 생성 : cron
cat <<EOT > keda-cron.yaml
apiVersion: keda.sh/v1alpha1
kind: ScaledObject
metadata:
  name: inflate-cron-scaled
spec: 
  # 파드 수 확인 
  minReplicaCount: 0
  maxReplicaCount: 10
  # 파드 대상 
  scaleTargetRef:
    apiVersion: apps/v1
    kind: Deployment
    name: inflate
  # 트리거 설정
  triggers:
  - type: cron
    metadata:
      timezone: Asia/Seoul
      start: 00,15,30,45 * * * *
      end: 05,20,35,50 * * * *
      desiredReplicas: "5"
EOT
kubectl apply -f keda-cron.yaml
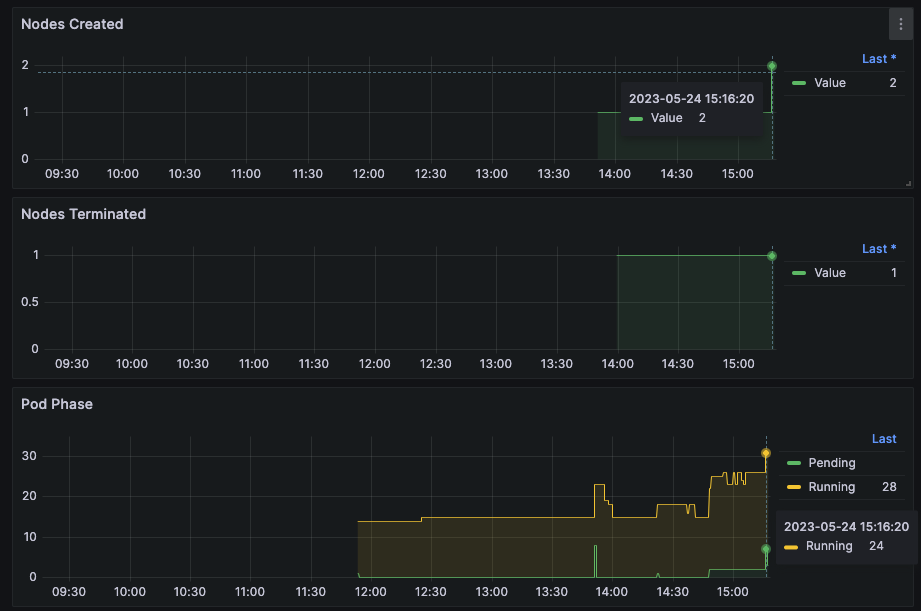
  • 확장 트리거를 cron으로 설정하여 특정 시간에 확장이 발생하도록 설정하였다. 매 시간 00, 15, 30, 45분에 5개의 파드으로 확장하고, 05, 20, 35, 50분에 확장을 종료하도록 설정하였다.

🧐 ScaledObject 트러블슈팅

필자의 경우 ScaledObject 배포시 다음과 같은 스키마 에러가 발생하였다.

1
2
3
kubectl logs ScaledObject/inflate-cron-scaled -n keda
---
error: no kind "ScaledObject" is registered for version "keda.sh/v1alpha1" in scheme "pkg/scheme/scheme.go:28"

구글링하니 CRD문제라 해서 차트를 재설치하였는데 문제가 계속 되어 트러블슈팅에 시간이 걸렸다. 결론적으로 CRD문제는 아니고, ScaledObject 속한 네임스페이스(keda) 와 deployment 네임스페이스(default) 달라 생긴 문제였다. 네임스페이스를 올바르게 설정하고 배포하면 문제 없이 진행된다.

1
2
3
4
kubectl get ScaledObject -A 
---
NAMESPACE   NAME                  SCALETARGETKIND      SCALETARGETNAME   MIN   MAX   TRIGGERS   AUTHENTICATION   READY   ACTIVE   FALLBACK   AGE
default     inflate-cron-scaled   apps/v1.Deployment   inflate           0     10    cron                        True    False    Unknown    9s

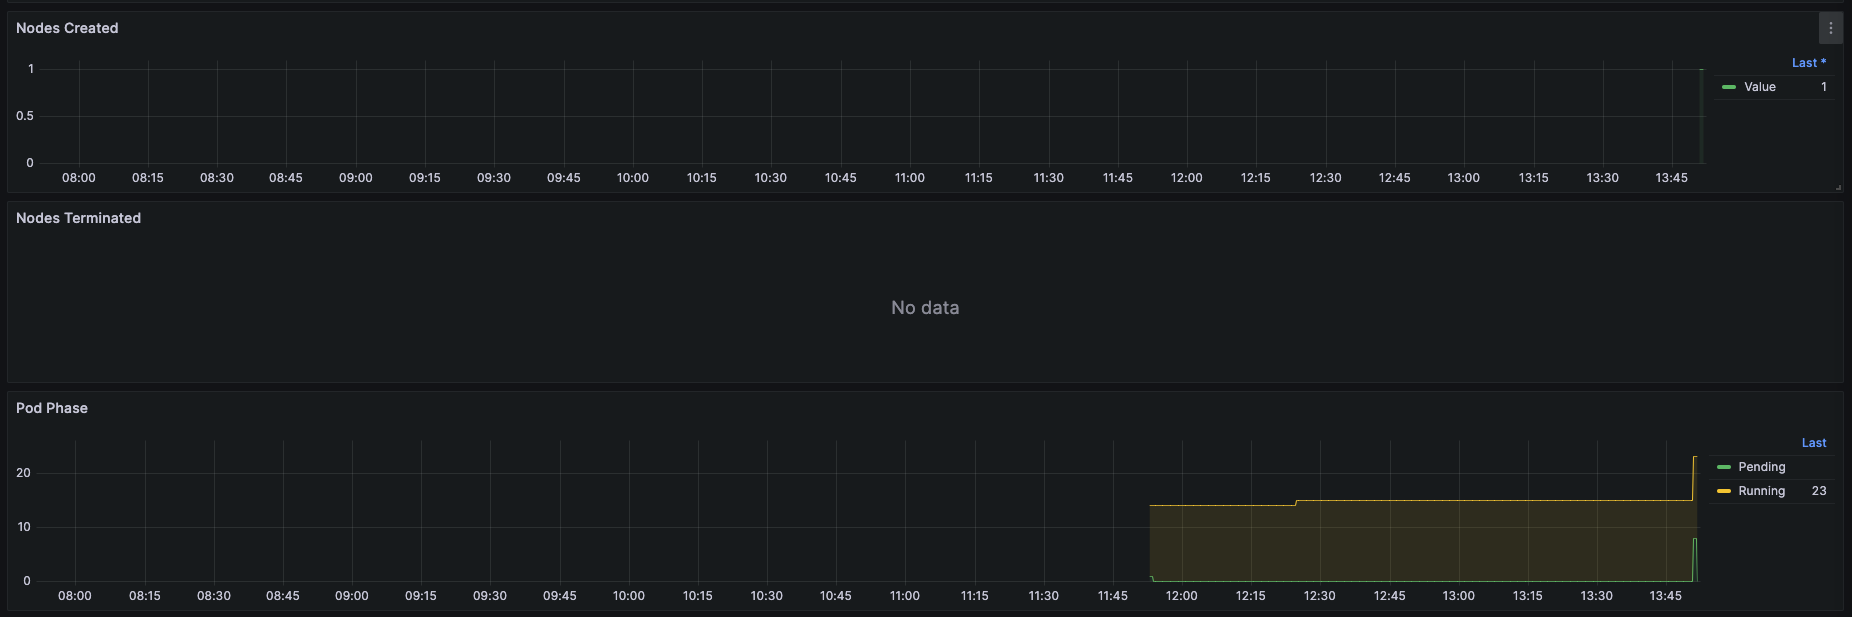
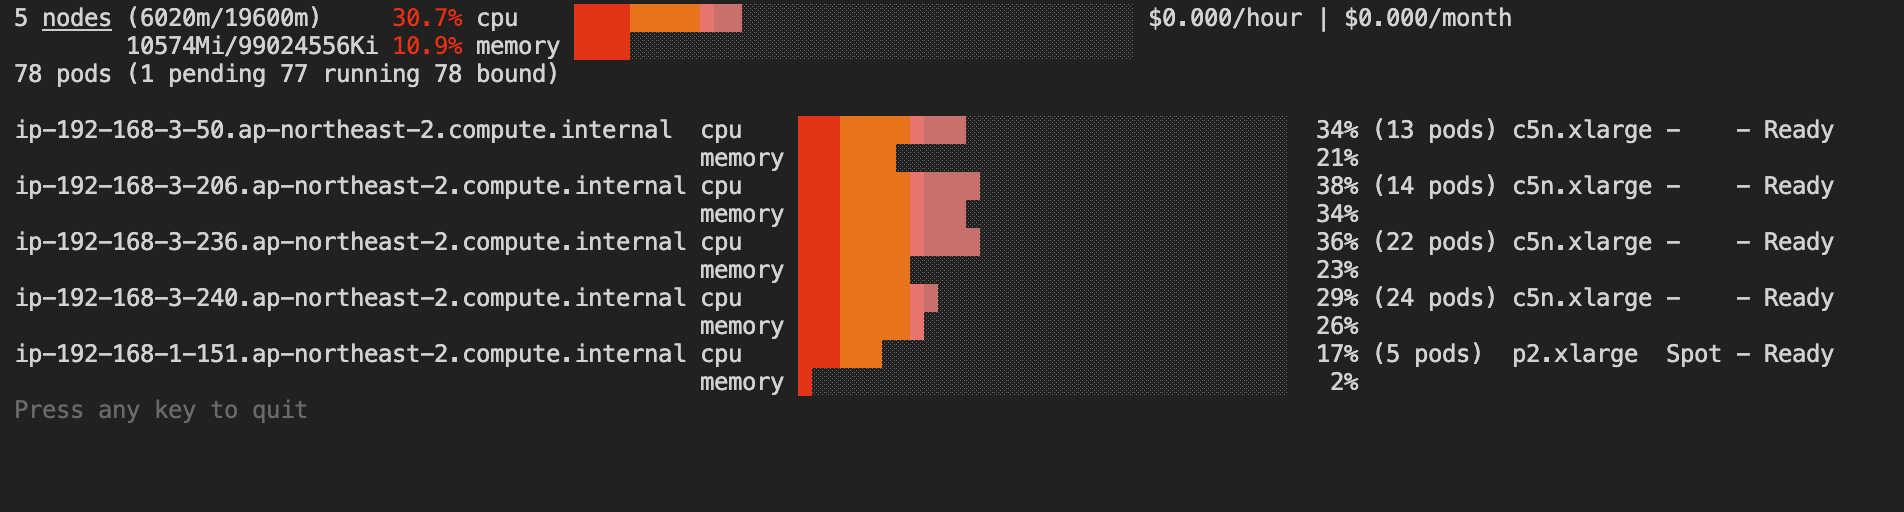
15분에 확인하니 노드가 아래와 같이 정상적으로 프로비저닝된 것을 확인할 수 있다.

karpenter13.png

karpenter14.png

Karpenter + Kubeflow 로 필요시 GPU 기반의 SPOT 인스턴스 제공하기

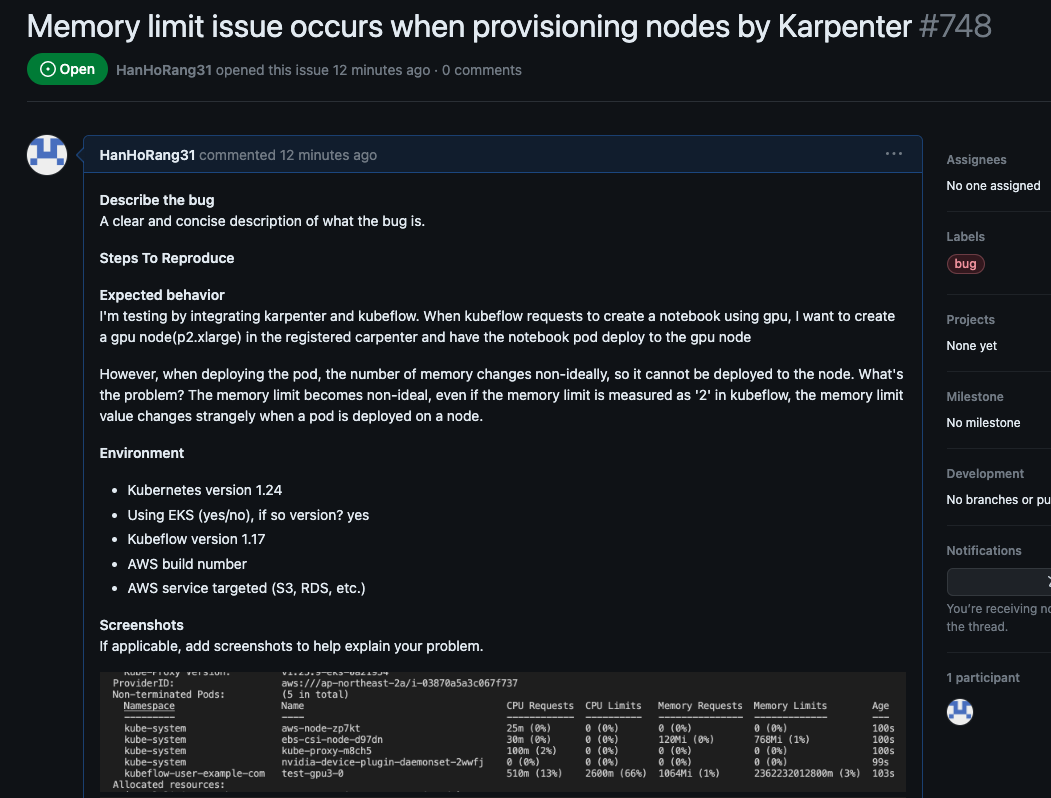
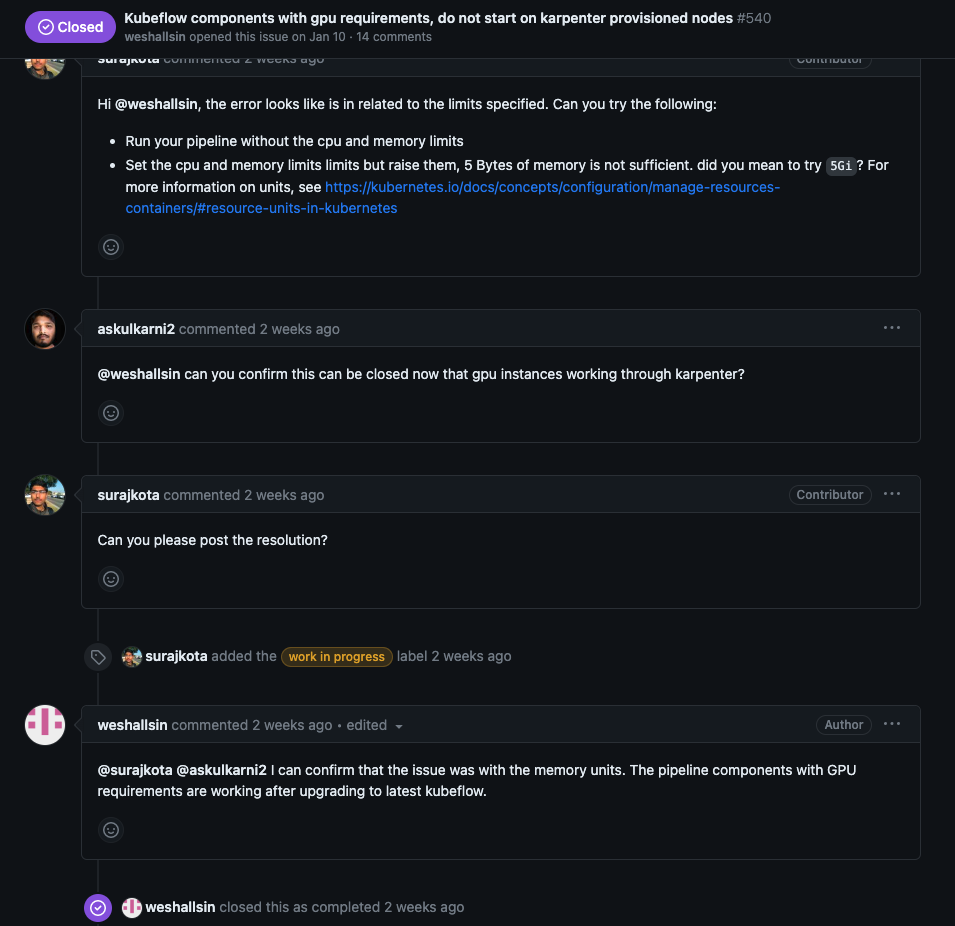
다음은 karpenter 를 kubeflow와 연계하여 GPU 기반의 SPOT 노드를 프로비저닝하겠다. 목적은 비용 최적화로 kubeflow 머신러닝 워크로드에서 GPU 자원이 필요할 때 SPOT 인스턴스를 노드에 프로비저닝하여 사용하고자 한다. 결론부터 말하면, 현재 karpenter 메모리 limit 이상 문제로 동작하지 않는다. 깃 이슈에서 문제를 확인 중이며 해결시 업데이트하겠다.

kubeflow 설치와 구성은 필자의 블로그 글을 기반으로 진행한다. karpenter를 설치하고 프로비저닝 파일은 다음과 같이 정의하여 배포한다.

  1
  2
  3
  4
  5
  6
  7
  8
  9
 10
 11
 12
 13
 14
 15
 16
 17
 18
 19
 20
 21
 22
 23
 24
 25
 26
 27
 28
 29
 30
 31
 32
 33
 34
 35
 36
 37
 38
 39
 40
 41
 42
 43
 44
 45
 46
 47
 48
 49
 50
 51
 52
 53
 54
 55
 56
 57
 58
 59
 60
 61
 62
 63
 64
 65
 66
 67
 68
 69
 70
 71
 72
 73
 74
 75
 76
 77
 78
 79
 80
 81
 82
 83
 84
 85
 86
 87
 88
 89
 90
 91
 92
 93
 94
 95
 96
 97
 98
 99
100
101
102
103
104
105
106
107
108
109
110
111
112
113
114
115
# Cost-Optimized EKS cluster for Kubeflow with spot GPU instances and node scale down to zero
# Built in efforts to reducing training costs of ML workloads.
# Supporting tutorial can be found at the following link: 
# https://blog.gofynd.com/how-we-reduced-our-ml-training-costs-by-78-a33805cb00cf
# This spec creates a cluster on EKS with the following active nodes 
# - 2x m5a.2xlarge - Accomodates all pods of Kubeflow
# It also creates the following nodegroups with 0 nodes running unless a pod comes along and requests for the node to get spun up
# - m5a.2xlarge   -- Max Allowed 10 worker nodes
# - p2.xlarge     -- Max Allowed 10 worker nodes
# - p3.2xlarge    -- Max Allowed 10 worker nodes
# - p3.8xlarge    -- Max Allowed 04 worker nodes
# - p3dn.24xlarge -- Max Allowed 01 worker nodes

apiVersion: eksctl.io/v1alpha5
kind: ClusterConfig

metadata:
  # Name of your cluster, change to whatever you find fit.
  # If changed, make sure to change all nodegroup tags from 
  # 'k8s.io/cluster-autoscaler/my-eks-kubeflow: "owned"' --> 'k8s.io/cluster-autoscaler/your-new-name: "owned"'
  name: hanhorang 
  # choose your region wisely, this will significantly impact the cost incurred
  region: ap-northeast-2
  # 1.14 Kubernetes version since Kubeflow 1.0 officially supports the same
  version: '1.25'
  tags:
    # Add more cloud tags if needed for billing
    karpenter.sh/discovery: hanhorang 
  
# Add all possible AZs to ensure nodes can be spun up in any AZ later on. 
# THIS CAN'T BE CHANGED LATER. YOU WILL HAVE TO CREATE A NEW CLUSTER TO ADD NEW AZ SUPPORT.
# This list applies to the whole cluster and isn't specific to nodegroups
vpc:
  id: vpc-032c30fdebbb69fd6
  cidr: 192.168.0.0/16
  securityGroup: sg-093be0632becd746b
  nat:
    gateway: HighlyAvailable

  subnets:
    public: 
      public-2a:
        id: subnet-03bfdfe3c7d5aa2a4
        cidr: 192.168.1.0/24
      public-2c:
        id: subnet-078ee0d964d71e1f2
        cidr: 192.168.2.0/24
    private:
      private-2a:
        id: subnet-0958e380d34c306e3
        cidr: 192.168.3.0/24
      private-2c:
        id: subnet-0bd38833c317d5e2b
        cidr: 192.168.4.0/24

iam: 
  withOIDC: true
  serviceAccounts:
  - metadata:
      name: karpenter
      namespace: karpenter
    roleName: hanhorang-karpenter
    attachPolicyARNs:
    - arn:aws:iam::955963799952:policy/KarpenterControllerPolicy-hanhorang
    roleOnly: true

iamIdentityMappings:
- arn: "arn:aws:iam::955963799952:role/KarpenterNodeRole-hanhorang"
  username: system:node:{{EC2PrivateDNSName}}
  groups:
  - system:bootstrappers
  - system:nodes

nodeGroups:
  - name: ng-1
    desiredCapacity: 4
    minSize: 0
    maxSize: 10
    # Set one nodegroup with 100GB volumes for Kubeflow to get deployed. 
    # Kubeflow requirement states 1-2 Nodes with 100GB volume attached to the node. 
    volumeSize: 100
    volumeType: gp2
    instanceType: c5n.xlarge
    privateNetworking: true 
    ssh:
      publicKeyName: eks-terraform-key
    availabilityZones:
      - ap-northeast-2a
    labels:
      node-class: "worker-node"
    tags:
      # EC2 tags required for cluster-autoscaler auto-discovery
      k8s.io/cluster-autoscaler/node-template/label/lifecycle: OnDemand
      k8s.io/cluster-autoscaler/node-template/label/aws.amazon.com/spot: "false"
      k8s.io/cluster-autoscaler/node-template/label/gpu-count: "0"
      k8s.io/cluster-autoscaler/enabled: "true"
      k8s.io/cluster-autoscaler/my-eks-kubeflow: "owned"
    iam:
      withAddonPolicies:
        awsLoadBalancerController: true
        autoScaler: true
        cloudWatch: true
        efs: true
        ebs: true 
        externalDNS: true

addons:
- name: vpc-cni # no version is specified so it deploys the default version
  version: v1.12.6-eksbuild.1
  attachPolicyARNs:
    - arn:aws:iam::aws:policy/AmazonEKS_CNI_Policy
- name: kube-proxy
  version: latest # auto discovers the latest available
- name: coredns
  version: latest # v1.9.3-eksbuild.2
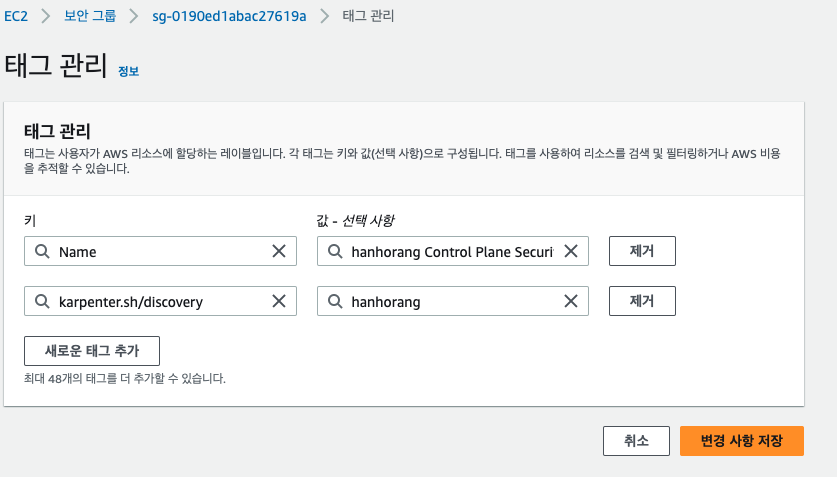
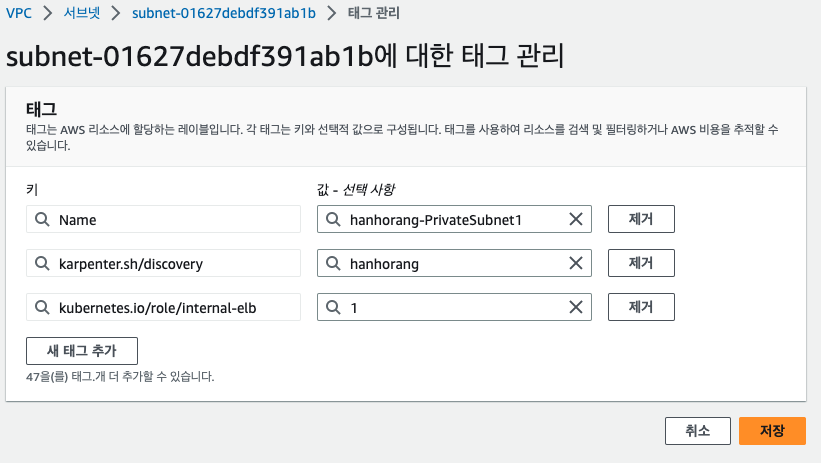
  • 서브넷에 태그 추가

    베스천 서버 구성에서 eks 클러스터를 배포함으로 서브넷과 보안 그룹에 카펜터 사용을 위한 태그가 필요하다. 다음과 같이 입력하다.

    kar1.png

    subnet1.png

  • EBS CSI Driver 배포

    앞 블로그 글에서의 트러블슈팅에서 다룬 내용이다. kubeflow 설치를 위해 EBS CSI driver를 배포하고 기본 스토리지 클래스를 변경하자

  • 베스천서버 보안그룹 인그래스 규칙 추가

    본 글에서는 베스천서버에서 포트포워딩을 해서 테스트한다. 이를 위해 필자는 베스천 서버의 보안 그룹 인그래스 포트 설정을 모두 허용(0.0.0.0/0)으로 바꿨다.

  • notebook 생성 트러블슈팅

    포트포워딩으로 jupyter notebook 생성시 추가 작업이 필요하다. 아래 작업을 통해 APP_SECURE_COOKIES 옵션을 false 로 변경하자.

     1
     2
     3
     4
     5
     6
     7
     8
     9
    10
    11
    12
    13
    14
    15
    16
    17
    18
    19
    20
    21
    22
    23
    24
    25
    26
    27
    28
    29
    30
    31
    32
    33
    34
    35
    36
    37
    38
    
    kubectl edit deploy/jupyter-web-app-deployment -n kubeflow
    ---
    ...
    maxUnavailable: 25%
        type: RollingUpdate
      template:
        metadata:
          creationTimestamp: null
          labels:
            app: jupyter-web-app
            kustomize.component: jupyter-web-app
        spec:
          containers:
          - env:
            - name: APP_PREFIX
              value: /jupyter
            - name: UI
              value: default
            - name: USERID_HEADER
              value: kubeflow-userid
            - name: USERID_PREFIX
            - name: APP_SECURE_COOKIES
              value: "false" # ture 에서 false 로 수정 ! 
            image: docker.io/kubeflownotebookswg/jupyter-web-app:v1.7.0
            imagePullPolicy: IfNotPresent
            name: jupyter-web-app
            ports:
            - containerPort: 5000
              protocol: TCP
            resources: {}
            terminationMessagePath: /dev/termination-log
            terminationMessagePolicy: File
            volumeMounts:
            - mountPath: /etc/config
              name: config-volume
            - mountPath: /src/apps/default/static/assets/logos
              name: logos-volume
    ...
    

EKS 클러스터 구성 후 카펜터 프로비저너를 다음과 같이 정의하여 배포하였다.

 1
 2
 3
 4
 5
 6
 7
 8
 9
10
11
12
13
14
15
16
17
18
19
20
21
22
23
24
25
26
27
28
29
30
31
32
33
34
35
cat <<EOF | kubectl apply -f -
apiVersion: karpenter.sh/v1alpha5
kind: Provisioner
metadata:
  name: default
spec:
  requirements:
    - key: karpenter.sh/capacity-type
      operator: In
      values: ["spot"]
    - key: node.kubernetes.io/instance-type
      operator: In
      values: ["p2.xlarge", "p3.2xlarge", "p3.8xlarge", "p3.16xlarge"] # Add your desired GPU instance types here
    - key: kubernetes.io/arch
      operator: In
      values: ["nvidia", "amd64"]
  limits:
    resources:
      cpu: 1000
      memory: 1000Gi
      nvidia.com/gpu: 10
  providerRef:
    name: default
  ttlSecondsAfterEmpty: 30
---
apiVersion: karpenter.k8s.aws/v1alpha1
kind: AWSNodeTemplate
metadata:
  name: default
spec:
  subnetSelector:
    karpenter.sh/discovery: ${CLUSTER_NAME}
  securityGroupSelector:
    karpenter.sh/discovery: ${CLUSTER_NAME}
EOF
  • GPU 기반의 인스턴스를 설정하고 spot 인스턴스만 설정하도록 프로비저닝하였다.

테스트

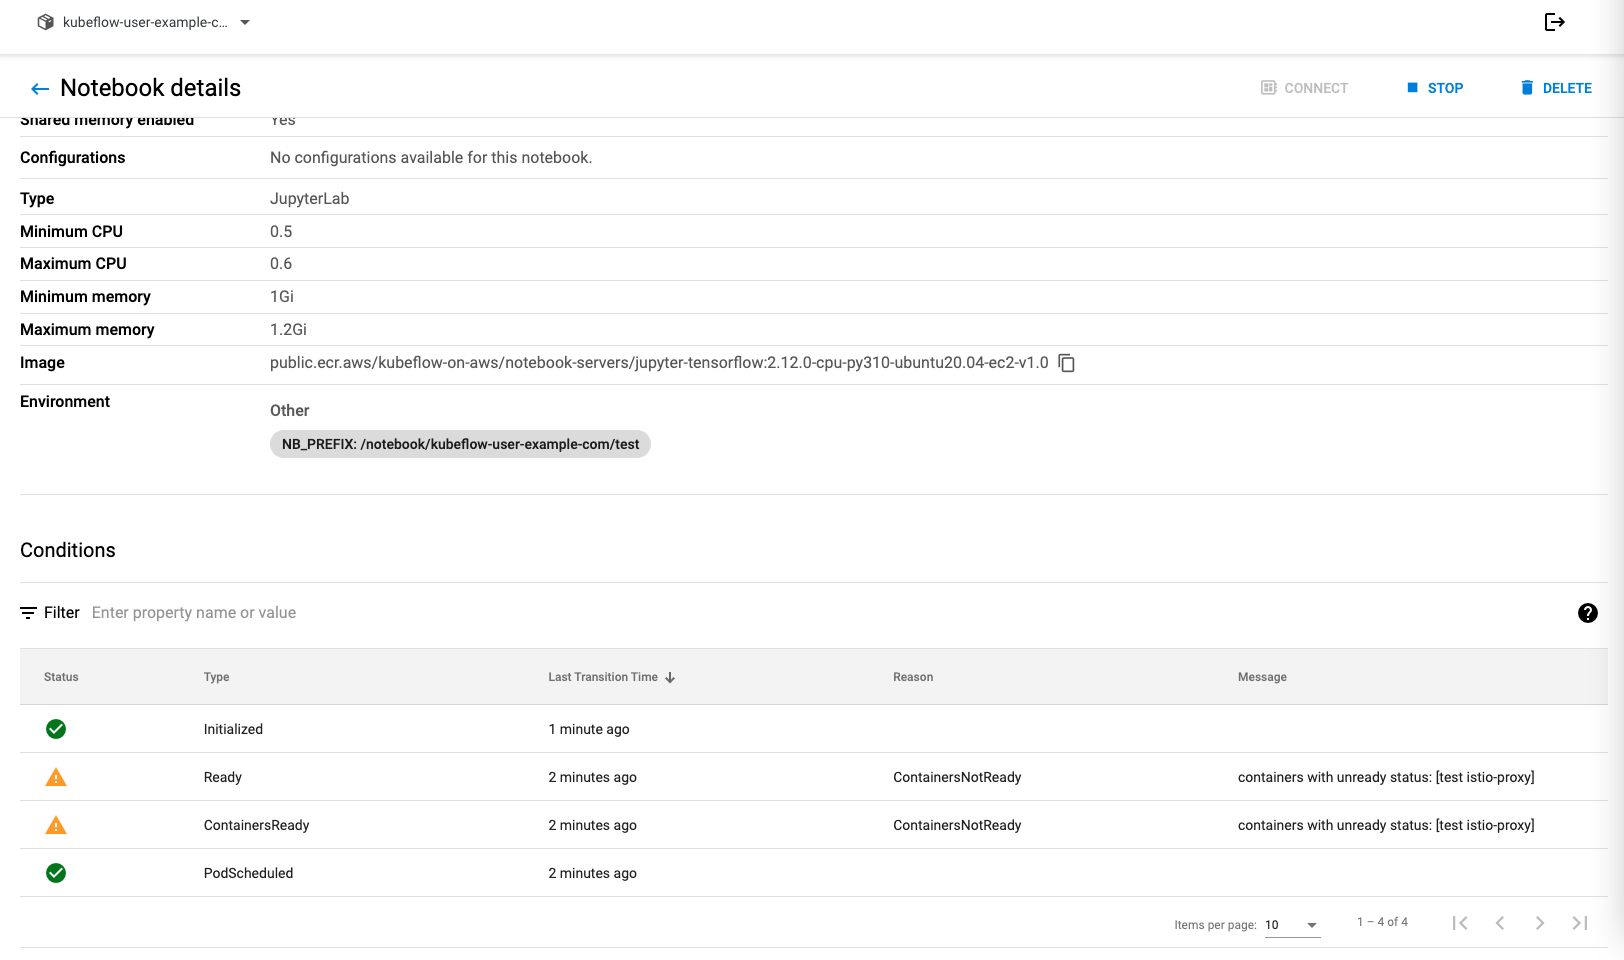
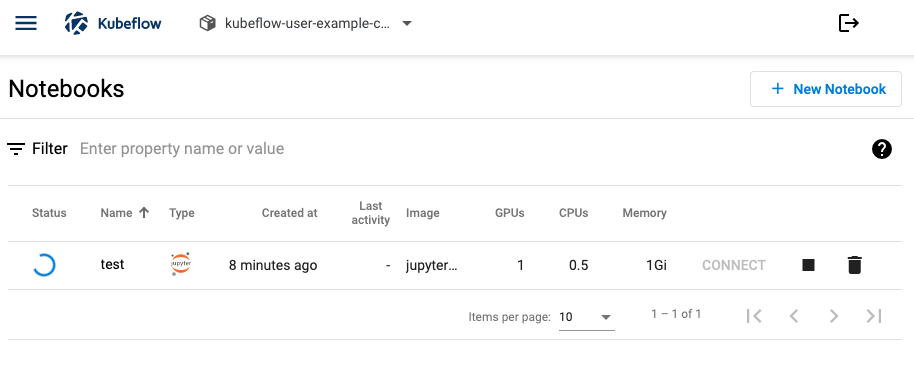
kubeflow 에서 GPU 1개를 사용하는 jupyter notebook을 생성하여 잘 동작되는 지 확인하겠다.

karpenter19.png

karpenter18.png

Karpenter15.png

GPU 자원을 사용하는 jupyer notebook 생성시 파드가 pending 상태로 있다가, karpenter에 의해 GPU 노드가 새로 프로비저닝되고 파드가 배치되는 것을 확인할 수 있다.

 1
 2
 3
 4
 5
 6
 7
 8
 9
10
11
12
13
14
15
16
17
18
# ubuntu golang install (go >1.16)
wget  https://go.dev/dl/go1.20.2.linux-amd64.tar.gz
sudo tar -xvf go1.20.2.linux-amd64.tar.gz
sudo mv go /usr/local

export GOROOT=/usr/local/go
export PATH=$GOPATH/bin:$GOROOT/bin:$PATH

go version 
-- 
go version go1.20.2 linux/amd64 

go install github.com/awslabs/eks-node-viewer/cmd/eks-node-viewer@latest

tree ~/go/bin
cd ~/go/bin

./eks-node-viewer -resources cpu,memory

kar5.png

🧐 워크로드 트러블슈팅

그러나, 노드의 임시 저장 공간이 부족하여 파드가 배치되었다가 추방되는 과정이 반복된다. 이벤트 로그를 확인하면 노드 ephemeral-storage 가 부족하다는데..

 1
 2
 3
 4
 5
 6
 7
 8
 9
10
11
12
13
14
Events:
  Type     Reason                  Age    From                     Message
  ----     ------                  ----   ----                     -------
  Warning  FailedScheduling        3m16s  default-scheduler        0/5 nodes are available: 1 node(s) had untolerated taint {node.kubernetes.io/disk-pressure: }, 4 Insufficient nvidia.com/gpu. preemption: 0/5 nodes are available: 1 Preemption is not helpful for scheduling, 4 No preemption victims found for incoming pod.
  Normal   Nominated               3m12s  karpenter                Pod should schedule on node: ip-192-168-3-68.ap-northeast-2.compute.internal
  Normal   Scheduled               117s   default-scheduler        Successfully assigned kubeflow-user-example-com/test-0 to ip-192-168-3-68.ap-northeast-2.compute.internal
  Normal   SuccessfulAttachVolume  113s   attachdetach-controller  AttachVolume.Attach succeeded for volume "pvc-e503cf70-748c-4a9c-aef8-c94172aa2324"
  Normal   Pulling                 106s   kubelet                  Pulling image "docker.io/istio/proxyv2:1.16.0"
  Normal   Pulled                  99s    kubelet                  Successfully pulled image "docker.io/istio/proxyv2:1.16.0" in 7.047356094s (7.047411717s including waiting)
  Normal   Created                 99s    kubelet                  Created container istio-init
  Normal   Started                 99s    kubelet                  Started container istio-init
  Normal   Pulling                 92s    kubelet                  Pulling image "public.ecr.aws/kubeflow-on-aws/notebook-servers/jupyter-tensorflow:2.12.0-cpu-py310-ubuntu20.04-ec2-v1.0"
  Warning  Evicted                 17s    kubelet                  The node was low on resource: ephemeral-storage.
  Warning  ExceededGracePeriod     7s     kubelet                  Container runtime did not kill the pod within specified grace period.

노드 리소스를 확인하면 jupyter notebook 파드의 memory limit 값이 비이상적으로 설정되어 생기는 원인임을 확인할 수 있다.

kar6.png

 1
 2
 3
 4
 5
 6
 7
 8
 9
10
11
12
13
14
15
16
17
18
19
20
21
22
23
24
25
26
Allocated resources:
  (Total limits may be over 100 percent, i.e., overcommitted.)
  Resource                    Requests     Limits
  --------                    --------     ------
  cpu                         665m (16%)   2600m (66%)
  memory                      1184Mi (1%)  3167538380800m (5%)
  ephemeral-storage           0 (0%)       0 (0%)
  hugepages-1Gi               0 (0%)       0 (0%)
  hugepages-2Mi               0 (0%)       0 (0%)
  attachable-volumes-aws-ebs  0            0
  nvidia.com/gpu              1            1
Events:
  Type     Reason                   Age                  From             Message
  ----     ------                   ----                 ----             -------
  Normal   Starting                 109s                 kube-proxy       
  Normal   RegisteredNode           2m44s                node-controller  Node ip-192-168-1-190.ap-northeast-2.compute.internal event: Registered Node ip-192-168-1-190.ap-northeast-2.compute.internal in Controller
  Normal   Starting                 2m3s                 kubelet          Starting kubelet.
  Warning  InvalidDiskCapacity      2m3s                 kubelet          invalid capacity 0 on image filesystem
  Normal   NodeHasSufficientMemory  2m3s (x3 over 2m3s)  kubelet          Node ip-192-168-1-190.ap-northeast-2.compute.internal status is now: NodeHasSufficientMemory
  Normal   NodeHasNoDiskPressure    2m3s (x3 over 2m3s)  kubelet          Node ip-192-168-1-190.ap-northeast-2.compute.internal status is now: NodeHasNoDiskPressure
  Normal   NodeHasSufficientPID     2m3s (x3 over 2m3s)  kubelet          Node ip-192-168-1-190.ap-northeast-2.compute.internal status is now: NodeHasSufficientPID
  Normal   NodeAllocatableEnforced  2m3s                 kubelet          Updated Node Allocatable limit across pods
  Normal   NodeReady                107s                 kubelet          Node ip-192-168-1-190.ap-northeast-2.compute.internal status is now: NodeReady
  Normal   Unconsolidatable         66s                  karpenter        provisioner default has consolidation disabled # 모으는 설정 비활성화 
  Warning  EvictionThresholdMet     25s                  kubelet          Attempting to reclaim ephemeral-storage
  Normal   NodeHasDiskPressure      20s                  kubelet          Node ip-192-168-1-190.ap-northeast-2.compute.internal status is now: NodeHasDiskPressure

파드 limit 값을 수정하면 해결되지만,, kubeflow 플랫폼을 사용할 때마다 limit 값을 수정할 수 는 없기에 깃 이슈를 생성해둔 상태이다. 이슈가 해결되면 업데이트하겠다.

<a href="https://github.com/awslabs/kubeflow-manifests/issues/748">https://github.com/awslabs/kubeflow-manifests/issues/748</a>

https://github.com/awslabs/kubeflow-manifests/issues/748

이슈를 뒤져보니,, 비슷한 이슈가 있었다. 개발자 측에서 인지하고 있는 문제로 다음 버전 업데이트에 해결될 것 같다.

<a href="https://github.com/awslabs/kubeflow-manifests/issues/540">https://github.com/awslabs/kubeflow-manifests/issues/748</a>

https://github.com/awslabs/kubeflow-manifests/issues/748