AWS EKS Workshop Study (=AEWS)는 EKS Workshop 실습 스터디입니다.
CloudNet@ Gasida(가시다)님이 진행하시며,공개된 AWS EKS Workshop을 기반으로 진행하고 있습니다.
EKS 구축 및 관리 툴인 eksctl은 다양한 구성 옵션을 제공한다. 공식 문서에 정리가 잘 되어 있으며 이번 블로그 글에서 필자 기준의 흥미로운 옵션을 몇 가지 선택하여 테스트한 내용을 공유하고자 한다.
EKS addon 확장을 위한 AWS IAM 정책 생성
EKS 노드로 Spot 인스턴스 사용하기
Spot 인스턴스를 기반으로한 kubeflow 인프라 구성하기
EKS addon 확장을 위한 AWS IAM 정책 생성
EKS addon는 Amazon EKS에서 제공하는 쿠버네티스 클러스터 구성 요소로, 클러스터의 관리, 네트워킹, 로드 밸런싱 등을 담당하는 확장 기능이다. 이러한 addon 을 사용하면 확장 기능의 버전 관리와 업데이트가 쉬워진다. 기본적으로 EKS 설치시 네트워크단의 addon이 설치된다. 설치되는 addon은 다음과 같다.
애드온 이름
설명
CoreDNS
클러스터 내의 DNS 쿼리를 처리하는데 사용된다.
Kube-proxy
쿠버네티스 서비스와 관련된 네트워크 요청을 처리한다.
VPC CNI
쿠버네티스 클러스터 내의 파드 간 네트워킹을 관리하는 Amazon VPC CNI 플러그인이다.
로드밸런싱, 네트워크 등의 추가 addon은 eks 설치 이후 설치가 가능하다. 중요한 점은 addon 설치을 위해서는 필요 IAM 정책이 필요하다. EKS addon 의 확장 기능은 AWS 서비스를 사용하며 이를 위해 AWS 서비스 사용을 위한 IAM 정책이 필요하기 때문이다. eksctl는 addon 설치를 제공하지 않지만, IAM 정책 생성은 제공한다. eksctl를 통해서 노드에 IAM 정책이 부여되는데 부여할 수 있는 리스트는 다음과 같다.
1
2
3
4
5
6
7
8
9
10
11
12
13
14
15
16
17
18
19
nodeGroups:- name:ng-1instanceType:m5.xlargedesiredCapacity:1iam:# addon 정책 부여 withAddonPolicies:imageBuilder: true # 이미지 빌더:사용자 정의 컨테이너 이미지를 빌드하고 관리하는 도구autoScaler: true # 오토 스케일러:클러스터 내에서 자동으로 노드 및 파드 크기를 조정externalDNS: true # 외부 DNS:쿠버네티스 서비스와 인그레스 리소스에 대한 외부 DNS 레코드를 관리certManager: true # 인증서 관리자:쿠버네티스 클러스터 내에서 TLS 인증서를 자동으로 발급 및 관리appMesh: true # 앱 메시:마이크로서비스 간 통신을 관리하고 모니터링하는 서비스 메시appMeshPreview: true # 앱 메시 프리뷰:앱 메시의 베타 기능을 미리 사용할 수 있게 해주는 프리뷰 버전ebs: true # Amazon EBS CSI 드라이버:쿠버네티스 클러스터에서 Amazon EBS 볼륨을 사용할 수 있게 함fsx: true # Amazon FSx CSI 드라이버:쿠버네티스 클러스터에서 Amazon FSx 파일 시스템을 사용할 수 있게 함efs: true # Amazon EFS CSI 드라이버:쿠버네티스 클러스터에서 Amazon EFS 파일 시스템을 사용할 수 있게 함awsLoadBalancerController: true # AWS 로드 밸런서 컨트롤러:AWS 로드 밸런서를 쿠버네티스 서비스와 통합xRay: true # AWS X-Ray:분산 애플리케이션의 성능 문제를 분석하고 디버깅하는 서비스cloudWatch: true # Amazon CloudWatch:AWS 리소스 및 애플리케이션의 모니터링 및 관측을 제공
eksctl 를 통해 설치된 정책은 AWS 콘솔에서 확인이 가능하다.
EKS 노드로 Spot 인스턴스 사용하기
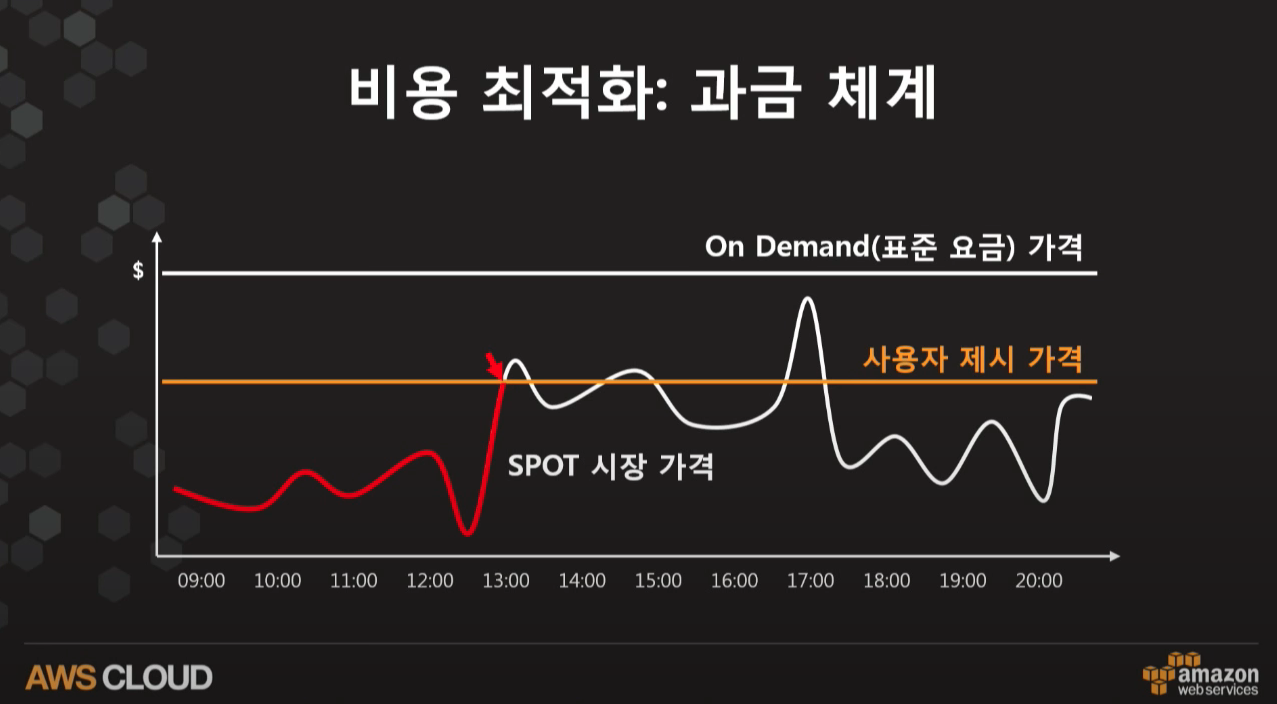
Spot 인스턴스는 AWS의 미사용 컴퓨팅 용량을 할인된 가격으로 제공하는 Amazon EC2 인스턴스 유형이다. Spot 인스턴스는 온디맨드 인스턴스보다 비용이 최대 90% 까지 저렴하게 사용할 수 있지만, 가용성이 떨어질 경우 AWS에 의해 중단될 수 있다. 이러한 이유로 가변 워크로드 처리나 시간에 민감하지 않는 워크로드(데이터 분석, 배치) 작업에 사용된다.
복잡할 것 같지만, Spot 인스턴스의 비용 절감이 가지고 오는 장점이 어마무시하다. 비용 절감의 원리는 다음과 같다.
# spot-ng.yaml---apiVersion:eksctl.io/v1alpha5kind:ClusterConfigmetadata:name:my-eksregion:ap-northeast-2nodeGroups:# 비관리형 노드 그룹 - name:spot-1minSize:0maxSize:2instancesDistribution:maxPrice:0.017instanceTypes:["t3.small","t3.medium"]# At least one instance type should be specifiedonDemandBaseCapacity:0onDemandPercentageAboveBaseCapacity:50spotInstancePools:2managedNodeGroups:# 관리형 노드 그룹 - name:spot-m1instanceTypes:["c3.large","c4.large","c5.large","c5d.large","c5n.large","c5a.large"]spot:truedesiredCapacity:1# 인스턴스를 설정하지 않으면 m5.large로 설정된다. - name:spot-m2spot:truedesiredCapacity:1
관리형 노드 그룹은 spot: ture 을 통해 비관리형 노드 그룹은 instancesDistribution 을 통해 가능하다. 옵션 설정 부분이 많이 차이나는데 관리형 노드 그룹은 AWS가 알아서 설정해주는 반면 비관리형 노드 그룹은 사용자가 자세하게 비용 및 정책을 설정해야 하기 때문이다.
비관리형 노드 그룹을 통해 구성하는 경우가 많으며 spot인스턴스 사용 예에 대해 이해가 필요하다. 아래는 공식 문서에서 제공하는 예를 이해하기 위해 작성하였다.
# 50% 스팟 인스턴스와 50% 온디맨드 인스턴스를 사용하는 노드 그룹nodeGroups:- name:ng-1minSize:2maxSize:5instancesDistribution:maxPrice:0.017instanceTypes:["t3.small","t3.medium"]# At least one instance type should be specifiedonDemandBaseCapacity:0# 항상 사용 가능한 최소 온디맨드 인스턴스 수 onDemandPercentageAboveBaseCapacity:50# 초과하는 인스턴스에 대해 온디맨드 인스턴스를 사용할 비율을 설정(백분율) spotInstancePools:2# 인스턴스 유형과 가용 영역 풀 설정 제한 # GPU 인스턴스도 Spot 인스턴스로 사용가능하다. nodeGroups:- name:ng-gpuinstanceType:mixeddesiredCapacity:1instancesDistribution:instanceTypes:- p2.xlarge- p2.8xlarge- p2.16xlargemaxPrice:0.50# capacity-optimized 용량 최적화 전략으로 할당nodeGroups:- name:ng-capacity-optimizedminSize:2maxSize:5instancesDistribution:maxPrice:0.017instanceTypes:["t3.small","t3.medium"]# At least one instance type should be specifiedonDemandBaseCapacity:0onDemandPercentageAboveBaseCapacity:50spotAllocationStrategy:"capacity-optimized"# capacity-optimized 용량 최적화 전략으로 할당(우선순위로 인스턴스 타입에서 첫 번째 인스턴스가 우선순위로 선택된다.) nodeGroups:- name:ng-capacity-optimized-prioritizedminSize:2maxSize:5instancesDistribution:maxPrice:0.017instanceTypes:["t3a.small","t3.small"]# At least two instance types should be specifiedonDemandBaseCapacity:0onDemandPercentageAboveBaseCapacity:0spotAllocationStrategy:"capacity-optimized-prioritized"
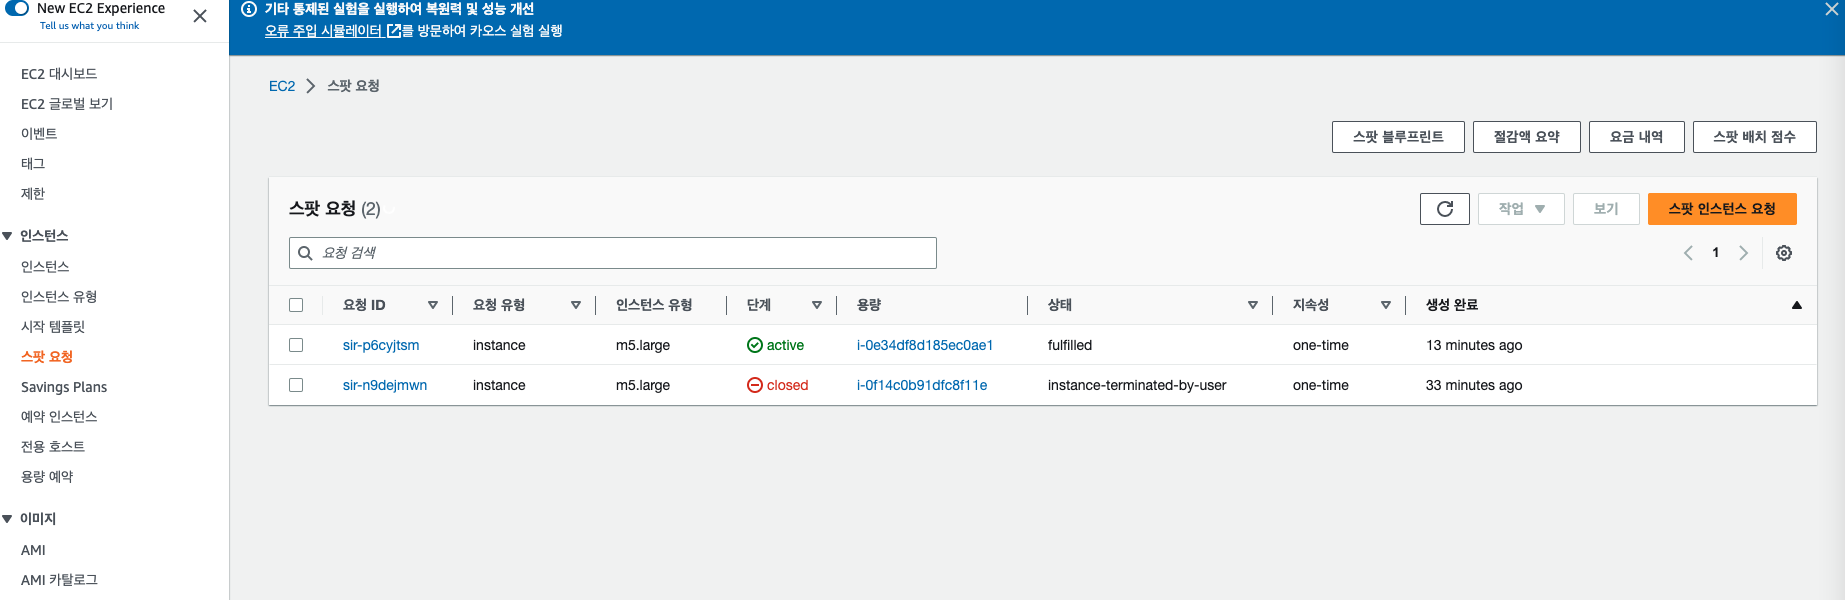
노드 그룹을 배포하면 AWS 콘솔에서 다음과 같이 확인이 가능하다.
1
eksctl create ng --cluster my-eks -f spot-ng.yaml
배포한지 30분이 지났지만 하나의 인스턴스가 실행되었다가 중단되었고 또 다른 인스턴스가 실행되는 것을 확인할 수 있다.
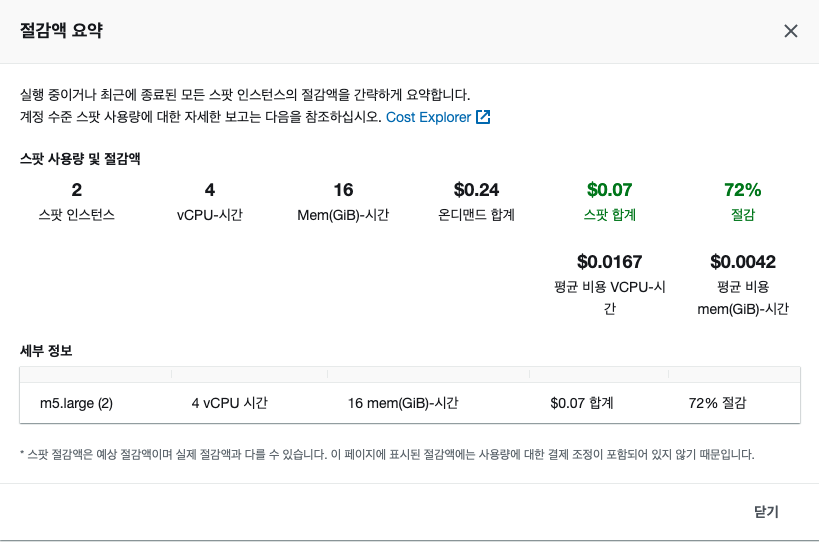
[절감액 요약] 에서 필자가 설정한 인스턴스로 얼마가 절감되었는지 확인할 수 있다.
오오 72퍼센트나..! 유용하게 사용하자!
Spot 인스턴스를 기반으로한 kubeflow 인프라 구성하기
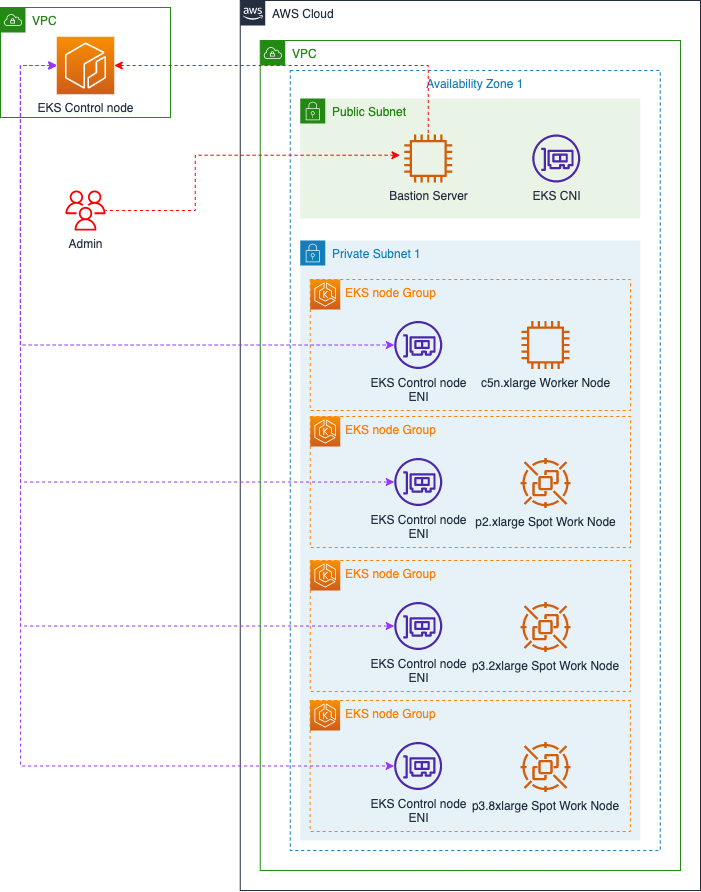
Spot 인스턴스가 가져오는 비용 절감을 통해 쿠버네티스 머신러닝 플랫폼인 kubeflow 인프라를 구성하겠다. 굳이 머신러닝 플랫폼을 정한 이유는 GPU 인스턴스 사용 비용을 최대한으로 절감하고 자원 사용을 최적화시켜줄 수 있어서 선택하였다. eksctl 공식 예에서도 kubeflow에 대한 인프라 구성을 예로 제공하고 있다. 해당 예를 가지고 리전 및 인스턴스를 변경하여 kubeflow 인프라를 구성해보겠다. 아키텍처는 다음과 같다.
GPU 인스턴스(px로 시작)만 Spot 인스턴스로 할당하였다. 최소 0개부터 시작하여 필요할 때만 사용할 수 있도록 하여 비용을 절감할 수 있도록 설정하였다. GPU 인스턴스의 비용을 확인하면 상당히 비싼것을 확인할 수 있는데 서울 리전 기준 p2.xlarge1.465 USD, p3.2xlarge4.234 USD 이다. 약 절반 기준의 비용을 산정해서 Spot 인스턴스의 비용을 설정하였다.
가용 영역을 ap-northeast-2a 에만 설정한 이유는 네트워크 지연 최소화 때문이다. 머신러닝에서 네트워크 지연을 최소화하기위함이며 머신러닝 워크로드 특성상 고가용성을 고려하지 않았다.
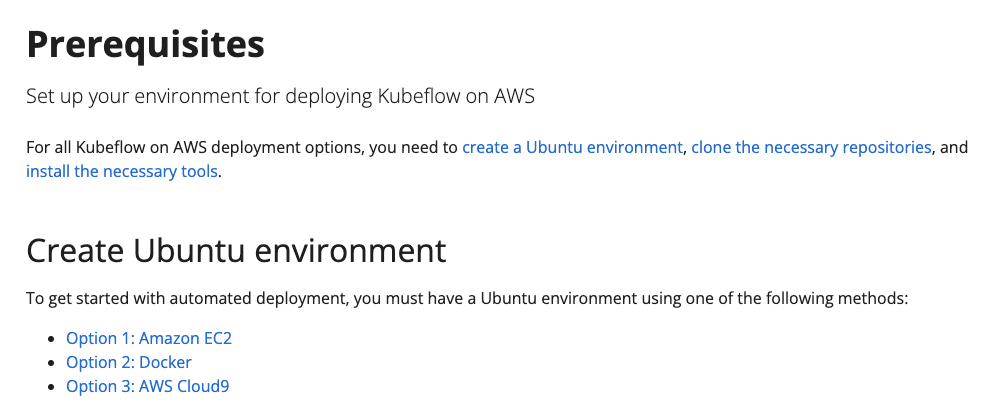
아키텍처로 베스천 서버와 EKS 클러스터를 구축할 것이다. 베스천 서버는 cloudformation 을 통한 EC2 서버로 생성하고, EKS 클러스터는 eksctl 구축하겠다. 베스천 서버의 cloudformation 코드는 필자의 깃허브 repo 를 참고하여 배포하자. 중요한 점은 ami를 ubuntu 지정하였는데 kubeflow 설치를 위해서는 설치 환경이 ubuntu이여만 한다.
# Cost-Optimized EKS cluster for Kubeflow with spot GPU instances and node scale down to zero# Built in efforts to reducing training costs of ML workloads.# Supporting tutorial can be found at the following link: # https://blog.gofynd.com/how-we-reduced-our-ml-training-costs-by-78-a33805cb00cf# This spec creates a cluster on EKS with the following active nodes # - 2x m5a.2xlarge - Accomodates all pods of Kubeflow# It also creates the following nodegroups with 0 nodes running unless a pod comes along and requests for the node to get spun up# - m5a.2xlarge -- Max Allowed 10 worker nodes# - p2.xlarge -- Max Allowed 10 worker nodes# - p3.2xlarge -- Max Allowed 10 worker nodes# - p3.8xlarge -- Max Allowed 04 worker nodes# - p3dn.24xlarge -- Max Allowed 01 worker nodesapiVersion:eksctl.io/v1alpha5kind:ClusterConfigmetadata:# Name of your cluster, change to whatever you find fit.# If changed, make sure to change all nodegroup tags from # 'k8s.io/cluster-autoscaler/my-eks-kubeflow: "owned"' --> 'k8s.io/cluster-autoscaler/your-new-name: "owned"'name:my-eks-kubeflow# choose your region wisely, this will significantly impact the cost incurredregion:ap-northeast-2# 1.14 Kubernetes version since Kubeflow 1.0 officially supports the sameversion:'1.25'tags:# Add more cloud tags if needed for billingenvironment:staging# Add all possible AZs to ensure nodes can be spun up in any AZ later on. # THIS CAN'T BE CHANGED LATER. YOU WILL HAVE TO CREATE A NEW CLUSTER TO ADD NEW AZ SUPPORT.# This list applies to the whole cluster and isn't specific to nodegroupsvpc:id:vpc-04686564a10b92c9ccidr:192.168.0.0/16securityGroup:sg-0ea8529af823353e9nat:gateway:HighlyAvailablesubnets:public:public-2a:id:subnet-03eeb6d32aa5397bfcidr:192.168.1.0/24public-2c:id:subnet-023bc1a3fce0cde07cidr:192.168.2.0/24private:private-2a:id:subnet-02c160be5273d5171cidr:192.168.3.0/24private-2c:id:subnet-018a370a44f973ac4cidr:192.168.4.0/24iam:withOIDC:truenodeGroups:- name:ng-1desiredCapacity:4minSize:0maxSize:10# Set one nodegroup with 100GB volumes for Kubeflow to get deployed. # Kubeflow requirement states 1-2 Nodes with 100GB volume attached to the node. volumeSize:100volumeType:gp2instanceType:c5n.xlargeprivateNetworking:truessh:publicKeyName:eks-terraform-keyavailabilityZones:- ap-northeast-2alabels:node-class:"worker-node"tags:# EC2 tags required for cluster-autoscaler auto-discoveryk8s.io/cluster-autoscaler/node-template/label/lifecycle:OnDemandk8s.io/cluster-autoscaler/node-template/label/aws.amazon.com/spot:"false"k8s.io/cluster-autoscaler/node-template/label/gpu-count:"0"k8s.io/cluster-autoscaler/enabled:"true"k8s.io/cluster-autoscaler/my-eks-kubeflow:"owned"iam:withAddonPolicies:awsLoadBalancerController:trueautoScaler:truecloudWatch:trueefs:trueebs:trueexternalDNS:true- name:1-gpu-spot-p2-xlargeminSize:0maxSize:10instancesDistribution:# set your own max price. AWS spot instance prices no longer cross OnDemand price. # Comment out the field to default to OnDemand as max price. maxPrice:0.7instanceTypes:["p2.xlarge"]onDemandBaseCapacity:0onDemandPercentageAboveBaseCapacity:0spotAllocationStrategy:capacity-optimizedlabels:lifecycle:Ec2Spotaws.amazon.com/spot:"true"gpu-count:"1"# Stick to one AZ for all GPU nodes. # In case of termination, this will prevent volumes from being unavailable # if the new instance got spun up in another AZ.privateNetworking:truessh:publicKeyName:eks-terraform-keyavailabilityZones:- ap-northeast-2ataints:- key:spotInstancevalue:"true"effect:PreferNoScheduletags:k8s.io/cluster-autoscaler/node-template/label/lifecycle:Ec2Spotk8s.io/cluster-autoscaler/node-template/label/aws.amazon.com/spot:"true"k8s.io/cluster-autoscaler/node-template/label/gpu-count:"1"k8s.io/cluster-autoscaler/node-template/taint/spotInstance:"true:PreferNoSchedule"k8s.io/cluster-autoscaler/enabled:"true"k8s.io/cluster-autoscaler/my-eks-kubeflow:"owned"iam:withAddonPolicies:autoScaler:truecloudWatch:trueawsLoadBalancerController:trueefs:trueebs:trueexternalDNS:true- name:1-gpu-spot-p3-2xlargeminSize:0maxSize:10instancesDistribution:# set your own max price. AWS spot instance prices no longer cross OnDemand price. # Comment out the field to default to OnDemand as max price. maxPrice:2.0instanceTypes:["p3.2xlarge"]onDemandBaseCapacity:0onDemandPercentageAboveBaseCapacity:0spotAllocationStrategy:capacity-optimizedlabels:lifecycle:Ec2Spotaws.amazon.com/spot:"true"gpu-count:"1"# Stick to one AZ for all GPU nodes. # In case of termination, this will prevent volumes from being unavailable # if the new instance got spun up in another AZ.privateNetworking:truessh:publicKeyName:eks-terraform-keyavailabilityZones:- ap-northeast-2ataints:- key:spotInstancevalue:"true"effect:PreferNoScheduletags:k8s.io/cluster-autoscaler/node-template/label/lifecycle:Ec2Spotk8s.io/cluster-autoscaler/node-template/label/aws.amazon.com/spot:"true"k8s.io/cluster-autoscaler/node-template/label/gpu-count:"1"k8s.io/cluster-autoscaler/node-template/taint/spotInstance:"true:PreferNoSchedule"k8s.io/cluster-autoscaler/enabled:"true"k8s.io/cluster-autoscaler/my-eks-kubeflow:"owned"iam:withAddonPolicies:autoScaler:truecloudWatch:trueawsLoadBalancerController:trueefs:trueebs:trueexternalDNS:true- name:4-gpu-spot-p3-8xlargeminSize:0maxSize:4instancesDistribution:# set your own max price. AWS spot instance prices no longer cross OnDemand price. # Comment out the field to default to OnDemand as max price. maxPrice:4.4instanceTypes:["p3.8xlarge"]onDemandBaseCapacity:0onDemandPercentageAboveBaseCapacity:0spotAllocationStrategy:capacity-optimizedlabels:lifecycle:Ec2Spotaws.amazon.com/spot:"true"gpu-count:"4"# Stick to one AZ for all GPU nodes. # In case of termination, this will prevent volumes from being unavailable # if the new instance got spun up in another AZ.privateNetworking:truessh:publicKeyName:eks-terraform-keyavailabilityZones:- ap-northeast-2ataints:- key:spotInstancevalue:"true"effect:PreferNoScheduletags:k8s.io/cluster-autoscaler/node-template/label/lifecycle:Ec2Spotk8s.io/cluster-autoscaler/node-template/label/aws.amazon.com/spot:"true"k8s.io/cluster-autoscaler/node-template/label/gpu-count:"4"k8s.io/cluster-autoscaler/node-template/taint/spotInstance:"true:PreferNoSchedule"k8s.io/cluster-autoscaler/enabled:"true"k8s.io/cluster-autoscaler/my-eks-kubeflow:"owned"iam:withAddonPolicies:autoScaler:truecloudWatch:trueawsLoadBalancerController:trueefs:trueebs:trueexternalDNS:trueaddons:- name:vpc-cni# no version is specified so it deploys the default versionversion:v1.12.6-eksbuild.1attachPolicyARNs:- arn:aws:iam::aws:policy/AmazonEKS_CNI_Policy- name:kube-proxyversion:latest# auto discovers the latest available- name:corednsversion:latest# v1.9.3-eksbuild.2
withAddonPolicies 정책에서 efs: true 가 추가된 것을 확인할 수 있는데 머신러닝의 데이터 셋을 공유 스토리지로 활용하여 모델 훈련 및 추론에 대한 더 나은 성능을 얻을 수 있기 때문에 추가하였다.
spec:revisionHistoryLimit:10selector:matchLabels:name:nvidia-device-plugin-dstemplate:metadata:annotations:scheduler.alpha.kubernetes.io/critical-pod:""creationTimestamp:nulllabels:name:nvidia-device-plugin-dsspec:nodeSelector:# 추가 gpu-count:""#추가
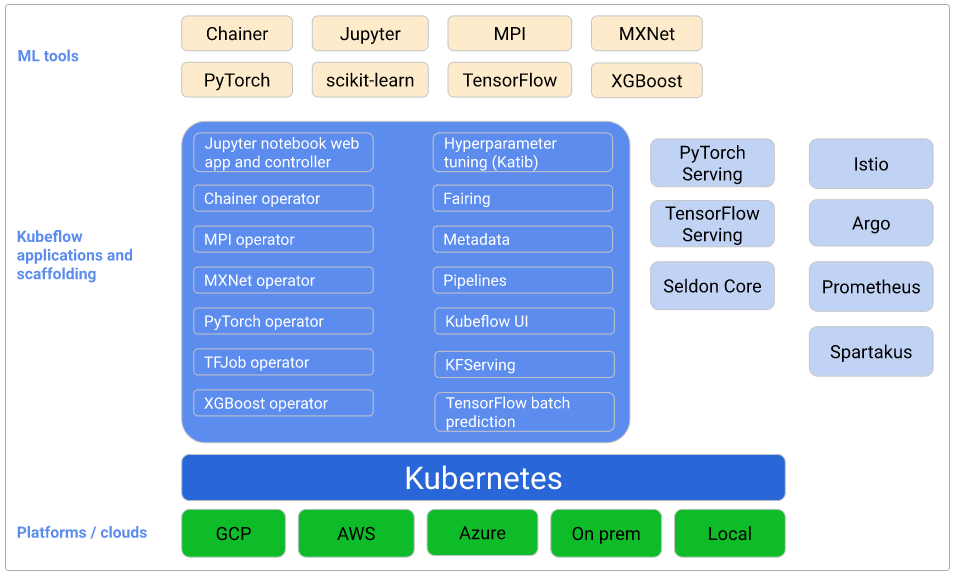
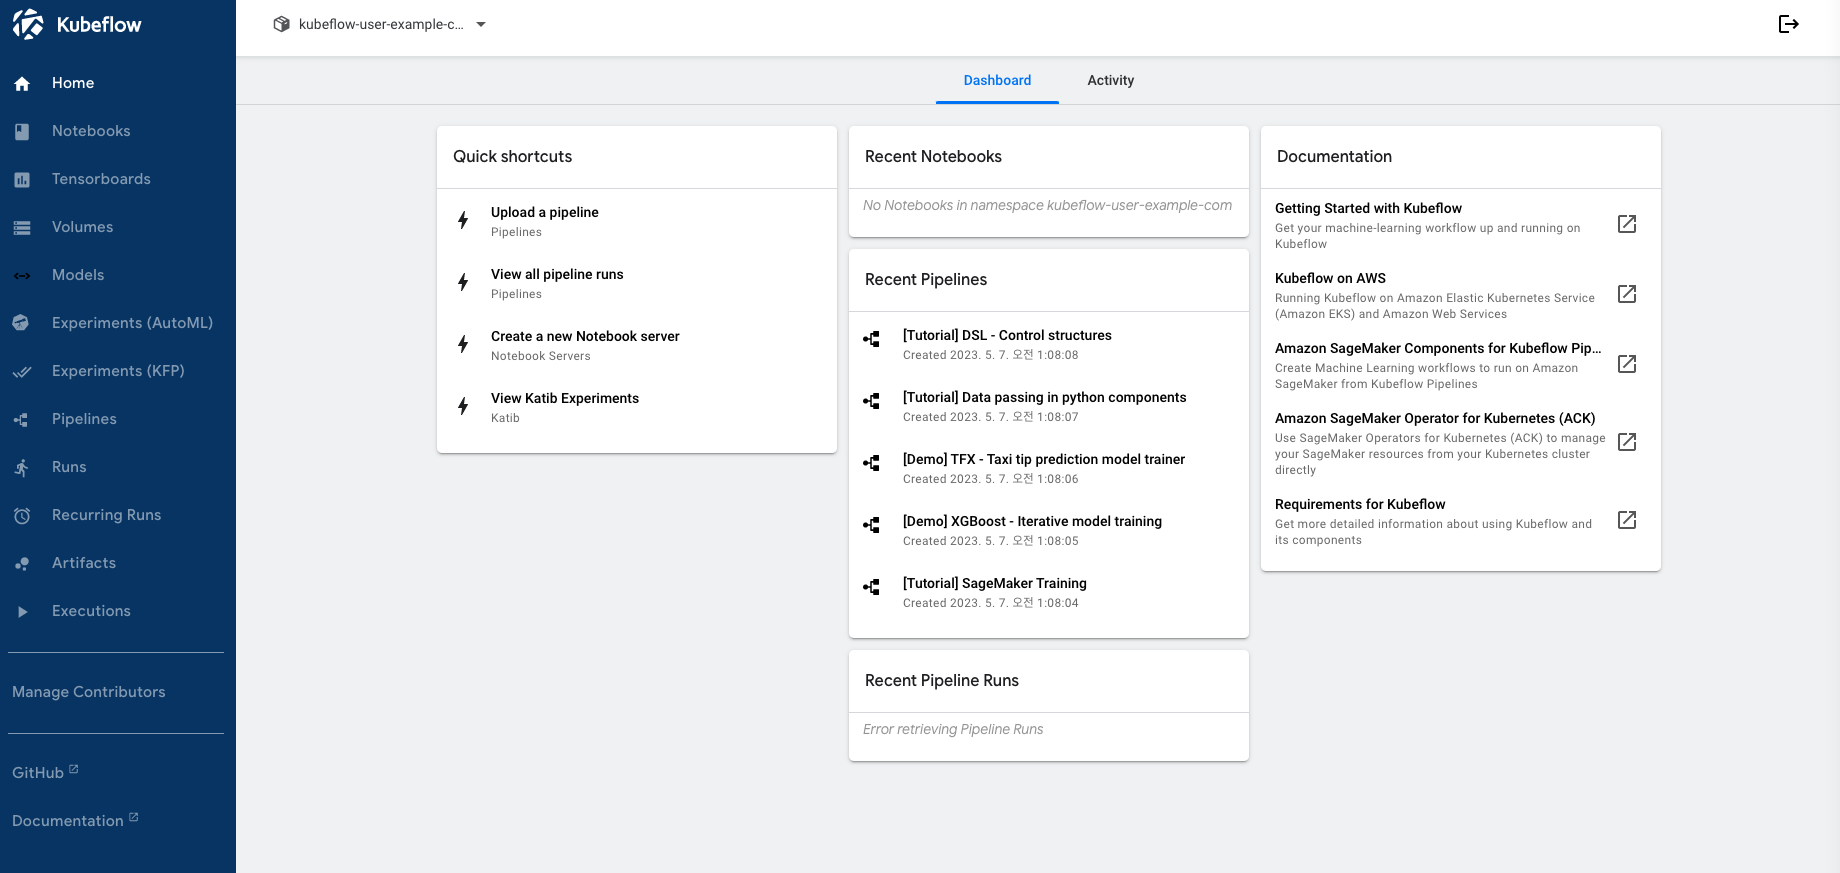
ML tools: 머신러닝 도구들은 데이터 전처리, 모델 학습, 평가, 최적화 및 배포와 같은 머신러닝 워크플로를 지원하는 소프트웨어 라이브러리 및 프레임워크이다.
Kubeflow applications and scaffolding: Kubeflow 애플리케이션 및 스캐폴딩은 Kubeflow 플랫폼에서 제공하는 기본 뼈대와 도구들로, 사용자가 머신러닝 워크플로를 쉽게 구축하고 관리할 수 있도록 지원한다. 머신러닝 오픈소스 뿐만 아니라 istio, prometheus, argo 등의 오픈소스가 있는 것을 확인할 수 있는데 해당 서비스를 결합하여 대시보드, 서비스 메시, 파이프라인 구성에 사용된다.
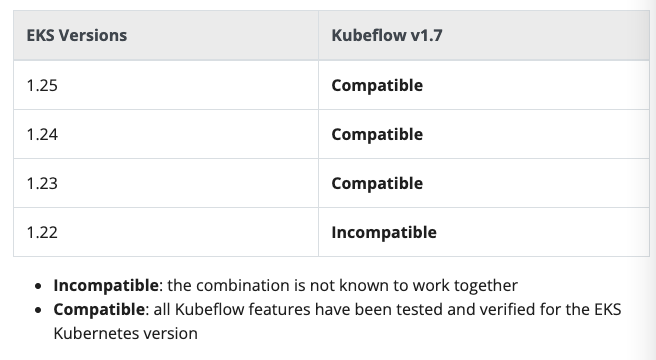
kubeflow 배포 전 작업으로 버전 확인 및 필요 addon 설치가 필요하다. 23년 5월 기준 EKS 버전 제공별 kubeflow 버전 지원은 다음의 그림을 통해 참고하자. 필자의 EKS 버전은 1.25로 kubeflow 1.7를 설치하겠다.
다음 과정으로 필요 패키지 및 addon 설치를 진행하자. 패키지의 경우 공식 문서의 명령어를 통해 쉽게 설치가 가능하다.
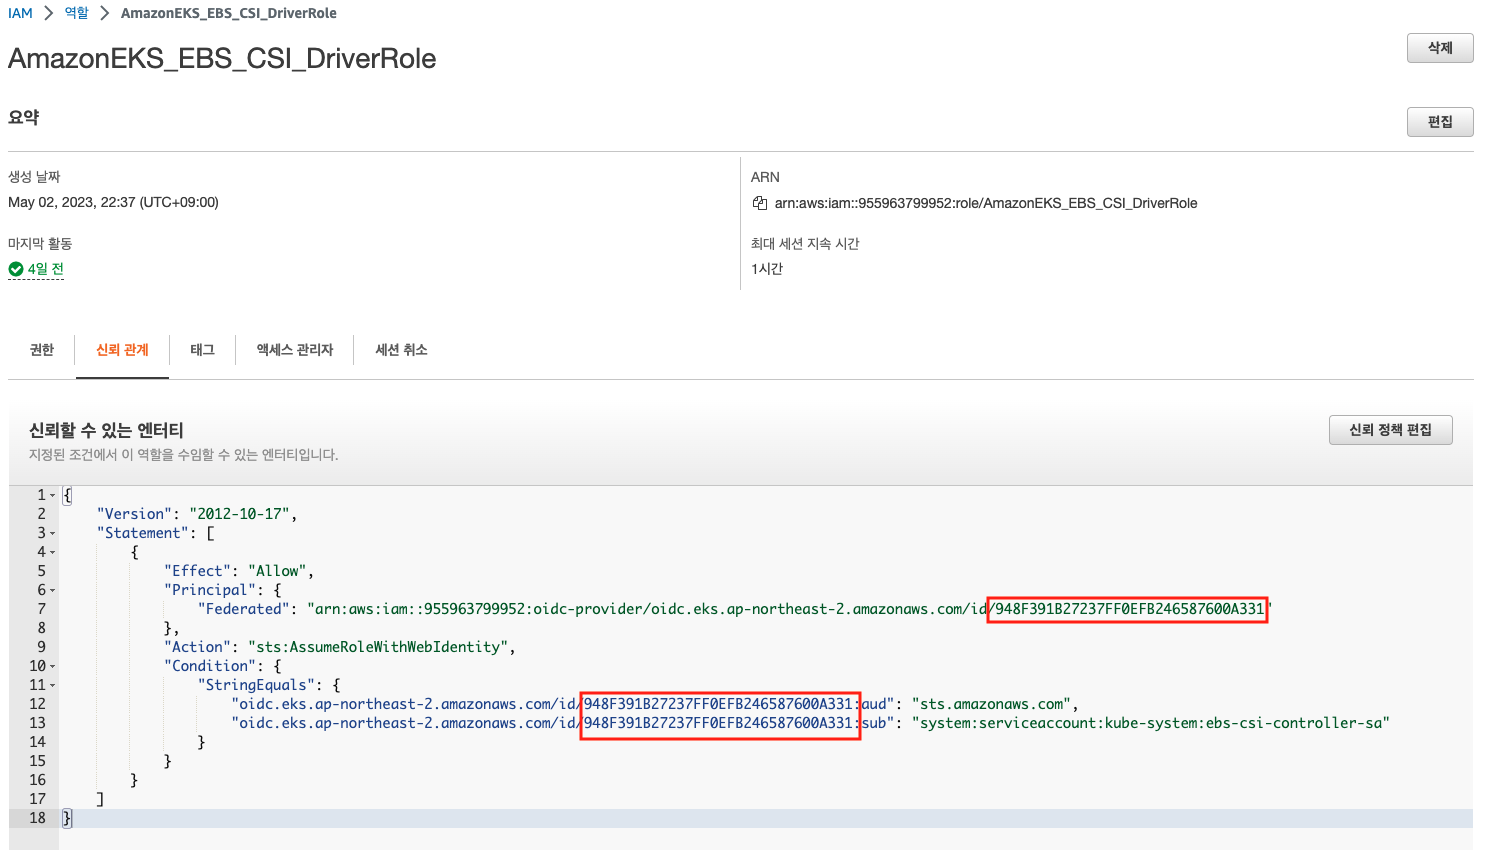
# 롤 생성aws iam create-role \
--role-name AmazonEKS_EBS_CSI_DriverRole \
--assume-role-policy-document file://"aws-ebs-csi-driver-trust-policy.json"# 정책 attachaws iam attach-role-policy \
--policy-arn arn:aws:iam::aws:policy/service-role/AmazonEBSCSIDriverPolicy \
--role-name AmazonEKS_EBS_CSI_DriverRole
정책 attach까지 완료하였으면 해당 정책을 쿠버네티스 내에서 사용하기 위해 사용자 어카운트에 연동이 필요하다.
1
2
3
4
5
6
# sa 생성 kubectl create sa ebs-csi-controller-sa -n kube-system
# Role annotationkubectl annotate serviceaccount ebs-csi-controller-sa \
-n kube-system \
eks.amazonaws.com/role-arn=arn:aws:iam::955963799952:role/AmazonEKS_EBS_CSI_DriverRole
# 스토리지 클래스 배포kubectl apply -f ebs-sc.yaml
# 기본 클래스 수정kubectl patch storageclass gp2 -p '{"metadata": {"annotations":{"storageclass.kubernetes.io/is-default-class":"false"}}}'
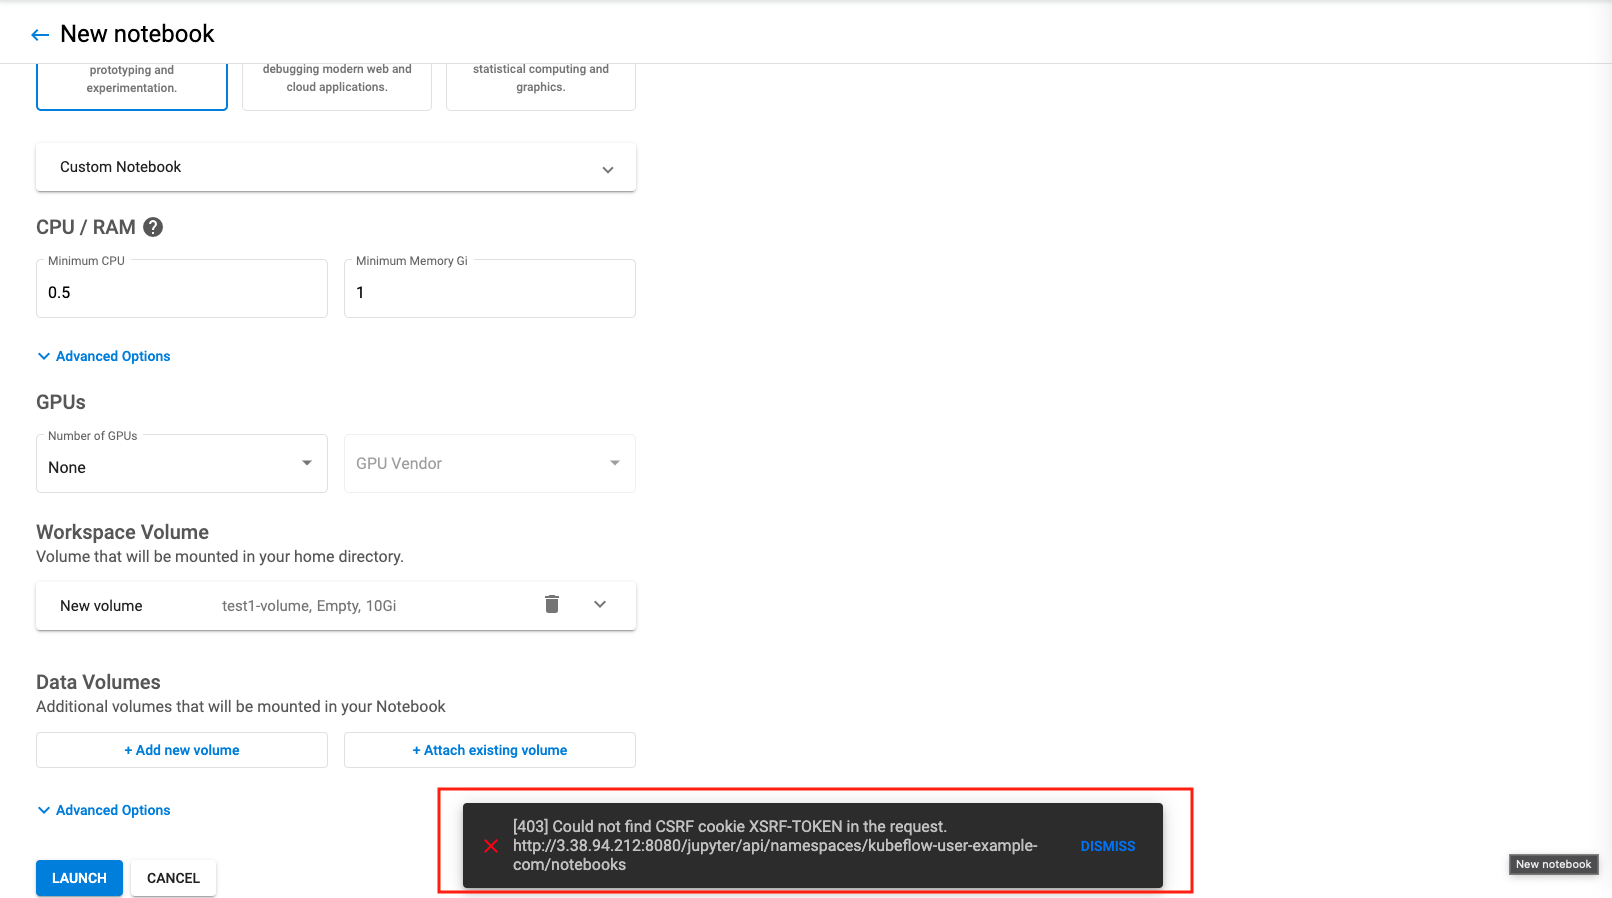
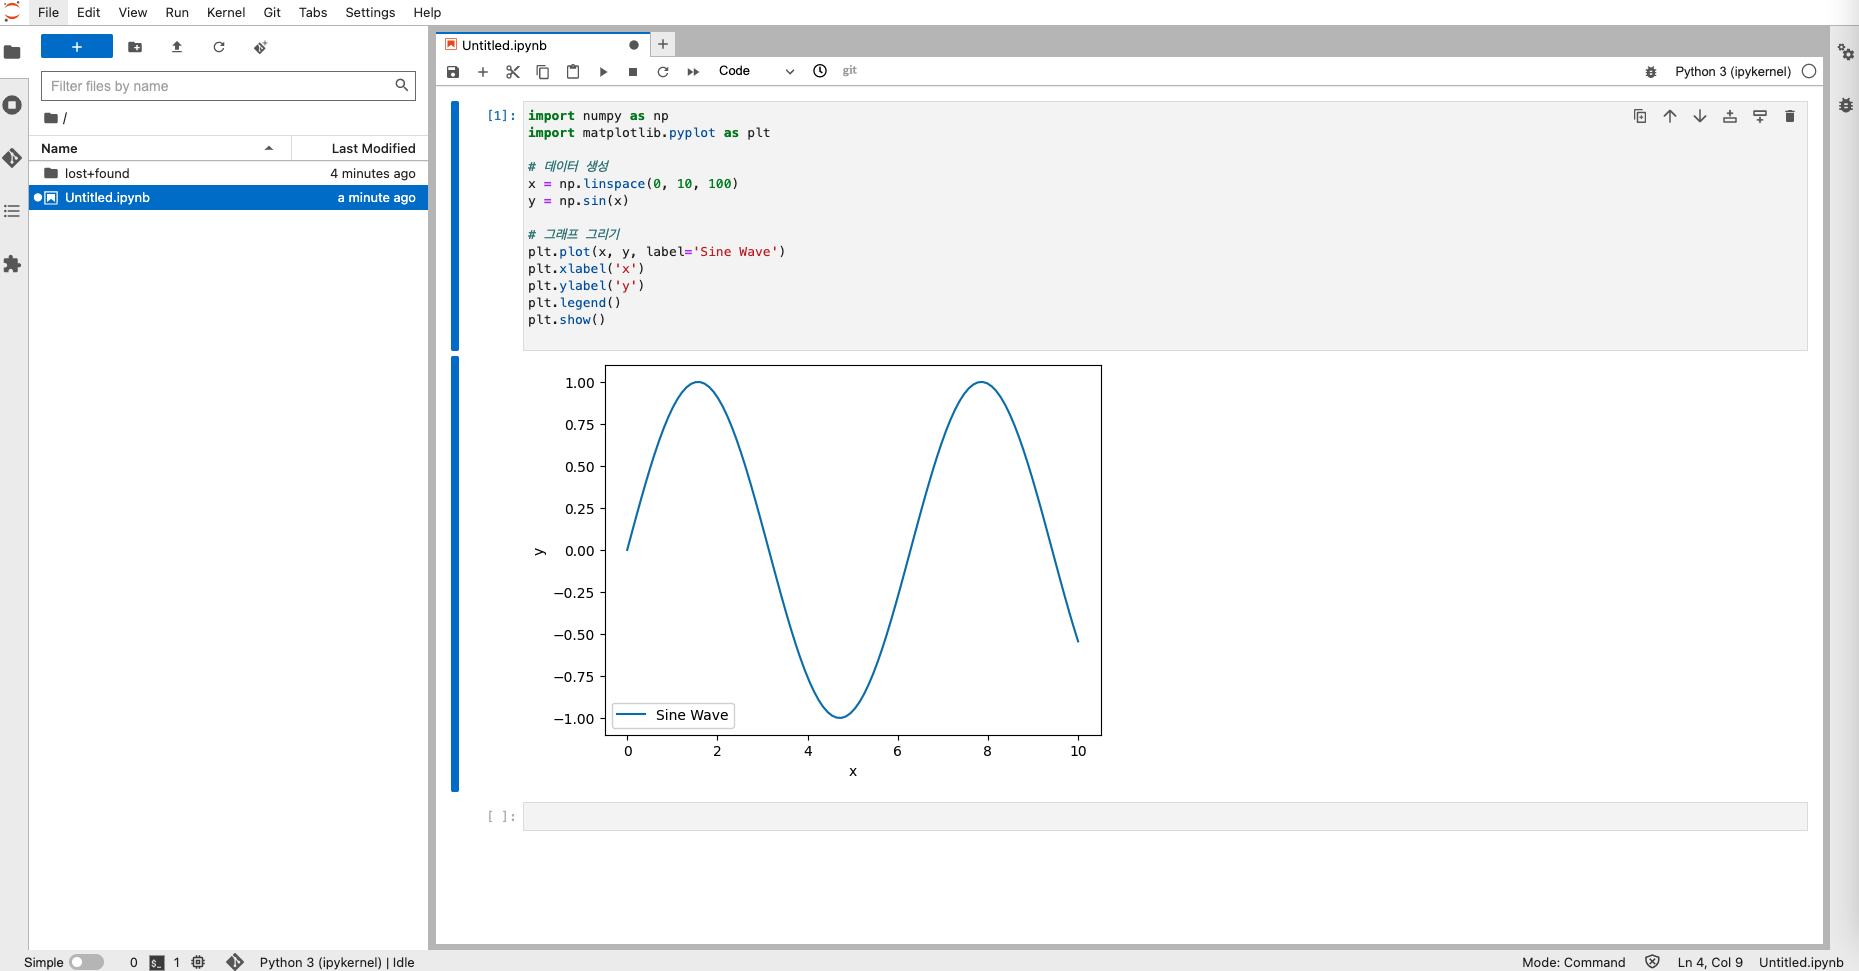
마지막으로 kubeflow 배포를 진행하겠다. 배포는 앞서 깃으로 클론한 레파지토리에 매니패스트 명령어를 통해 진행하겠다.
1
2
3
4
5
exportCLUSTER_NAME=my-eks-kubeflow
exportCLUSTER_REGION=ap-northeast-2
# 설치 명령어 make deploy-kubeflow INSTALLATION_OPTION=kustomize DEPLOYMENT_OPTION=vanilla
...
All istio pods are running!
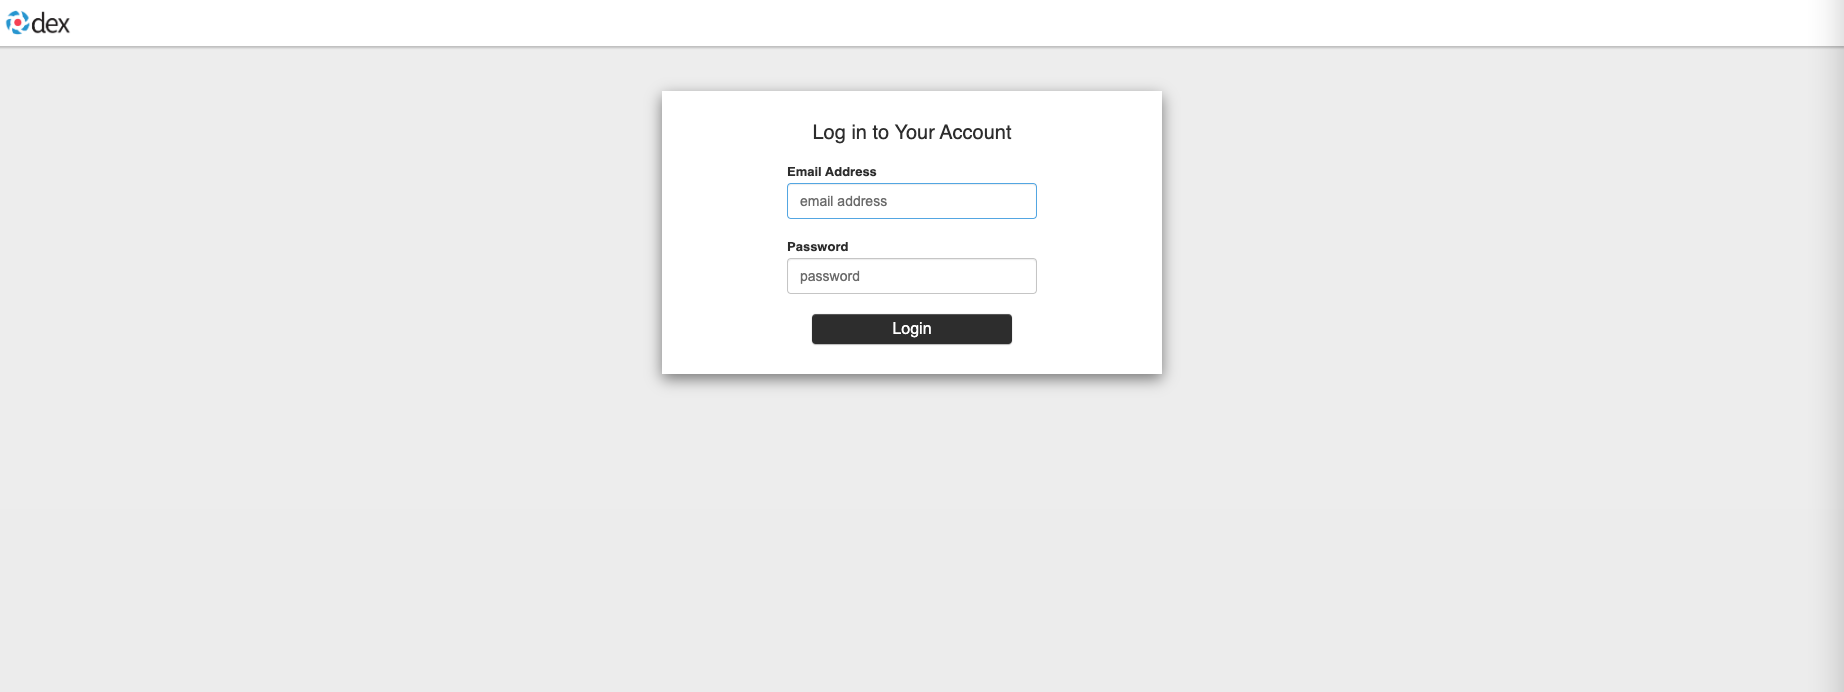
==========Installing dex==========Release "dex" does not exist. Installing it now.
NAME: dex
LAST DEPLOYED: Tue May 2 22:47:51 2023NAMESPACE: default
STATUS: deployed
REVISION: 1TEST SUITE: None
Waiting for dex pods to be ready ...
running command: kubectl wait --for=condition=ready pod -l 'app in (dex)' --timeout=240s -n auth
pod/dex-56d9748f89-99ggv condition met
All dex pods are running!
==========Installing oidc-authservice==========Release "oidc-authservice" does not exist. Installing it now.
NAME: oidc-authservice
LAST DEPLOYED: Tue May 2 22:48:01 2023NAMESPACE: default
STATUS: deployed
REVISION: 1TEST SUITE: None
Waiting for oidc-authservice pods to be ready ...
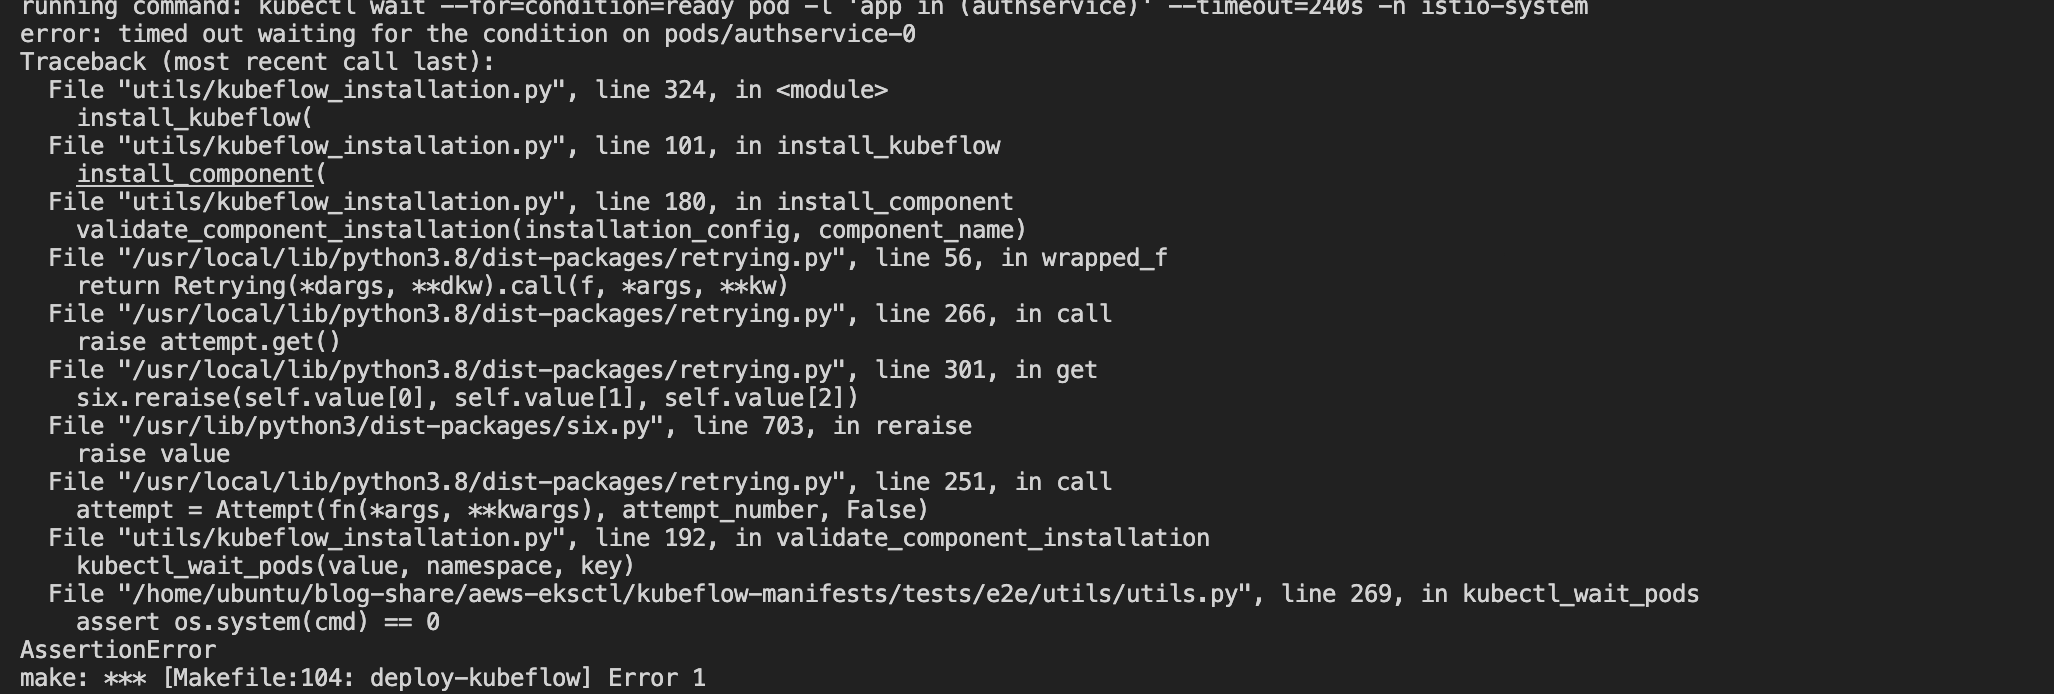
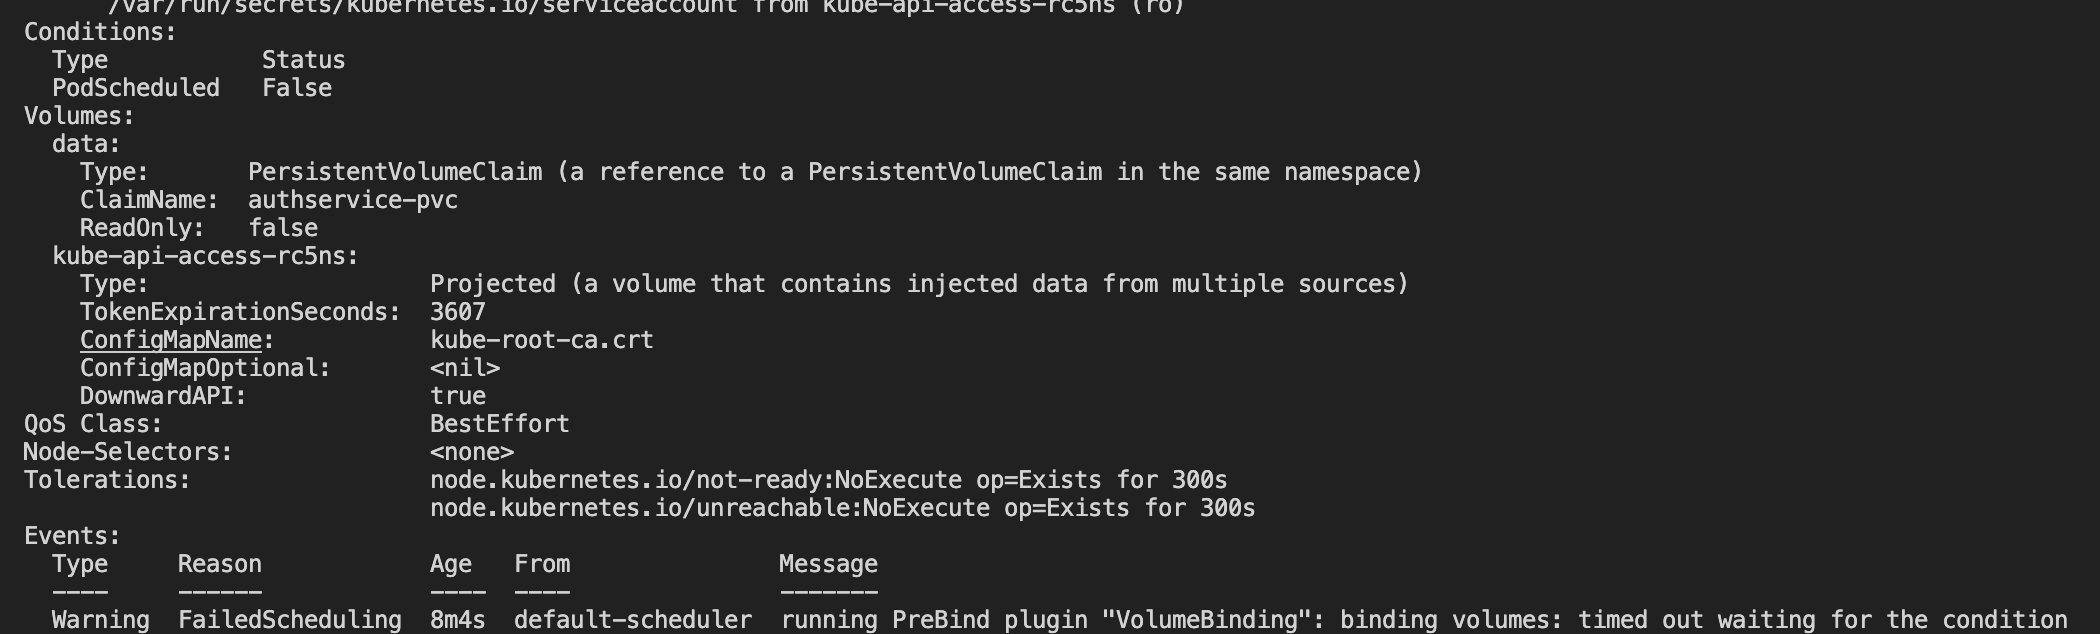
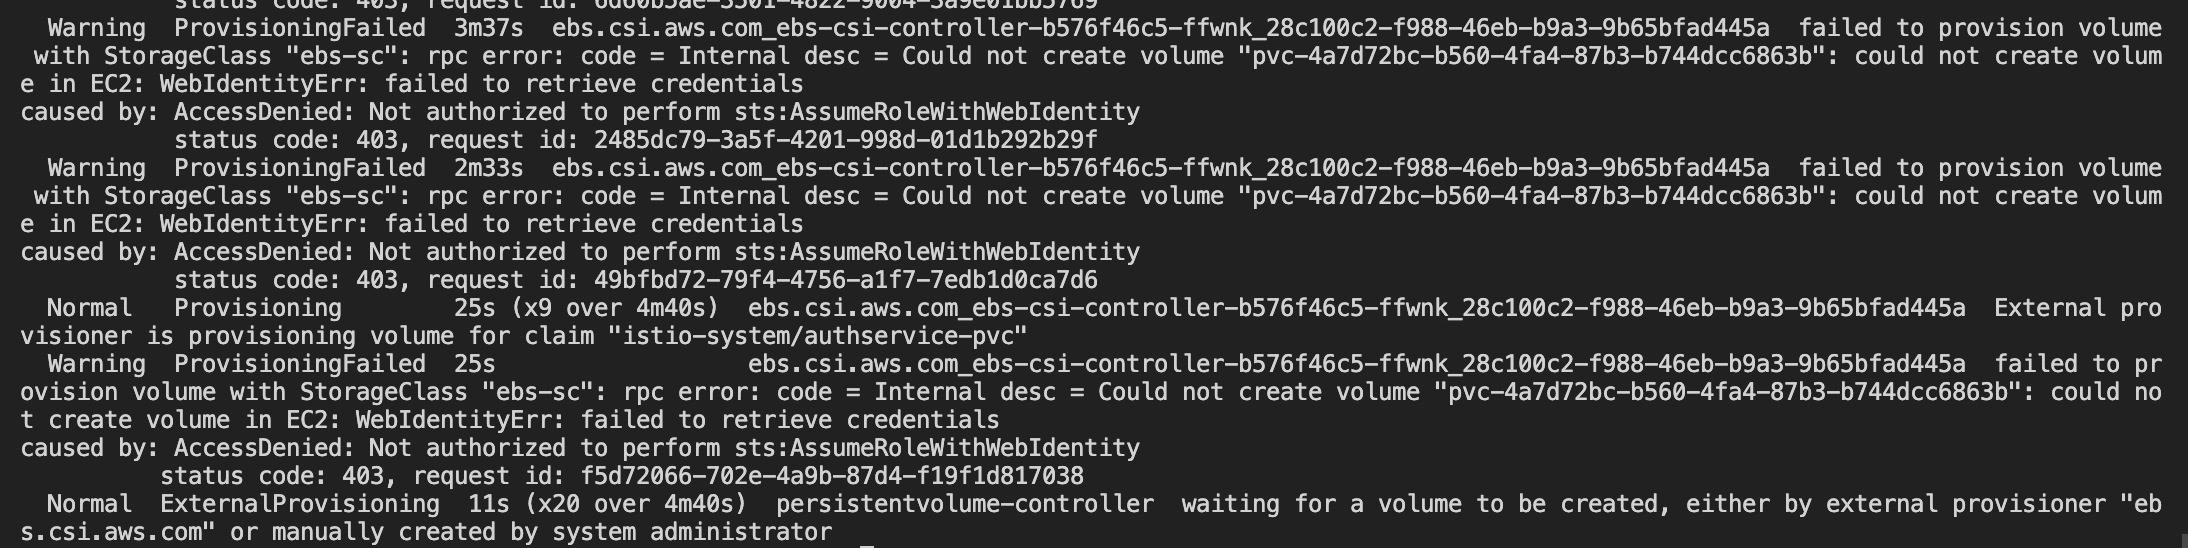
running command: kubectl wait --for=condition=ready pod -l 'app in (authservice)' --timeout=240s -n istio-system
error: timed out waiting for the condition on pods/authservice-0
Waiting for oidc-authservice pods to be ready ...
running command: kubectl wait --for=condition=ready pod -l 'app in (authservice)' --timeout=240s -n istio-system
error: timed out waiting for the condition on pods/authservice-0
Waiting for oidc-authservice pods to be ready ...
running command: kubectl wait --for=condition=ready pod -l 'app in (authservice)' --timeout=240s -n istio-system