T101 3기(=Terraform 101 Study)는 Terraform 실무 실습 스터디입니다.
CloudNet@ 유형욱, 윤서율님이 진행하시며, 책 "테라폼으로 시작하는 IaC"을 기반으로 진행하고 있습니다.
들어가기 전
이번 스터디 활동은 T101 3기다. 6주동안 Terraform과 관련된 실무 예제와 노하우에 대해 정리하여 공유할 예정이다. 1주차에는 IaC에 대한 기본 내용과 테라폼 소개, 문법를 스터디하였다. 이에 대한 내용을 정리할까 했지만, 앞 선 기수에 참여하신 분들의 블로그 글이 너무나 잘 되어 있어 다른 방향으로 작성할까 한다. 다른 방향은 평소 필자가 궁금했던 내용, 여러 세미나에서 주워들은 내용들에 대한 실습이 될 것 같다.
먼저 포스트할 글의 주제는 테라폼 코드 Import와 멀티클러스터 마이그레이션에 대해 작성할 것이다. 이 두 개의 주제는 이어지는 시나리오일 듯 싶다. 가상의 목표로 설명하자면, 무중단 서비스 제공을 위해 운영 중인 AWS 리소스들에 대해 테라폼으로 전환한 후(IaC)한 후 멀티클러스터 방법으로 마이그레이션하겠다.
Terraform Import은 기존 AWS 클라우드 리소스를 테라폼 코드로 변환하는 작업이다. 이는 클라우드를 서비스를 수동으로 관리하는 대신 코드로 인프라를 관리한다는 의미이다. 코드로 인프라를 관리하게 되면 얻을 수 있는 장점은 다음과 같다. (책 참고)
속도와 효율성 : 자동화된 시스템은 인간의 실수를 줄이고, 보다 효율적인 리소스 관리를 가능하게 하여 비용 절감 및 생산성을 높일 수 있다. 또한, 코드로 변경하기에 기존 방식보다 변경 속도가 빠르다.
버전 관리 : 코드로 인프라를 정의하면 Git과 같은 버전 관리 시스템을 통해 변경 내역을 추적하고 롤백할 수 있다.
협업 :파일 형태로 되어 있어 쉽게 공유할 수 있고, 버전 관리 툴과 연계하여 공동 작업을 위한 환경을 만들 수 있다.
재사용성 : 코드로 되어 있기 때문에 다른 프로젝트나 환경에서 쉽게 재사용할 수 있다.
기술의 자산화: 관리 노하우와 작업 방식이 코드에 녹아 있고, 파이프라인에 통합해 자산화되어 기술 부채를 제거할 수 있다.
Terraform Import and Tools
Terraform CLI로 Import를 할 수 있지만, 리소스 별로 매칭시켜야 하는 단점이 있다. 깃허브 Terraform awesome-terraform 를 확인하면 테라폼에 대한 여러 팁과 기술들을 확인할 수 있다. 이 중 AWS 리소스 관련 Import 도구가 존재한다.
[Import Tools]
terraformer : 기존 인프라에서 Terraform 파일을 생성하는 CLI 도구이다. (Star 10.7K)
former2 : AWS 계정 내의 기존 리소스에서 Terraform 구성을 생성한다.(Star 1.9k)
terracognita - 기존 클라우드 제공자(역 Terraform)에서 읽고 Terraform 구성에서 인프라를 코드로 생성한다. (Star 1.8k)
aws2tf : 기존 AWS 리소스를 Terraform으로 가져오는 작업을 자동화하고 Terraform HCL 코드를 출력합니다. (Star 295)
도구들 중 가장 Star가 많은 terrafomer를 선택하여 EKS를 TF code로 변환할 것이다.
AWS 리소스 배포
테라폼 추출 리소스 대상으로 EKS를 선택하였다. EKS는 AEWS 스터디에서 공유해주신 원 클릭 파일(cloudformation, eksctl) 로 구성하였다. 참고 내용과 구성 방법은 필자의 블로그 글을 확인하자.
# 구성 파일 다운로드 curl -O https://s3.ap-northeast-2.amazonaws.com/cloudformation.cloudneta.net/K8S/eks-oneclick5.yam
# 배포 <*> 로 표시된 매개변수에 값을 입력하자. aws cloudformation deploy --template-file eks-oneclick5.yaml --stack-name myeks --parameter-overrides KeyName=<iam Key name> MyIamUserAccessKeyID=<AWS Access Key> MyIamUserSecretAccessKey=<AWS Secret Key> ClusterBaseName=<cluster name> --region ap-northeast-2
# 베스천 서버 접속 ssh -i <key-file-name>.pem ec2-user@$(aws cloudformation describe-stacks --stack-name myeks --query 'Stacks[*].Outputs[0].OutputValue' --output text)---
The authenticity of host '43.201.6.136 (43.201.6.136)' can't be established.
ED25519 key fingerprint is SHA256:Ej5/5MfPW4sRGuQvwAcVkC609QUJR4nXjfBF64FEsDY.
This key is not known by any other names
Are you sure you want to continue connecting (yes/no/[fingerprint])? yes
# 클러스터 확인, 배포 약 20분 소요kubectl get pods -A
--
NAMESPACE NAME READY STATUS RESTARTS AGE
kube-system aws-node-9sjp9 2/2 Running 0 76m
kube-system aws-node-wglbd 2/2 Running 0 76m
kube-system coredns-b65b7888f-st5rb 1/1 Running 0 73m
kube-system coredns-b65b7888f-zmh5s 1/1 Running 0 73m
kube-system ebs-csi-controller-cb695654d-d2blq 6/6 Running 0 72m
kube-system ebs-csi-controller-cb695654d-fh9qz 6/6 Running 0 72m
kube-system ebs-csi-node-2689h 3/3 Running 0 72m
kube-system ebs-csi-node-xwhh9 3/3 Running 0 72m
kube-system kube-proxy-7mlxg 1/1 Running 0 74m
kube-system kube-proxy-nr6xs 1/1 Running 0 74m
Terraformer 를 통한 EKS Import
이어서 MAC환경에서 terraformer 를 설치하고 EKS를 Import 하겠다. 설치 방법은 다음과 같다.
1
2
3
4
5
6
7
# terraformer 설치brew install terraformer
# 테스트 진행terraformer import aws --resources=eks
---
2023/08/31 17:21:36 aws importing default region
2023/08/31 17:21:36 open /Users/mzc02-hseungho/.terraform.d/plugins/darwin_amd64: no such file or directory
설치 이후 Import 시 프로바이더가 없어 에러가 발생한다. 아래 시스템 아키텍처를 참고하여 프로바이더를 설치하자. 프로바이더는 hashicorp release에서 확인할 수 있다.
1
2
3
4
5
# darwin_amd64 환경 aws 설치mkdir -p ~/.terraform.d/plugins/darwin_amd64
cd ~/.terraform.d/plugins/darwin_amd64
curl -OL https://releases.hashicorp.com/terraform-provider-aws/5.14.0/terraform-provider-aws_5.14.0_darwin_amd64.zip
unzip terraform-provider-aws_5.14.0_darwin_amd64.zip
terraformer import aws --resources=eks
--
2023/08/31 17:30:22 aws importing default region
2023/08/31 17:30:27 aws importing... eks
2023/08/31 17:30:27 aws done importing eks
2023/08/31 17:30:27 Number of resources for service eks: 22023/08/31 17:30:27 Refreshing state... aws_eks_cluster.tfer--hanhorang
2023/08/31 17:30:27 Refreshing state... aws_eks_node_group.tfer--ng1
2023/08/31 17:30:27 Filtered number of resources for service eks: 22023/08/31 17:30:27 aws Connecting....
2023/08/31 17:30:27 aws save eks
2023/08/31 17:30:27 aws save tfstate for eks
tree .
---
.
├── eks_cluster.tf
├── eks_node_group.tf
├── outputs.tf
├── provider.tf
└── terraform.tfstate
eks만 tf로 변환되었다. 추가로, EKS와 연관된 VPC, nat gateway 와 베스천 서버도 변환이 필요하다. 깃허브 문서를 참고하면 --filter으로 태그에 설정된 리소스만 가져오거나, --exclude 전체 리소스를 가져오는 데 특정 리소스만 빼서 가져올 수 있다. 이를 조합하여 EKS가 배포된 VPC에 포함된 리소스를 가져오자.
# terraformer import aws --resources=vpc,subnet,route_table,igw,sg,nat,eks,ec2 --filter=vpc=<vpc-id> --path-pattern="{output}/"terraformer import aws --resources=vpc,subnet,route_table,igw,sg,nat,eks,ec2 --filter=vpc=vpc-080c3cee56b75cd1d --path-pattern="{output}/"---
..
2023/08/31 18:04:59 Filtered number of resources for service route_table: 142023/08/31 18:04:59 Filtered number of resources for service igw: 22023/08/31 18:04:59 Filtered number of resources for service sg: 142023/08/31 18:04:59 Filtered number of resources for service nat: 12023/08/31 18:04:59 Filtered number of resources for service eks: 22023/08/31 18:04:59 Filtered number of resources for service vpc: 12023/08/31 18:04:59 Filtered number of resources for service subnet: 102023/08/31 18:04:59 aws Connecting....
2023/08/31 18:04:59 aws save
2023/08/31 18:04:59 aws save tfstate
tree ./generated
---
.
├── eks_cluster.tf
├── eks_node_group.tf
├── internet_gateway.tf
├── main_route_table_association.tf
├── nat_gateway.tf
├── outputs.tf
├── provider.tf
├── route_table.tf
├── route_table_association.tf
├── security_group.tf
├── security_group_rule.tf
├── subnet.tf
├── terraform.tfstate
├── variables.tf
└── vpc.tf
가져온 TF code를 기반으로 인프라 구성시 에러가 발생한다. 에러를 참고하니 provider.tf에 aws config 설정 추가와 프로바이더 교체가 필요하다.
(공유해주신 tei님 감사합니다. 참고 블로그 글)
Provider.tf 에 shared_config_files, shared_credentials_files 옵션 추가
1
2
3
4
5
6
7
8
9
10
11
12
13
14
# provider.aws 에 내용 추가 provider "aws"{region="ap-northeast-2"shared_config_files=["~/.aws/config"]shared_credentials_files=["~/.aws/credentials"]}terraform { required_providers {aws={version="~> 5.14.0"}}}
프로바이더 교체
1
2
3
4
5
6
7
cd generated && terraform state replace-provider -auto-approve -- -/aws hashicorp/aws
---
Terraform will perform the following actions:
~ Updating provider:
- registry.terraform.io/-/aws
+ registry.terraform.io/hashicorp/aws
프로바이더 수정 이후 프로바이더 초기화와 코드로 인프라를 배포를 진행하자. 필자의 경우 plan 으로 영향도 확인시 서브넷과 VPC에 추가 설정이 필요했다.
Terraform init
--
provider downloading..
Terraform plan
--
╷
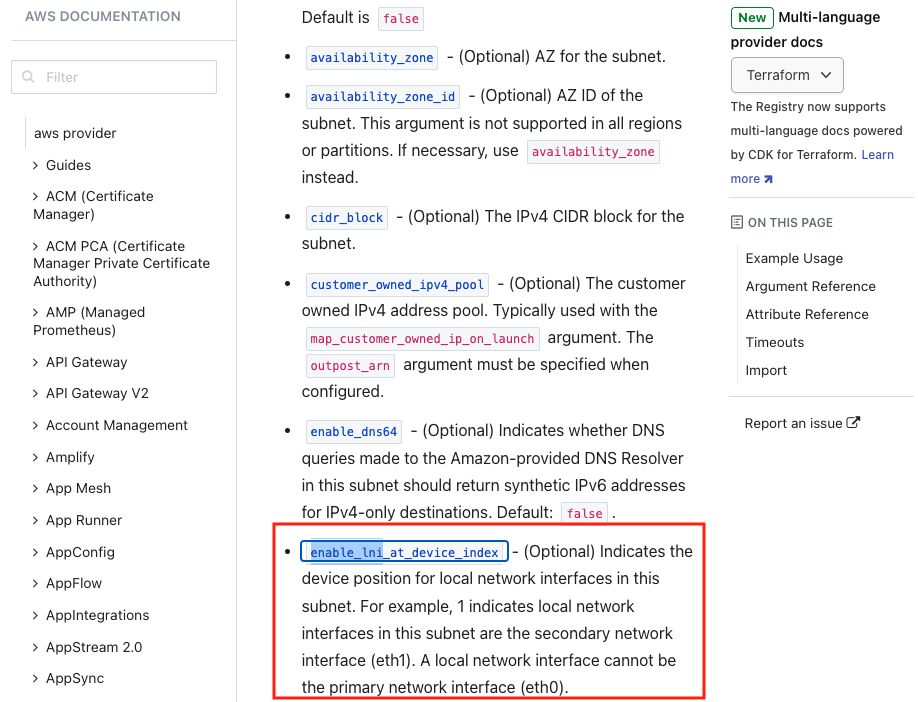
│ Error: enable_lni_at_device_index must not be zero, got 0│
│ with aws_subnet.tfer--subnet-015058ac61e07391c,
│ on subnet.tf line 5, in resource "aws_subnet""tfer--subnet-015058ac61e07391c":
│ 5: enable_lni_at_device_index="0"│
│ Error: Missing required argument
│
│ with aws_subnet.tfer--subnet-015058ac61e07391c,
│ on subnet.tf line 9, in resource "aws_subnet""tfer--subnet-015058ac61e07391c":
│ 9: map_customer_owned_ip_on_launch="false"│
│ "map_customer_owned_ip_on_launch": all of `customer_owned_ipv4_pool,map_customer_owned_ip_on_launch,outpost_arn` must be specified
╵
.
.
╷
│ Error: Missing required argument
│
│ with aws_vpc.tfer--vpc-087e1e27e159bf626,
│ on vpc.tf line 8, in resource "aws_vpc""tfer--vpc-087e1e27e159bf626":
│ 8: ipv6_netmask_length="0"│
│ "ipv6_netmask_length": all of `ipv6_ipam_pool_id,ipv6_netmask_length` must be specified
╵
• [enable_lni_at_device_index](https://registry.terraform.io/providers/hashicorp/aws/latest/docs/resources/subnet#enable_lni_at_device_index) - (Optional) Indicates the device position for local network interfaces in this subnet. For example, 1 indicates local network interfaces in this subnet are the secondary network interface (eth1). A local network interface cannot be the primary network interface (eth0).
• [map_customer_owned_ip_on_launch](https://registry.terraform.io/providers/hashicorp/aws/latest/docs/resources/subnet#map_customer_owned_ip_on_launch) - (Optional) Specify true to indicate that network interfaces created in the subnet should be assigned a customer owned IP address. The customer_owned_ipv4_pool and outpost_arn arguments must be specified when set to true. Default is false.
• [ipv6_netmask_length](https://registry.terraform.io/providers/hashicorp/aws/latest/docs/resources/vpc#ipv6_netmask_length) - (Optional) Netmask length to request from IPAM Pool. Conflicts with ipv6_cidr_block. This can be omitted if IPAM pool as a allocation_default_netmask_length set. Valid values: 56.
옵션 확인시 구성에 필요없는 옵션이기에 해당 옵션을 삭제했다. 다만, 삭제 후에도 몇 가지 계획 확인 과정에서 필요없는 옵션으로 에러가 발생하여 삭제를 진행하였다. 원인은 버전 호환성으로 생각된다. 영향도 확인시 13개의 변동사항이 발생하는데 모두 security group에서 발생하였다. 플래그 및 옵션 변경으로 확인된다.
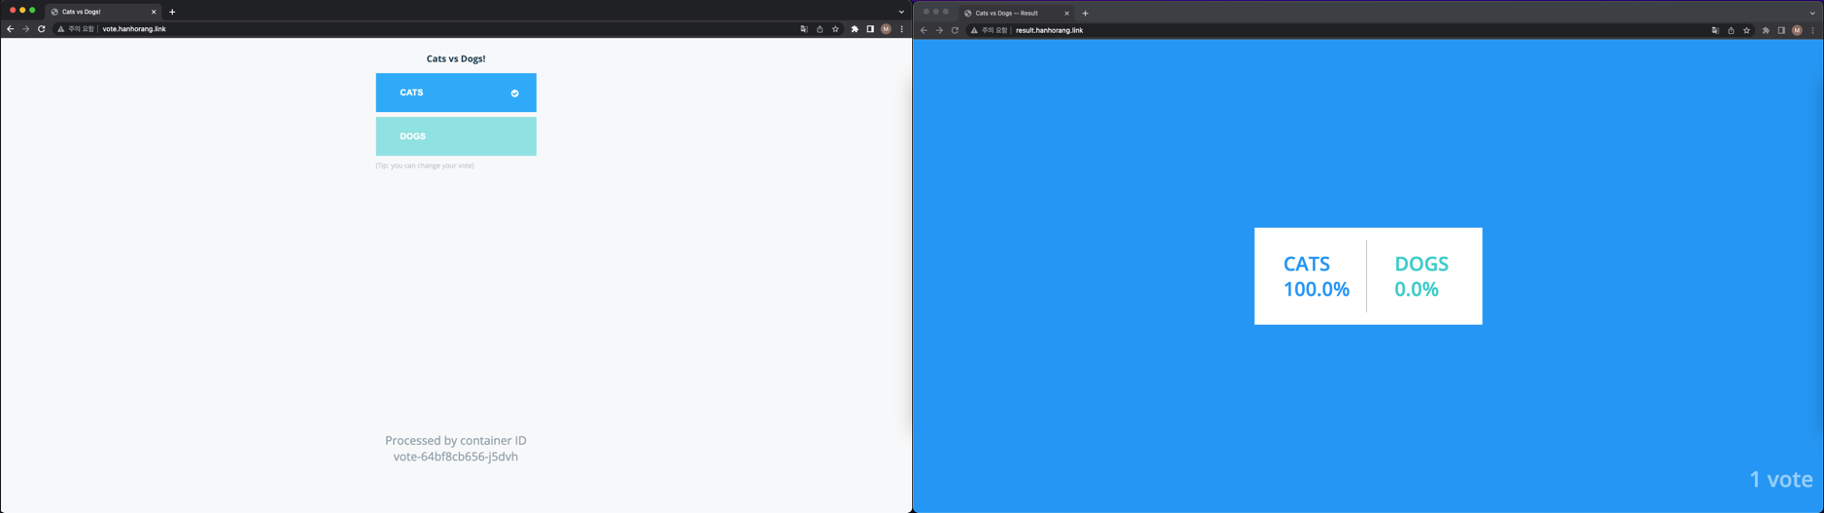
# git clone git clone https://github.com/HanHoRang31/blog-share.git
cd blog-share/k8s-app/vote-app-alb
# 서비스 배포 kubectl apply -f .
# ExternaDNS 추가## 각자 자신의 도메인 정보 입력# MyDOMAIN1=<각자 자신의 nginx 도메인 지정># MyDOMAIN2=<각자 자신의 nginx 도메인 지정>MyDOMAIN1=vote.hanhorang.link
MyDOMAIN2=result.hanhorang.link
kubectl annotate ingress vote-ingress "external-dns.alpha.kubernetes.io/hostname=$MyDOMAIN1."kubectl annotate ingress result-ingress "external-dns.alpha.kubernetes.io/hostname=$MyDOMAIN2."
설정한 도메인에 접속하면 예제 애플리케이션을 확인할 수 있다.
새 클러스터 구성
새로운 클러스터 배포는 TF code 에서 아래 내용을 수정하면 된다. 변수 네이밍과 태그, 그리고 클러스터 버전을 확인해서 업그레이드하자.
## eks_cluster-blue.tfresource "aws_eks_cluster""tfer--hanhorang2"{# 수정 kubernetes_network_config {ip_family="ipv4"service_ipv4_cidr="10.100.0.0/16"}name="hanhorang2"# 수정role_arn="arn:aws:iam::955963799952:role/eksctl-hanhorang-cluster-ServiceRole-BP23R8UEH9QW"tags={# 수정Name="eksctl-hanhorang-cluster/ControlPlane""alpha.eksctl.io/cluster-name"="hanhorang2""alpha.eksctl.io/cluster-oidc-enabled"="true""alpha.eksctl.io/eksctl-version"="0.154.0""eksctl.cluster.k8s.io/v1alpha1/cluster-name"="hanhorang2"}tags_all={Name="eksctl-hanhorang-cluster/ControlPlane""alpha.eksctl.io/cluster-name"="hanhorang2""alpha.eksctl.io/cluster-oidc-enabled"="true""alpha.eksctl.io/eksctl-version"="0.154.0""eksctl.cluster.k8s.io/v1alpha1/cluster-name"="hanhorang2"}version="1.25"# 업그레이드 vpc_config {endpoint_private_access="false"endpoint_public_access="true"public_access_cidrs=["0.0.0.0/0"]security_group_ids=["${data.terraform_remote_state.local.outputs.aws_security_group_tfer--eksctl-hanhorang-cluster-ControlPlaneSecurityGroup-186VO6YUM9A43_sg-0270c4da847aa9121_id}"]subnet_ids=["${data.terraform_remote_state.local.outputs.aws_subnet_tfer--subnet-015058ac61e07391c_id}", "${data.terraform_remote_state.local.outputs.aws_subnet_tfer--subnet-0590fd1917b053a6a_id}", "${data.terraform_remote_state.local.outputs.aws_subnet_tfer--subnet-0eb54f96064d4e96c_id}"]}}# eks_node_group-blue.tfresource "aws_eks_node_group""tfer--ng2"{# 수정 ami_type="AL2_x86_64"capacity_type="ON_DEMAND"cluster_name="${aws_eks_cluster.tfer--hanhorang2.name}"disk_size="0"instance_types=["t3.medium"]# 수정 labels={"alpha.eksctl.io/cluster-name"="hanhorang2""alpha.eksctl.io/nodegroup-name"="ng1"}node_group_name="ng1"node_role_arn="arn:aws:iam::955963799952:role/eksctl-hanhorang-nodegroup-ng1-NodeInstanceRole-G4237QU98U14" scaling_config {desired_size="2"max_size="2"min_size="2"}subnet_ids=["subnet-015058ac61e07391c", "subnet-0590fd1917b053a6a", "subnet-0eb54f96064d4e96c"]# 수정 tags={"alpha.eksctl.io/cluster-name"="hanhorang2""alpha.eksctl.io/eksctl-version"="0.154.0""alpha.eksctl.io/nodegroup-name"="ng1""alpha.eksctl.io/nodegroup-type"="managed""eksctl.cluster.k8s.io/v1alpha1/cluster-name"="hanhorang2"}tags_all={"alpha.eksctl.io/cluster-name"="hanhorang2""alpha.eksctl.io/eksctl-version"="0.154.0""alpha.eksctl.io/nodegroup-name"="ng1""alpha.eksctl.io/nodegroup-type"="managed""eksctl.cluster.k8s.io/v1alpha1/cluster-name"="hanhorang2"} update_config {max_unavailable="1"}# 노드 그룹 업그레이드 version="1.25"}
새 클러스터 구성 후 베스천 서버에서 새 클러스터에 접근할 수 있도록 구성을 변경하자.
1
2
3
4
5
6
7
eksctl get cluster --region=ap-northeast-2
--
NAME REGION EKSCTL CREATED
hanhorang ap-northeast-2 True
hanhorang2 ap-northeast-2 False
aws eks update-kubeconfig --region ap-northeast-2 --name hanhorang2
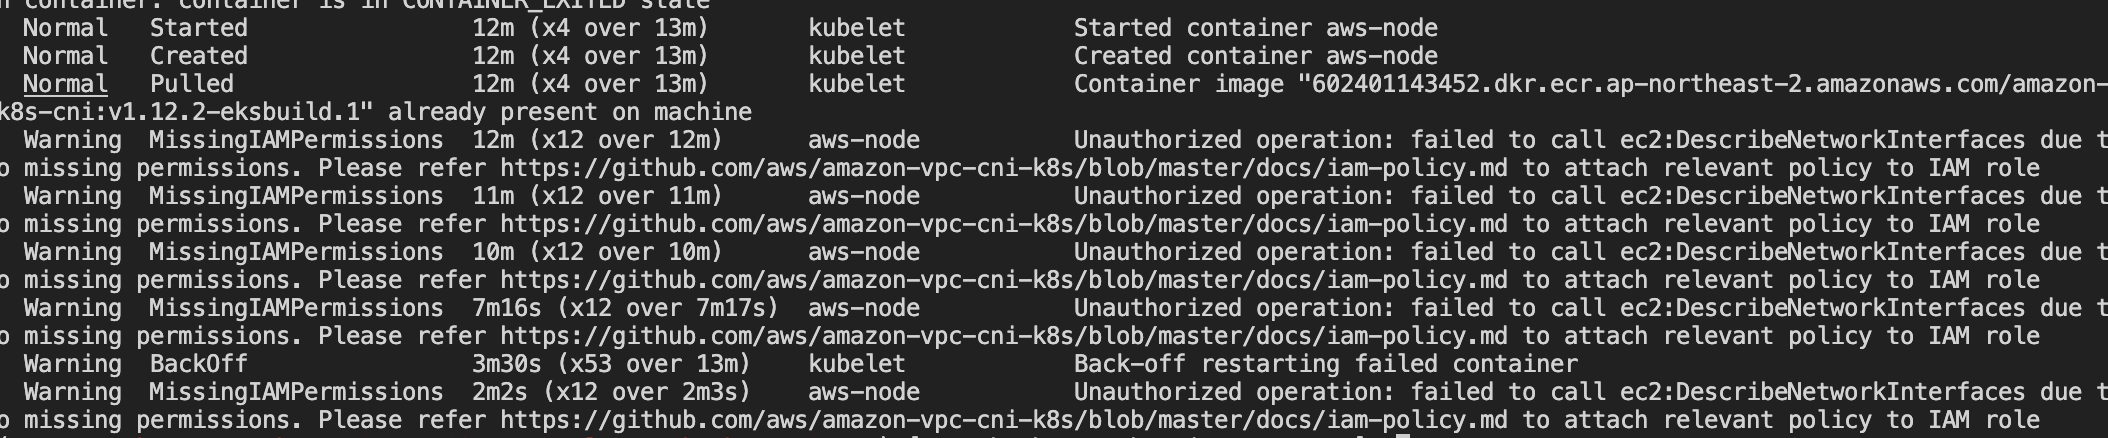
kubectl 로 접근시 새 클러스터 파드에 aws-node가 붙지 않는다. 로그를 확인하면 노드 그룹에 연결된 iam role에 필요 정책이 없어 발생한 에러였다.
EC2 role에 관리형 정책인 AmazonEKS_CNI_Policy 를 추가하자.
1
2
3
4
5
6
7
8
9
kubectl get pods -A
---
NAMESPACE NAME READY STATUS RESTARTS AGE
kube-system aws-node-5sn6g 1/1 Running 0 62s
kube-system aws-node-s2jwf 1/1 Running 0 79s
kube-system coredns-76b4dcc5cc-hp5sb 1/1 Running 0 50m
kube-system coredns-76b4dcc5cc-nwg44 1/1 Running 0 50m
kube-system kube-proxy-hq2m8 1/1 Running 0 41m
kube-system kube-proxy-vl7nv 1/1 Running 0 41m
접근이 확인되면, 선수 작업에 진행한 네트워크 addon 과 예제 애플리케이션을 배포하자.
1
2
3
4
5
# 새 클러스터 OIDC 활성화exportcluster_name=hanhorang2
eksctl utils associate-iam-oidc-provider --cluster $cluster_name --approve
# .. 이후 선수작업의 네트워크 addon 과 예제 애플리케이션 배포
클러스터 마이그레이션
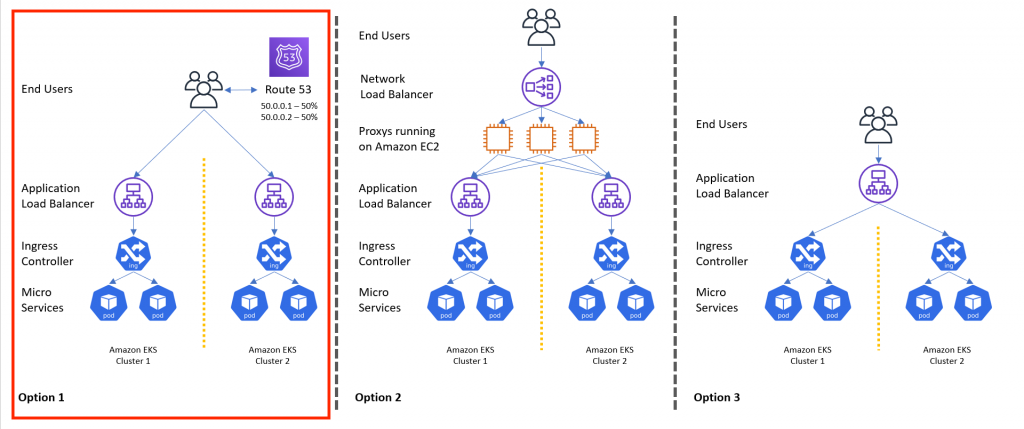
두 개의 다른 클러스터에서 같은 도메인을 등록하여 애플리케이션을 등록하였다. 등록한 어플리케이션에 트래픽 조절을 구 클러스터에서 새 클러스터로 바꾸면 마이그레이션은 완료다. 새 클러스터에서 vote 애플리케이션을 똑같이 배포하면, route53에 등록된 dns가 구 클러스터에서 새 클러스터에서 수정되며 등록되는 시간 약 5분동안 순단이 발생한다. 무중단으로 트래픽을 전환하기 위한 작업이 필요하다.
Route53 가중치 라우팅을 통한 트래픽 전환
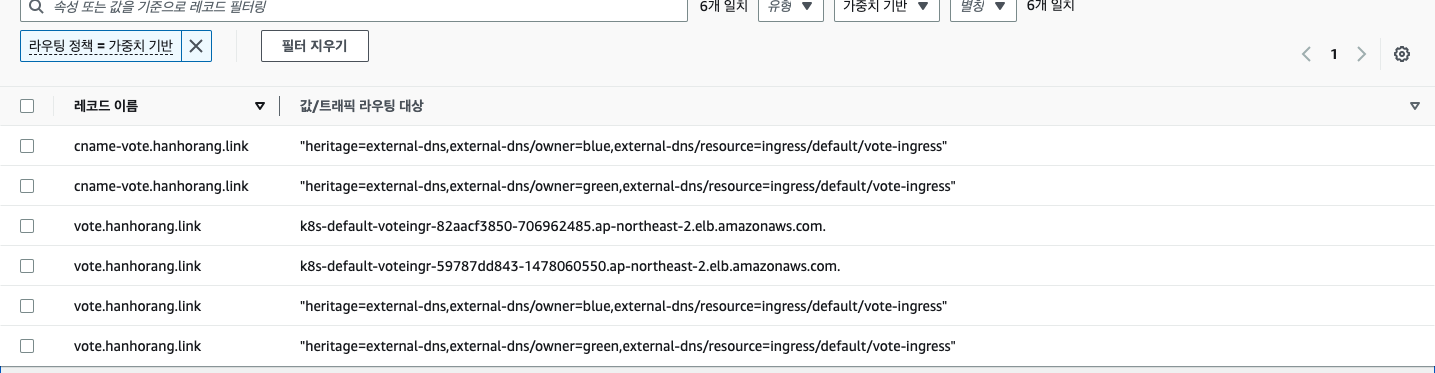
route53 의 가중치 기반 라우팅을 통해 blue-green 버전 사이의 트래픽을 기호에 맞게 옮길 수 있다. 이를 위해 구 클러스터의 ingress annotation 에 가중치 주석을 추가하자. (기타 라우팅의 경우 external-dns 깃 참고)
external-dns.alpha.kubernetes.io/aws-weight : 0~255 의 정수값이 들어가며, 상대적인 비율을 나타낸다. 예를 들어, A 서비스와 B서비스의 트래픽 비율을 1:1로 맞추고 싶다면, A 서비스 값을 1 설정하고 B 서비스의 값을 1로 설정하자.
새 클러스터에서 예제 Ingress 배포를 진행하면 A레코드와,TXT 가 중복되어 route53이 업데이트 되지 않는다. 해결 방법을 찾아보니 기존의 리소스를 삭제하여 중복을 없애라는데.. 무중단으로 진행이 안된다.
1
2
3
4
5
6
7
time="2023-09-01T13:46:50Z"level=error msg="Failure in zone hanhorang.link. [Id: /hostedzone/Z08463751O7YNWD79KKIX] when submitting change batch: InvalidChangeBatch: [RRSet with DNS name hanhorang.link., type A cannot be created as other RRSets exist with the same name and type., RRSet with DNS name hanhorang.link., type TXT cannot be created as other RRSets exist with the same name and type.]\n\tstatus code: 400, request id: 64a5953f-902c-4e8c-9bd7-2062a22c8109"time="2023-09-01T13:46:51Z"level=error msg="failed to submit all changes for the following zones: [/hostedzone/Z08463751O7YNWD79KKIX]"time="2023-09-01T13:47:50Z"level=info msg="Applying provider record filter for domains: [hanhorang.link. .hanhorang.link.]"time="2023-09-01T13:47:50Z"level=info msg="Desired change: CREATE hanhorang.link A [Id: /hostedzone/Z08463751O7YNWD79KKIX]"time="2023-09-01T13:47:50Z"level=info msg="Desired change: CREATE hanhorang.link TXT [Id: /hostedzone/Z08463751O7YNWD79KKIX]"time="2023-09-01T13:47:50Z"level=error msg="Failure in zone hanhorang.link. [Id: /hostedzone/Z08463751O7YNWD79KKIX] when submitting change batch: InvalidChangeBatch: [RRSet with DNS name hanhorang.link., type A cannot be created as other RRSets exist with the same name and type., RRSet with DNS name hanhorang.link., type TXT cannot be created as other RRSets exist with the same name and type.]\n\tstatus code: 400, request id: 6f961338-b1bd-4ddd-93ad-1bb169fc686d"time="2023-09-01T13:47:51Z"level=error msg="failed to submit all changes for the following zones: [/hostedzone/Z08463751O7YNWD79KKIX]"
apiVersion:networking.k8s.io/v1kind:Ingressmetadata:name:vote-ingressannotations:kubernetes.io/ingress.class:albalb.ingress.kubernetes.io/scheme:internet-facingalb.ingress.kubernetes.io/target-type:ipexternal-dns.alpha.kubernetes.io/hostname:vote.hanhorang.link# 도메인 입력external-dns.alpha.kubernetes.io/set-identifier:green external-dns.alpha.kubernetes.io/aws-weight:'1'
apiVersion:networking.k8s.io/v1kind:Ingressmetadata:name:vote-ingressannotations:kubernetes.io/ingress.class:albalb.ingress.kubernetes.io/scheme:internet-facingalb.ingress.kubernetes.io/target-type:ipexternal-dns.alpha.kubernetes.io/hostname:vote.hanhorang.link# 도메인 입력 external-dns.alpha.kubernetes.io/set-identifier:blueexternal-dns.alpha.kubernetes.io/aws-weight:'1'
각 클러스터에서 예제 애플리케이션을 배포하면 콘솔에서 같은 도메인의 레코드 정보가 2개씩 생겼음을 확인할 수 있다.
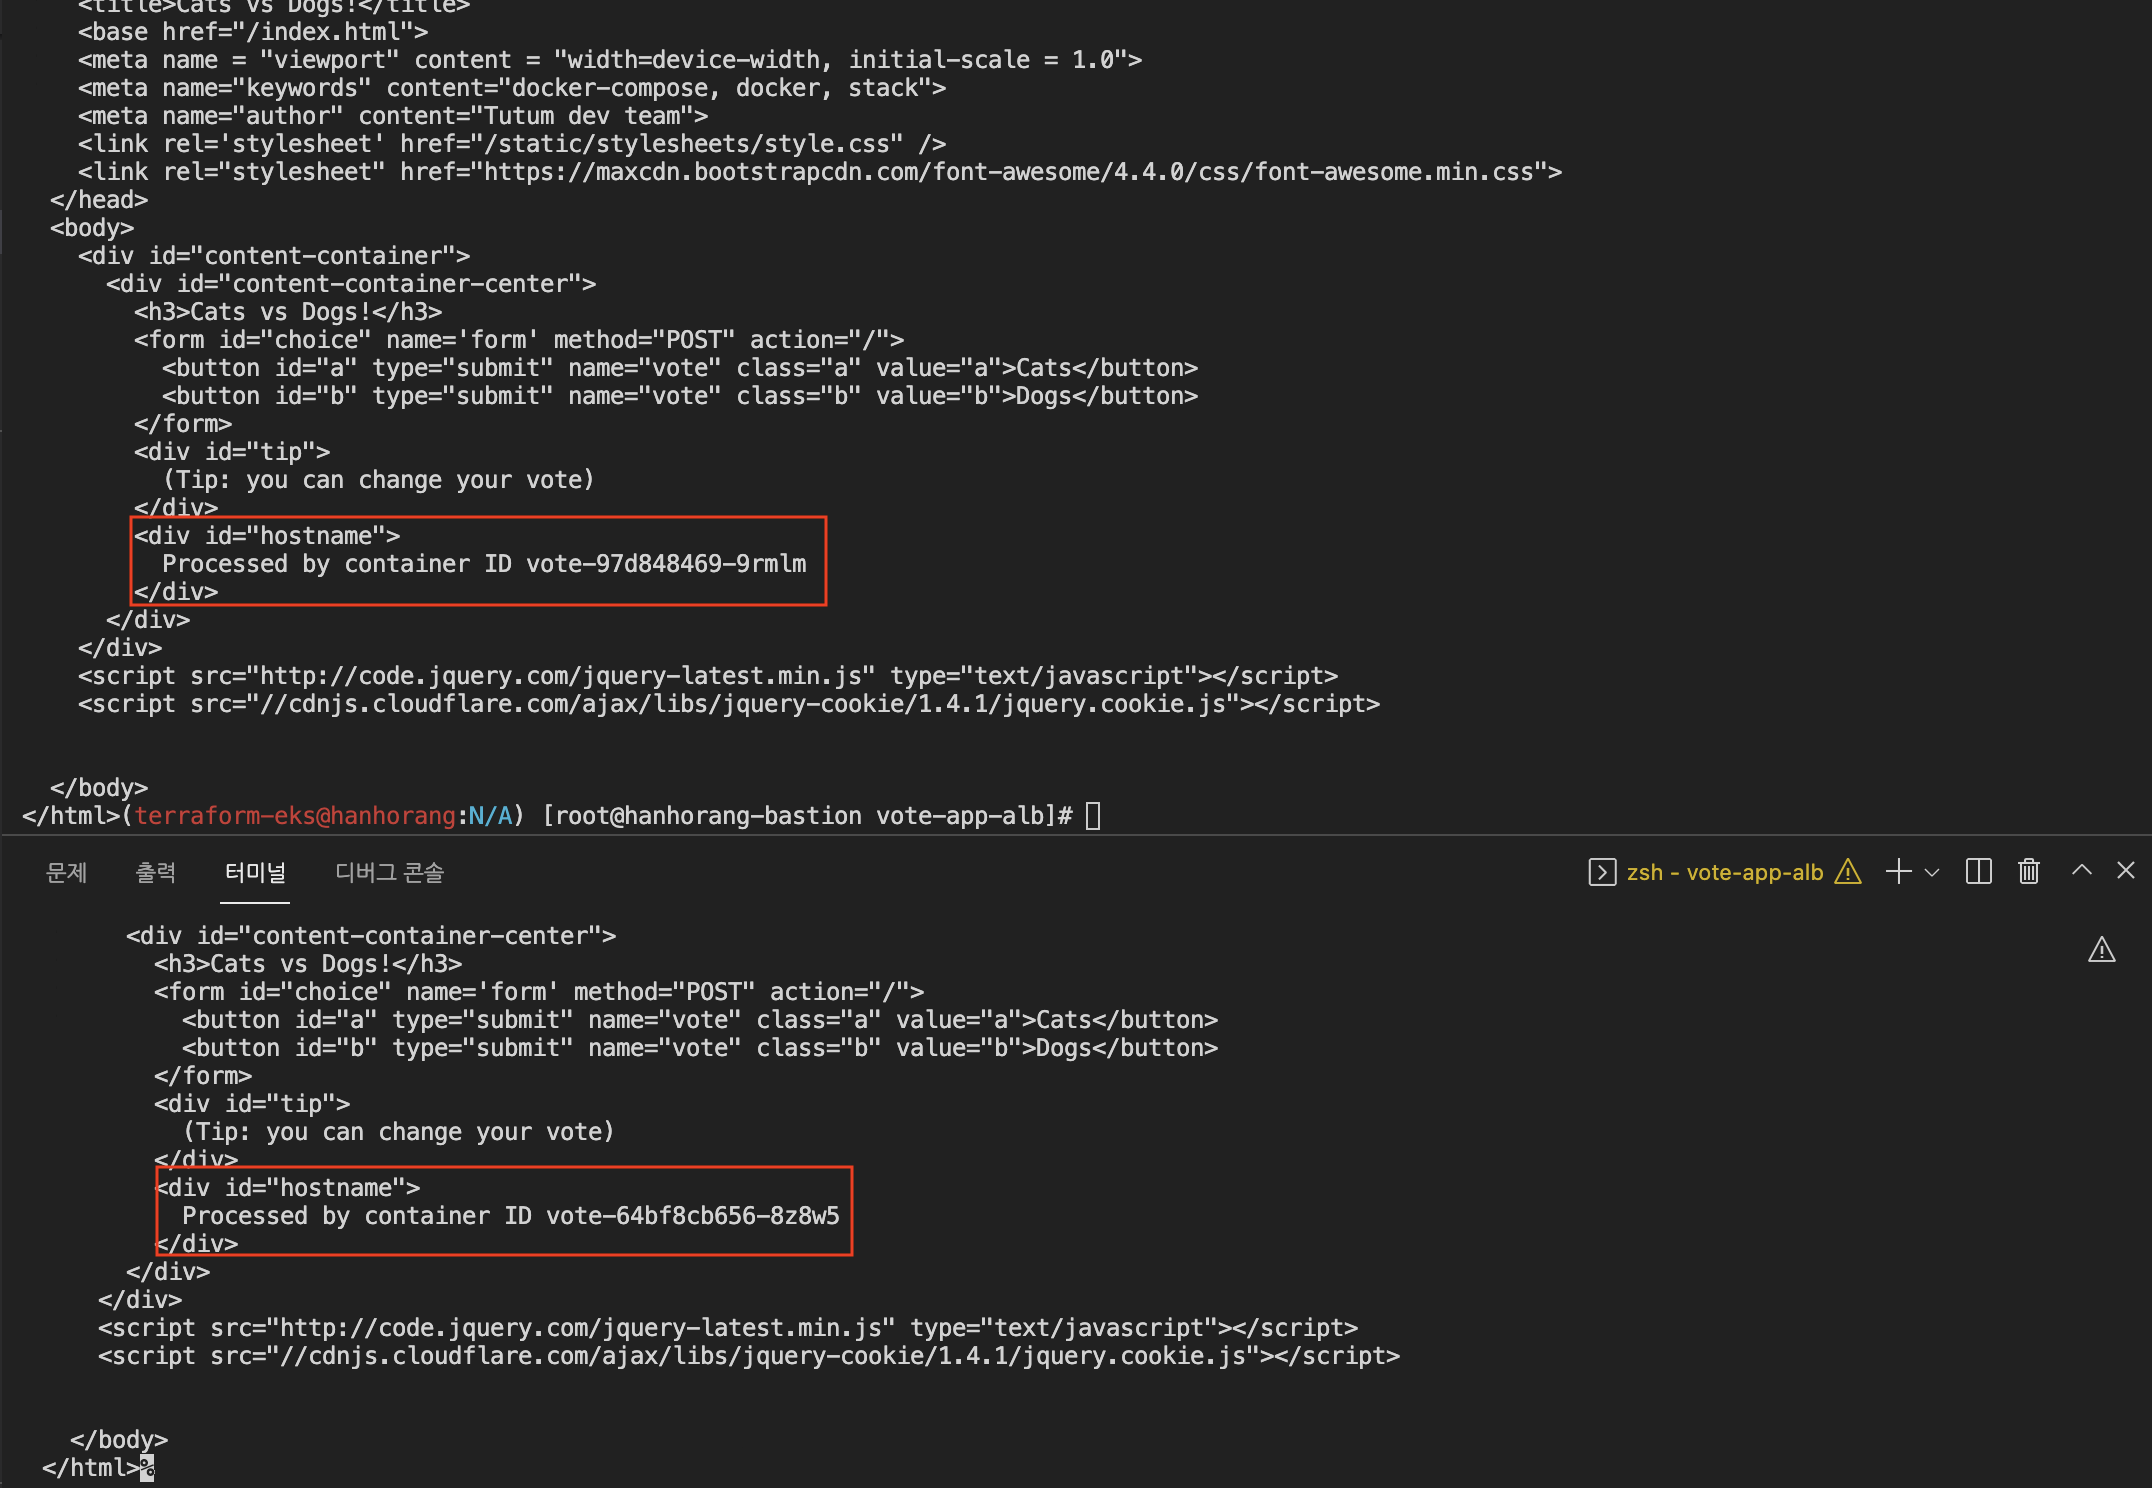
예제 어플리케이션 접속시 가중치에 맞게 변환되어 호출되는 것을 확인할 수 있다. 확인하면서 주의할 점이 있는데 DNS캐싱으로 한 번 DNS에 연결되면 설정된 TTL 동안 같은 DNS로 연결된다.
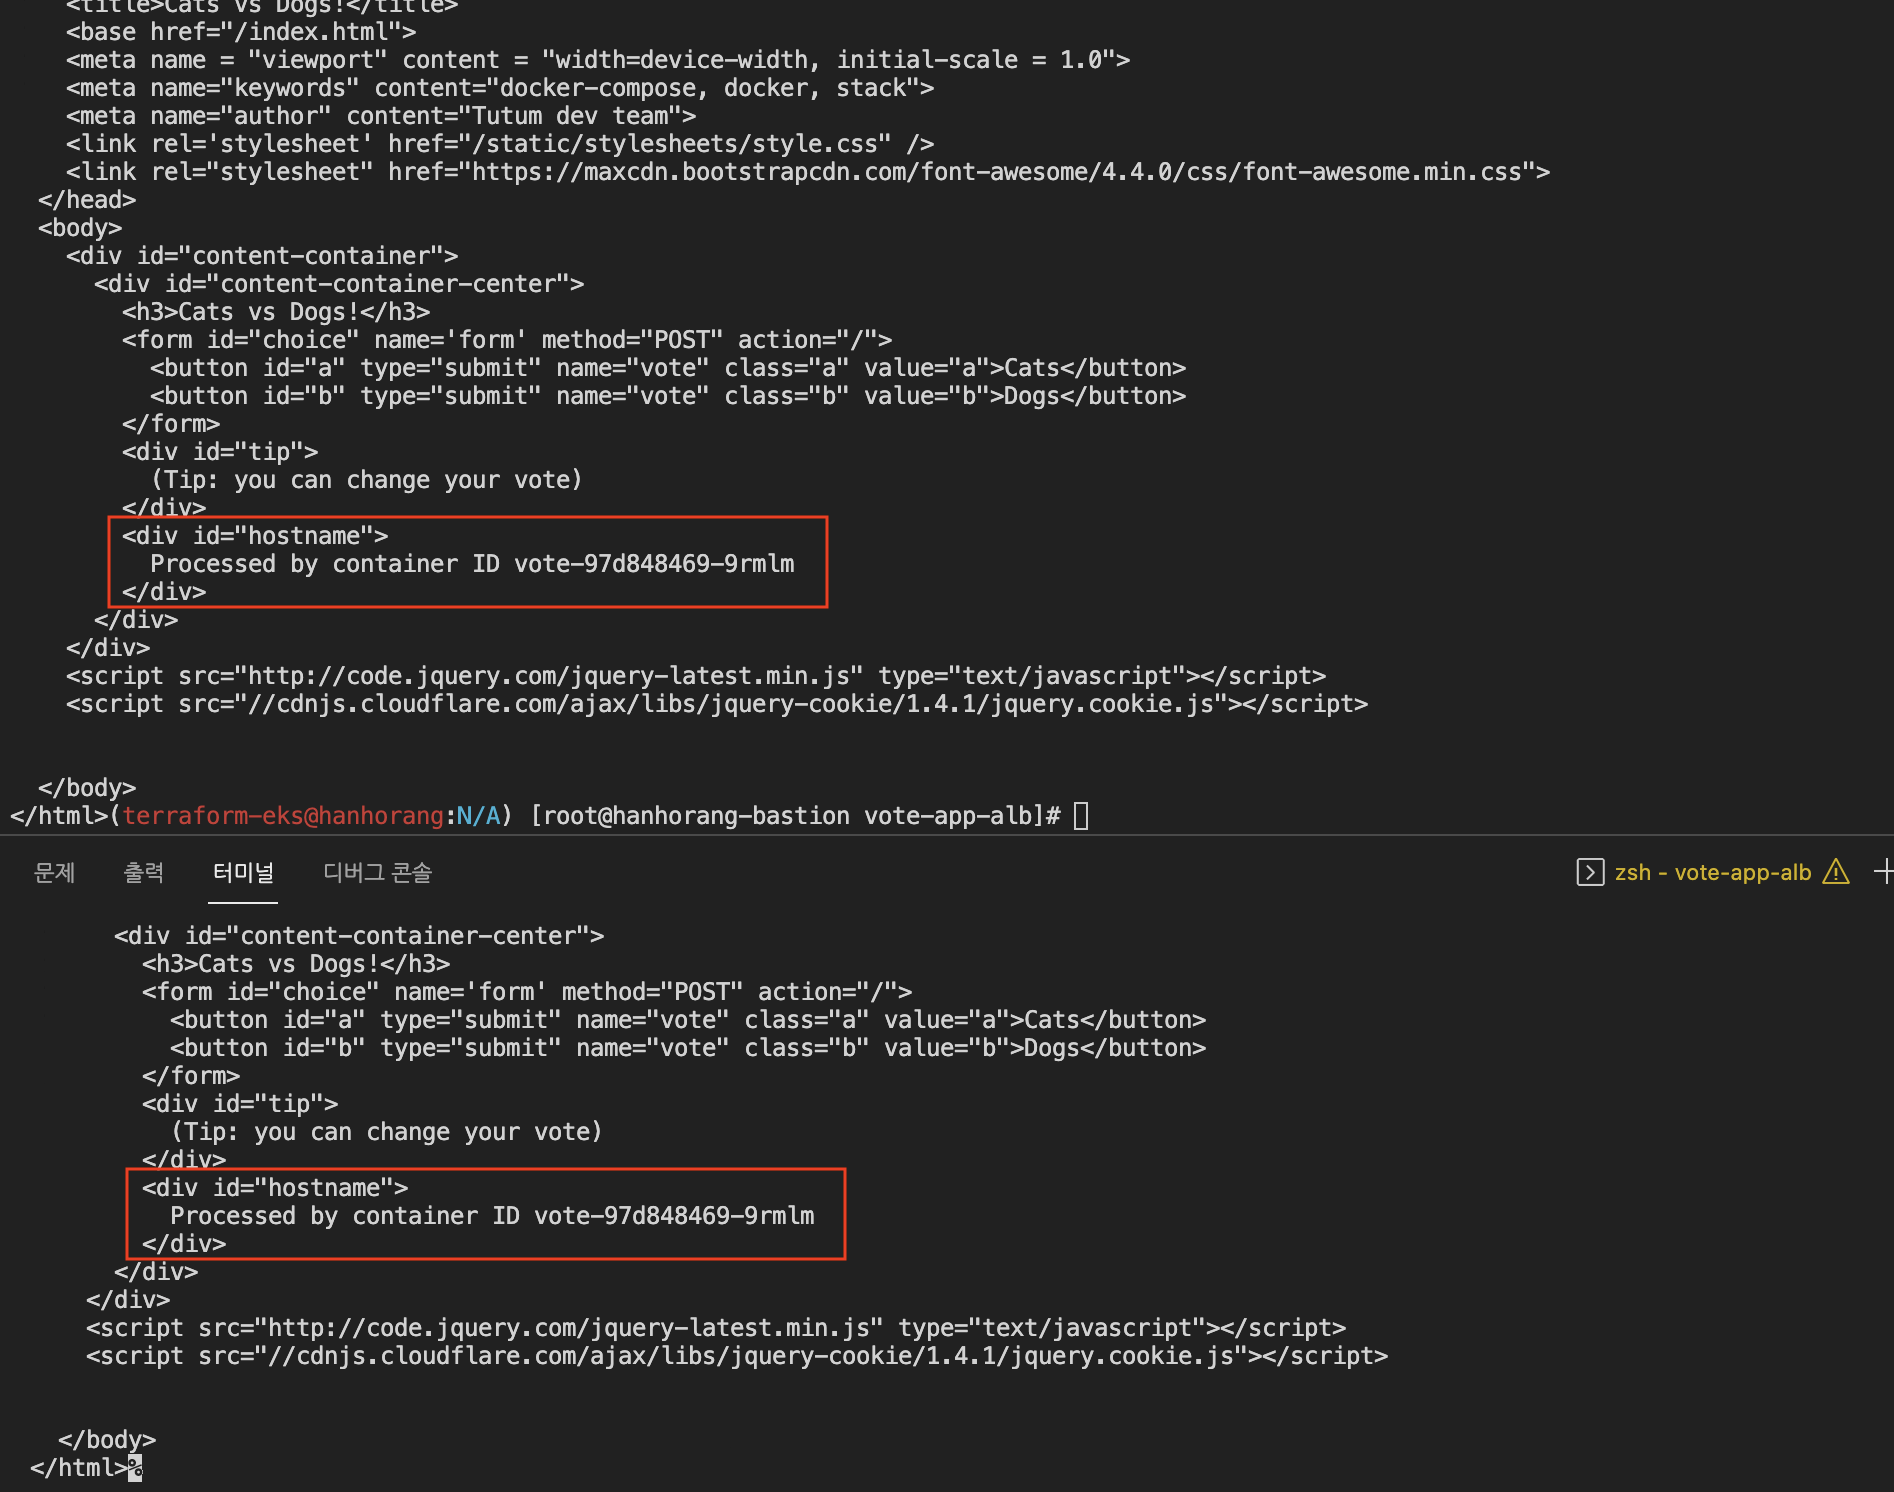
설정한 가중치 라우팅을 1:1 에서 0:1로 수정하여 테스트하면 새 버전의 서버에서만 트래픽을 전달하는 것을 확인할 수 있다.
1
2
3
4
5
6
7
8
9
10
11
12
kubectl edit ingress vote-ingress
--
apiVersion: networking.k8s.io/v1
kind: Ingress
metadata:
annotations:
alb.ingress.kubernetes.io/scheme: internet-facing
alb.ingress.kubernetes.io/target-type: ip
external-dns.alpha.kubernetes.io/aws-weight: "0"# 1에서 0으로 수정 external-dns.alpha.kubernetes.io/hostname: vote.hanhorang.link
external-dns.alpha.kubernetes.io/set-identifier: green
kubectl.kubernetes.io/last-applied-configuration: |
마치며
테라폼과 Route53 라우팅 정책을 통해 무중단 클러스터 마이그레이션 작업을 진행하였다. 내용이 복잡했지만, External DNS 로 Route53 가중치 정책 설정 방법과 Terraformer Import 이후 수정 작업만 기억하면 된다. 추후 실무에서 도입시 기대되는 부분이다.